The Mac mini now boasts an incredibly fast M2 or M2 Pro processor, and rivals even Apple’s most pro computers despite costing significantly less. However, as great as it is, there is a problem with the Mac mini—the upgrades are pricey and after you buy one, it’s impossible to upgrade its internal components. However, we’re here to help.
Most of these tips work with the Apple Studio, too.
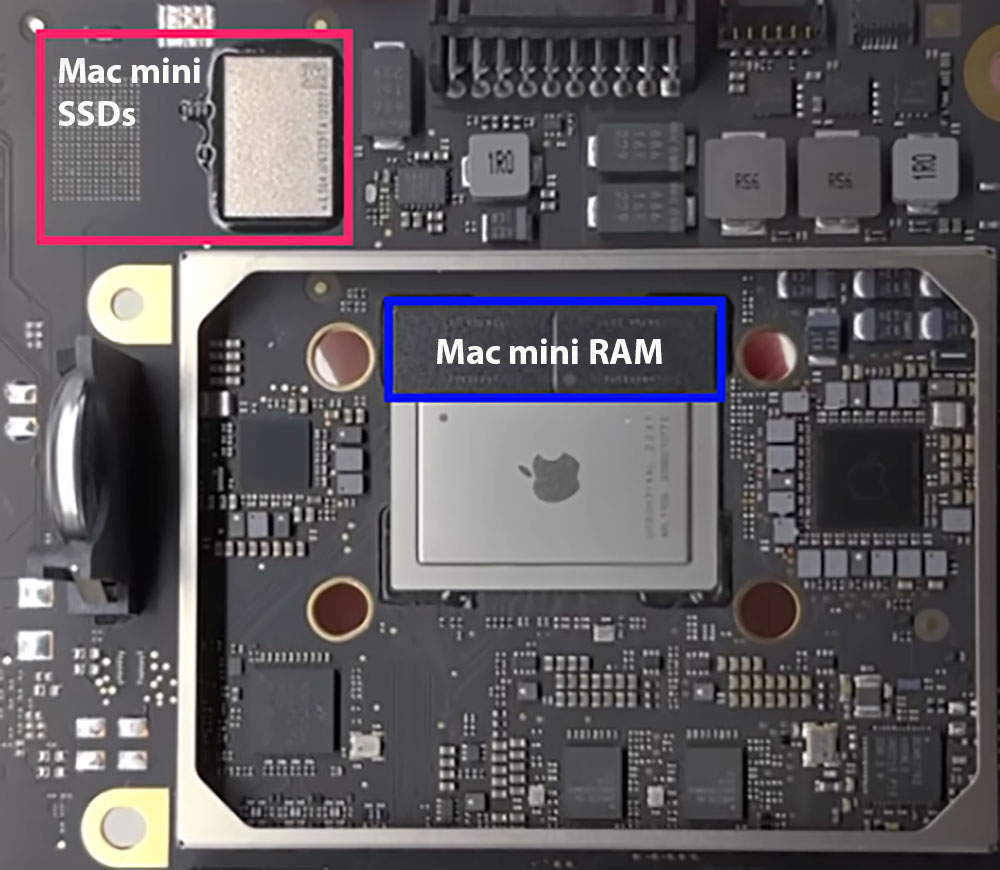
Apple doesn’t let you upgrade the Mac mini with inexpensive third-party components such as RAM or internal storage, and it prices its custom-build options at the very high end of affordability. Like the rest of the Apple silicon Macs, the Mac mini, Apple has fixed the RAM to the processor and the SSDs to the logic board, so they can’t be swapped out after you buy one.
Here we look at your best M1, M2 and M2 Pro Mac mini upgrade options, adding: storage, memory, screen, speakers and microphone.
Foundry
Upgrading the M2 Mac mini: Adding memory
Apple integrated the RAM right into the M2 chip package in the Mac mini (2023) and Mac mini (M1, 2020) and so it can’t be upgraded. You must instead configure the amount of memory you want in your Mac mini when you purchase it. Unfortunately, there’s simply no way of adding more RAM to the Mac mini after you buy it. Depending on the model you buy, there are three options: 16GB, 24GB, and 32G, which cost up to $400. If you need more than 8GB of standard memory, you’ll have to pay for it at the time of purchase.
Upgrading the M2 Mac mini: Adding storage
Like the RAM, Apple has soldered the SSD (solid state drive) storage onto the Mac mini’s logic board, meaning that you can’t remove it and plug in a new one. As with the RAM, you must instead configure the amount of flash storage you want in your Mac mini when you purchase it. However, there are several ways that you can upgrade your Mac mini with extra storage—at a fraction of the cost you’d have to pay Apple at build time.
SSD or HDD?
Solid-state drives have no moving parts. Data is stored on interconnected flash memory microchips, which allows for data to be pulled from many different places at once and significantly increases memory read speeds. Hard disk drives (HDD) rely on spinning metal disks to read and write data.
SSDs speed up boot times, improve the responsiveness of your programs, and generally make your computer feel faster. However, you’ll pay more money for the same storage capacity on SSDs as HDDs. SSDs cost more per gigabyte than mechanical HDDs and aren’t often available in ultra-high capacities. Even as prices of SSDs continue to drop, HDDs will always be cheaper.
A good strategy is to use an HDD for backup, secondary storage or archiving, and an SSD for the files you work on every day. We recommend a backup drive at least twice as large as the total capacity of your Mac—for example, if you have 1TB of storage in your Mac, a 2TB backup drive will allow you to make a full backup while keeping other files or archived backups on the same drive.
For both HDD and SSD, there are many trusted storage brands, including Samsung, Seagate, Crucial, and Kingston.
Adding external storage
The simplest way to add storage to a Mac mini is the same as any other Mac: Connect an external hard drive or SSD using one of the Thunderbolt ports on the back of the computer. Even the slowest SSDs are faster than mechanical hard disk drives (HDD), but look out for speed differences—entry-level SSDs provide speeds of around 500MB/s, while more advanced models can step up to 1,000MB/s or even 2,000MB/s.
External HDDs are a great solution for backups and archives as speed is less of an issue, and the prices are much cheaper than SSDs. No HDD, unless combined in RAID with others, can outstrip the 5Gbps (roughly 500MBps real-world after overhead) throughput of USB-C. Where Thunderbolt definitely helps is with RAID hard drive setups, or more likely an external SSD.
Another way to add inexpensive portable storage is via an SD or microSD card—once the go-to storage format for camera users but also a great format for cheap and portable backup and archive storage. Sadly, the Mac mini doesn’t have a card reader slot, so you’ll need to add one, such as this UGreen USB-C SD Card Reader for $13.
But there are admittedly ugly methods. You’ll have wires hanging out of the back of your Mac mini and a desk cluttered with drives.
Adding Internal storage
The best option is to get more internal storage in your Mac mini, but Apple’s custom-built pricing means upgrading a 512GB model to 1TB will cost you an extra $200, and 2TB will cost $600, while M2 Pro options cost even more: 4TB is $1,200 and 8TB will set you back a whopping $2,400. Additionally, having the storage soldered to the logic board makes it faster, so if you can afford it, it’s the best way to go.
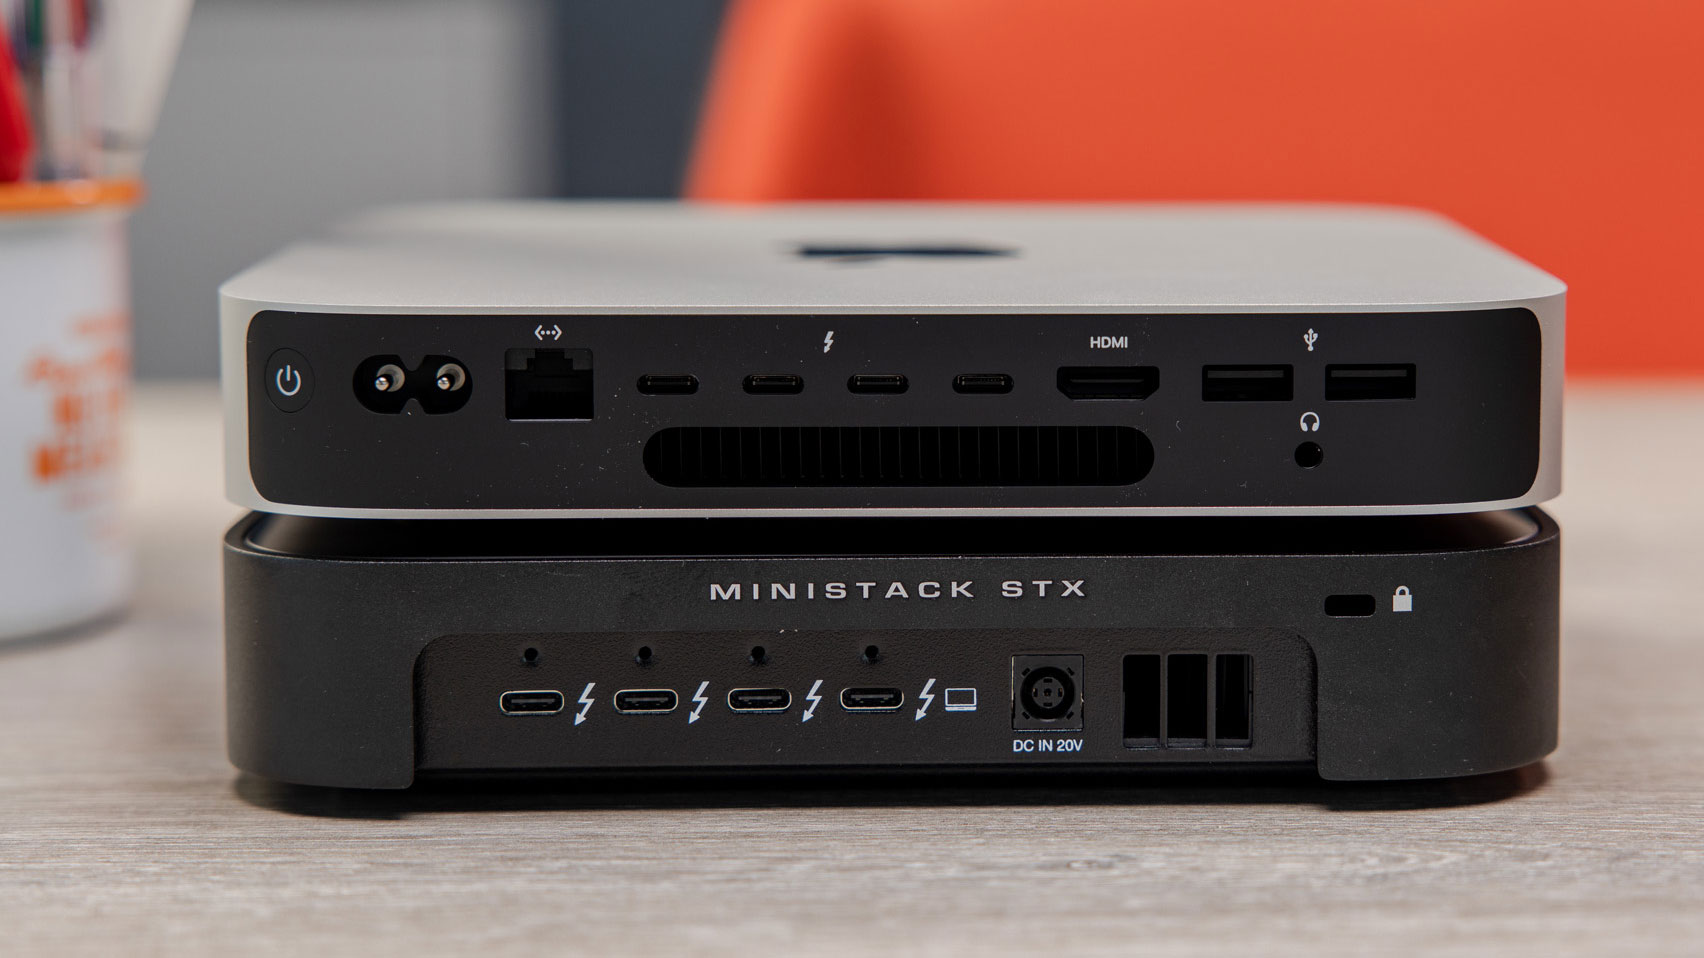
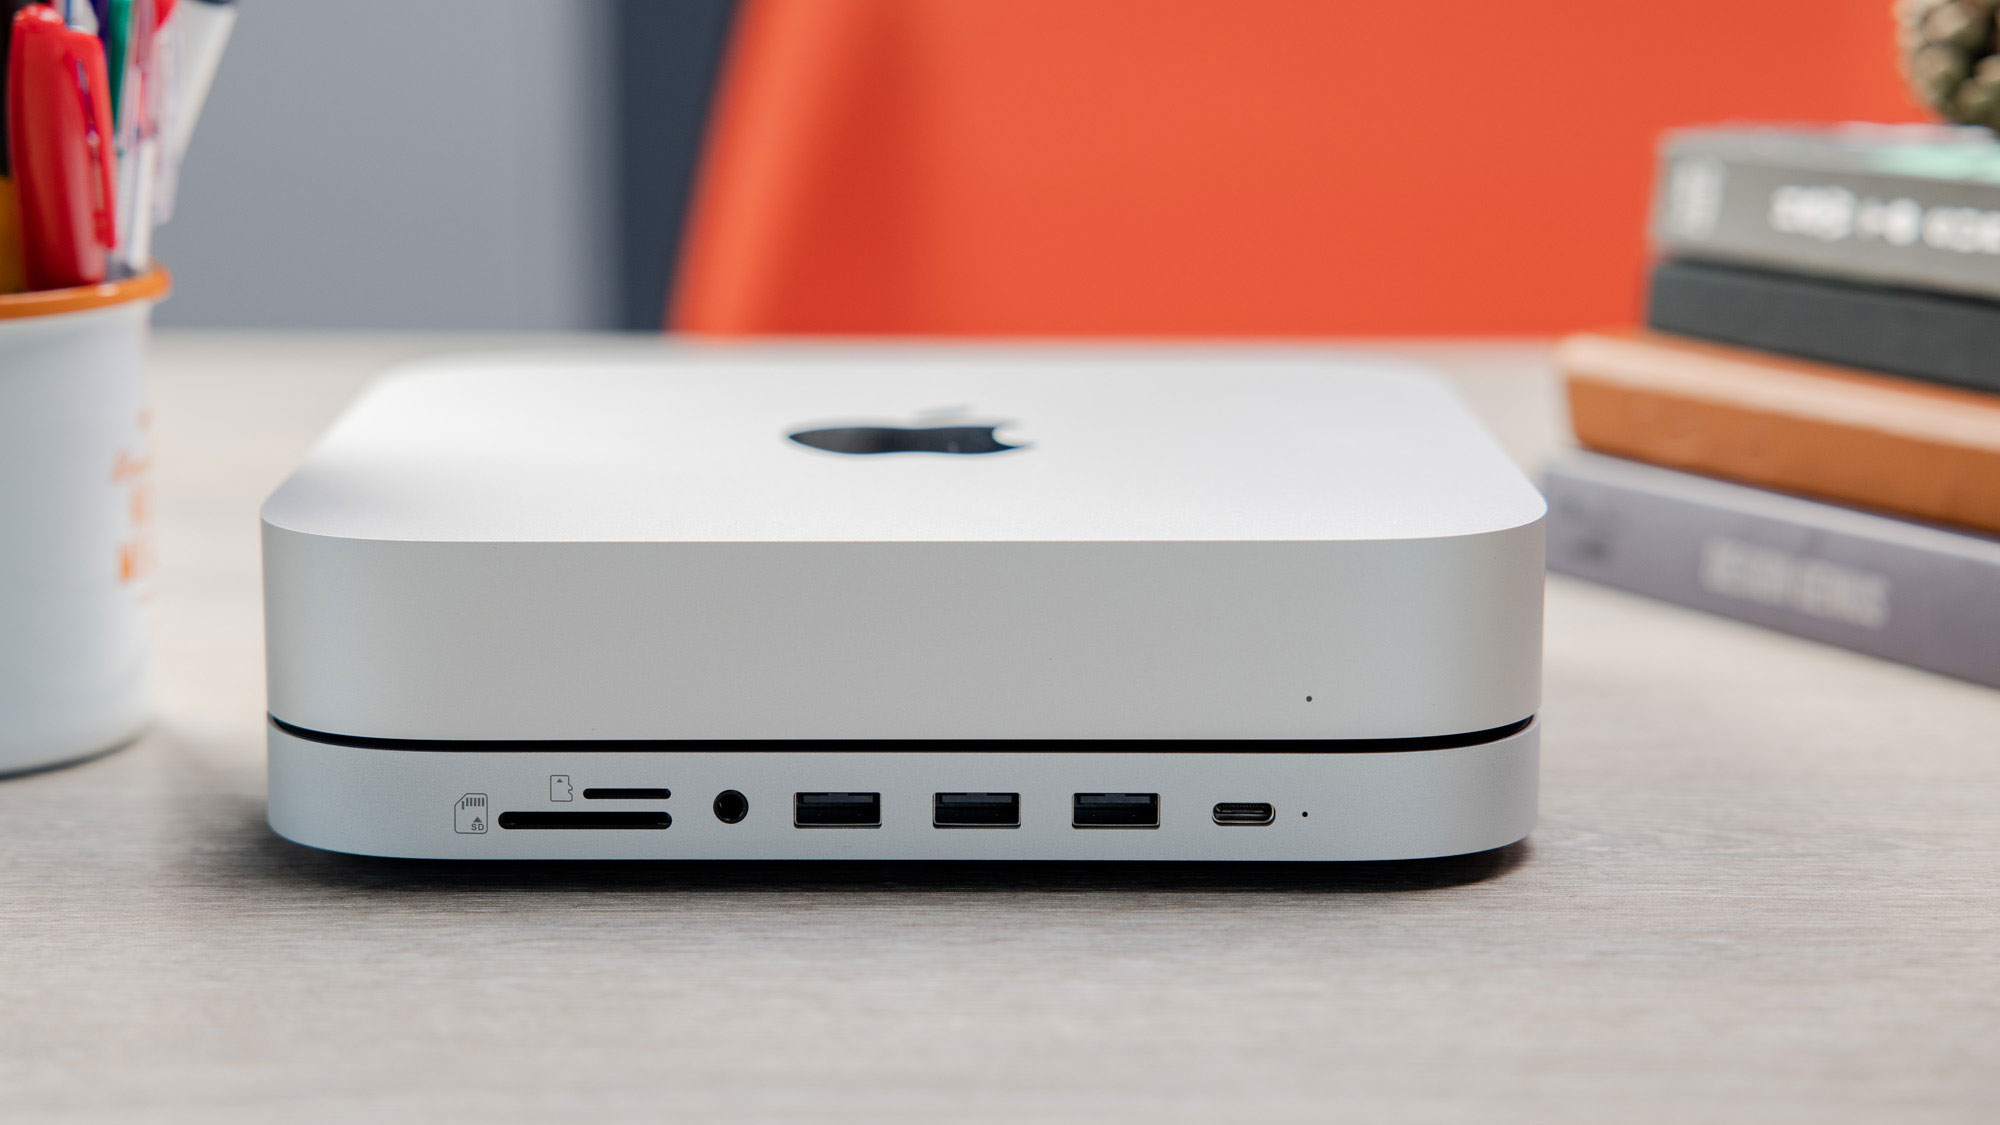
However, if you can’t swing the prices for more storage or just decide later that you need more, there are hardware solutions that connect to the mini without messing up the footprint of the small computer. Two of our favorites are the Satechi Stand & Hub for Mac mini with SSD Enclosure ($100) and the OWC ministack STX ($280), which feature bays for both an SSD drive and a 2.5- or 3.5-inch SATA hard drive.
We’ve written more on these Mac mini storage accessories later in this feature.
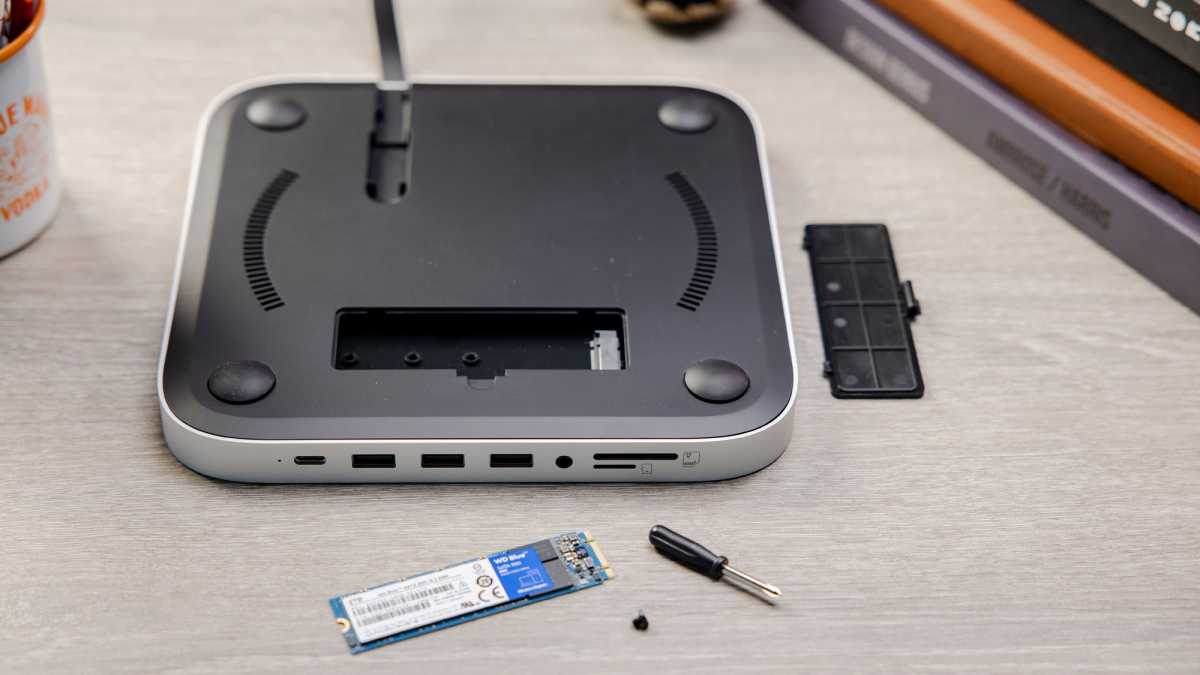
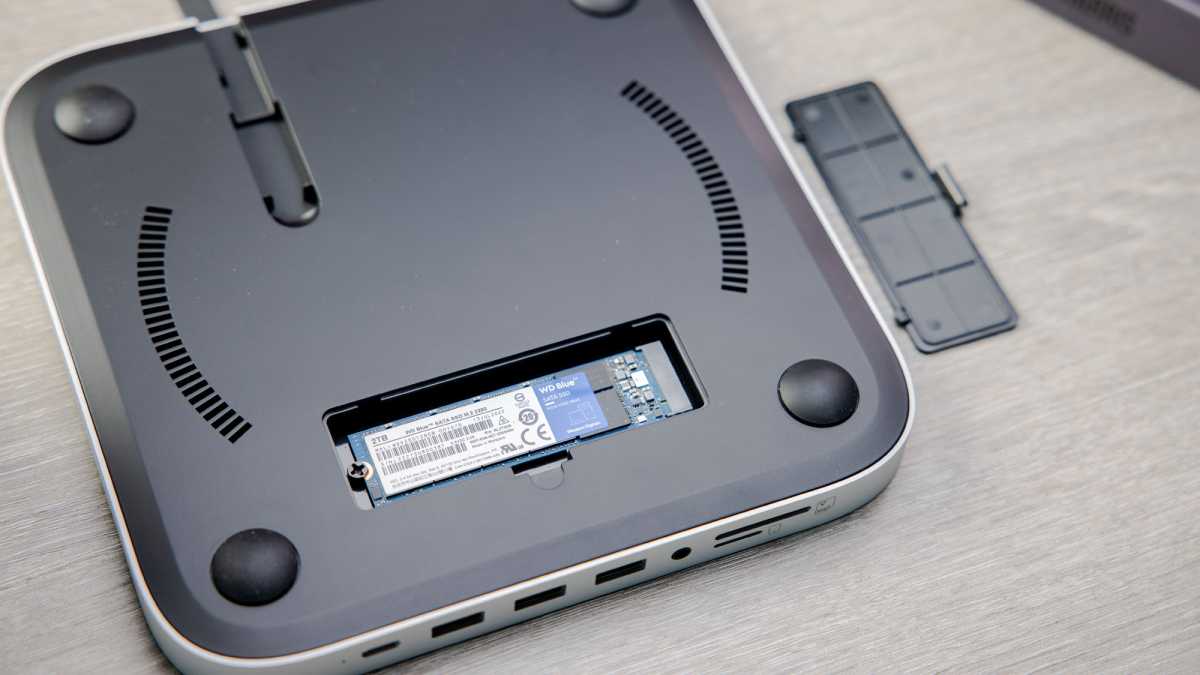
Either of these Mac mini hub features upgradeable and inexpensive internal storage plus a range of extra ports. They both support the slim M.2 SSD and NVMe form factors that resemble a stick of chewing gum. At the time of writing, we could find SSD drives from respected brands for $50/£50 (1TB) and $150/£120 (2TB). 4TB can be found for between $250 and $500—around a third of what you’d pay Apple to boost the internal Mac mini storage.
Foundry
You can add internal storage up to the maximum compatible SSD you can find inside the Satechi Stand & Hub for Mac mini with SSD Enclosure and OWC ministack STX. Installation is simple, with everything bar the SSD board itself included (screwdriver and screws). It’s a little fiddly but nothing to be worried about—if you can use a screwdriver, you can install the SSD board yourself.
Foundry
Note that the original version of the Satechi Stand & Hub’s enclosure did not support NVMe (Non-Volatile Memory Express) SSDs, while the OWC ministack does. Satechi has now updated the stand/hub to support NVMe as well as M.2 SSD.
NVMe M.2 SSDs are designed to be faster by using a more direct path to a computer’s processor over PCIe.5. That said, the NVMe slot on the OWC has only one lane of PCIe allocated to it, so the performance is limited to 770MB/s in real-world use.
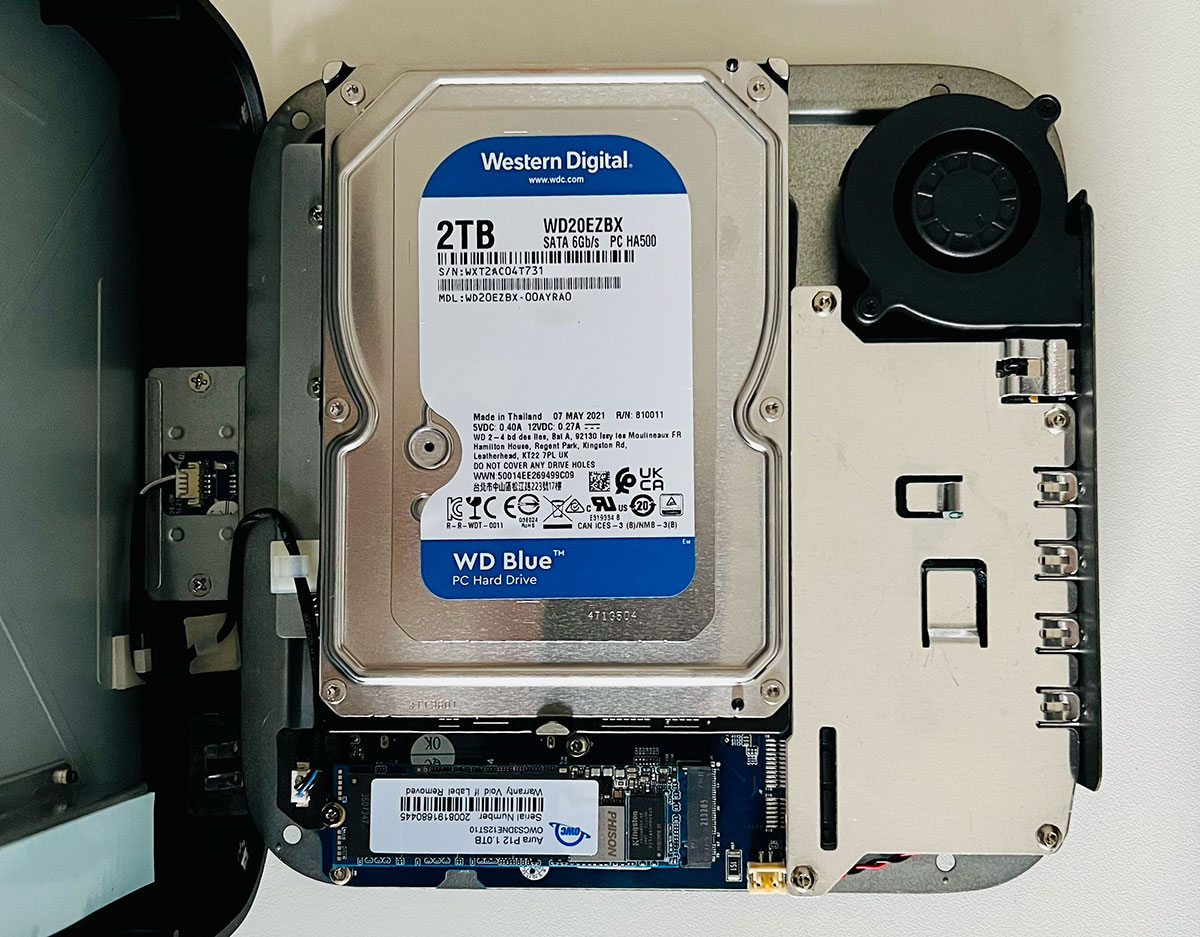
While the Satechi stand/hub has caught up with the OWC by supporting NVMe, one remaining advantage of the OWC miniStack STX is the second drive bay, which supports a 2.5- or 3.5-inch mechanical hard disk drive (HDD). These old-school hard drives offer far-greater storage capacities at a much lower cost than SSDs. 2TB HDDs can cost around $50. A 12TB HDD might cost under $200.
Foundry
Foundry
Upgrading the M2 Mac mini: Adding front-facing ports and extra expansion
While the Mac mini has plenty of ports around the back, Apple did not bless the Mac mini with any ports at the front like the Mac Studio. That means you’ll need to reach over to connect a peripheral device—which could be tricky if you’ve slipped the very hideable computer out of sight.
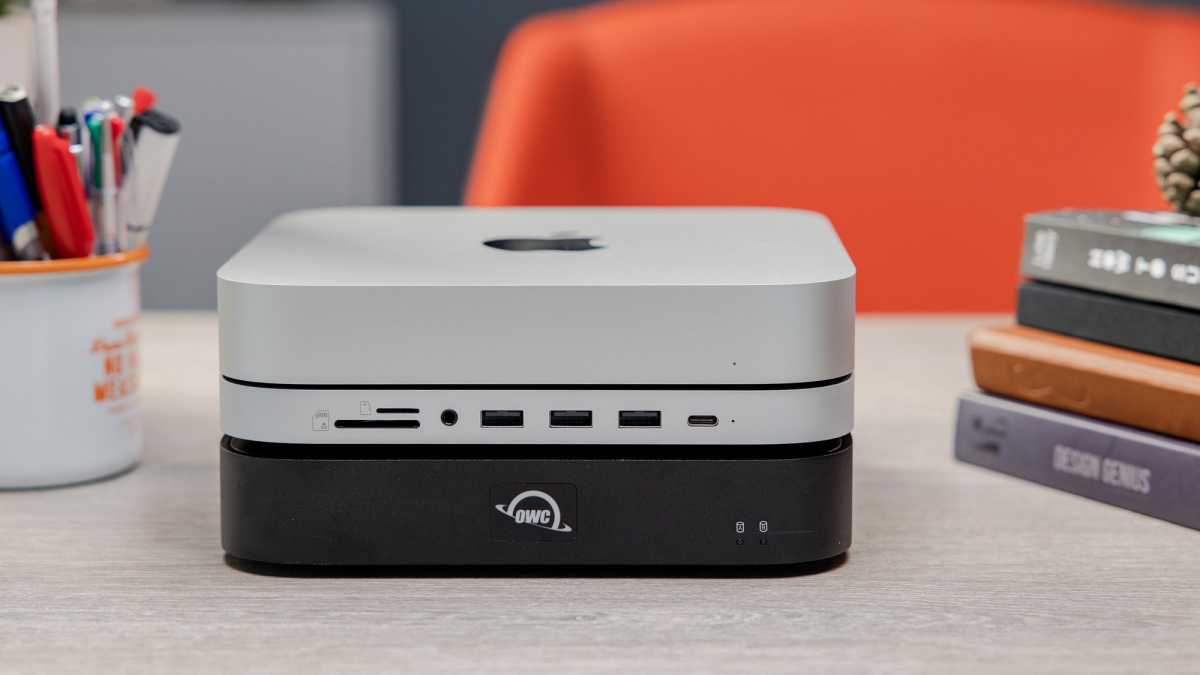
But there are options for adding them. For example, the Satechi Stand & Hub adds several front-facing ports. At 10Gbps, they aren’t as fast as the mini’s back-racked 40Gbps Thunderbolt 4 ports, but they are handy for micro thumb drives that you might want to plug in. You also get SD and microSD card readers, which are super useful for adding inexpensive portable storage. You can buy a Samsung memory card with 256GB of storage for under $30/£30 and half a terabyte for around $50.
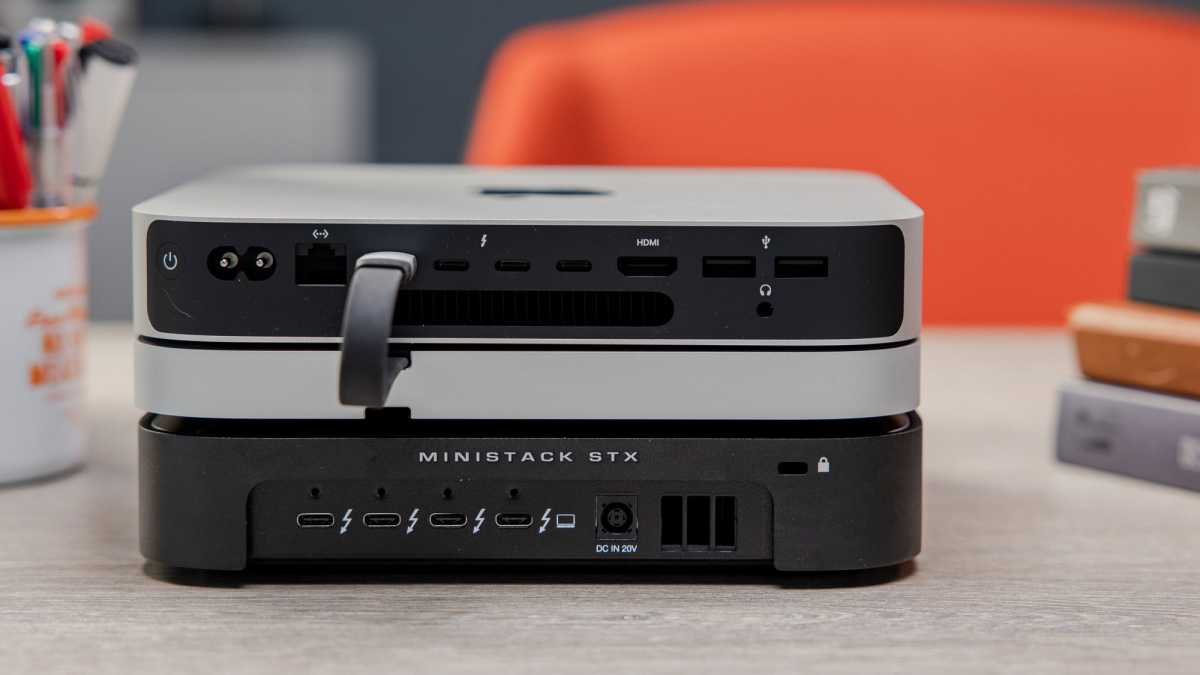
The OWC ministack STX, on the other hand, mimics the Mac mini with no ports on its front. But its back has more powerful connectors than the Satechi hub. It boasts four 40Gbps Thunderbolt 4 ports (one upstream to the computer) and three 5Gbps USB-A ports, but lacks card reader slots.
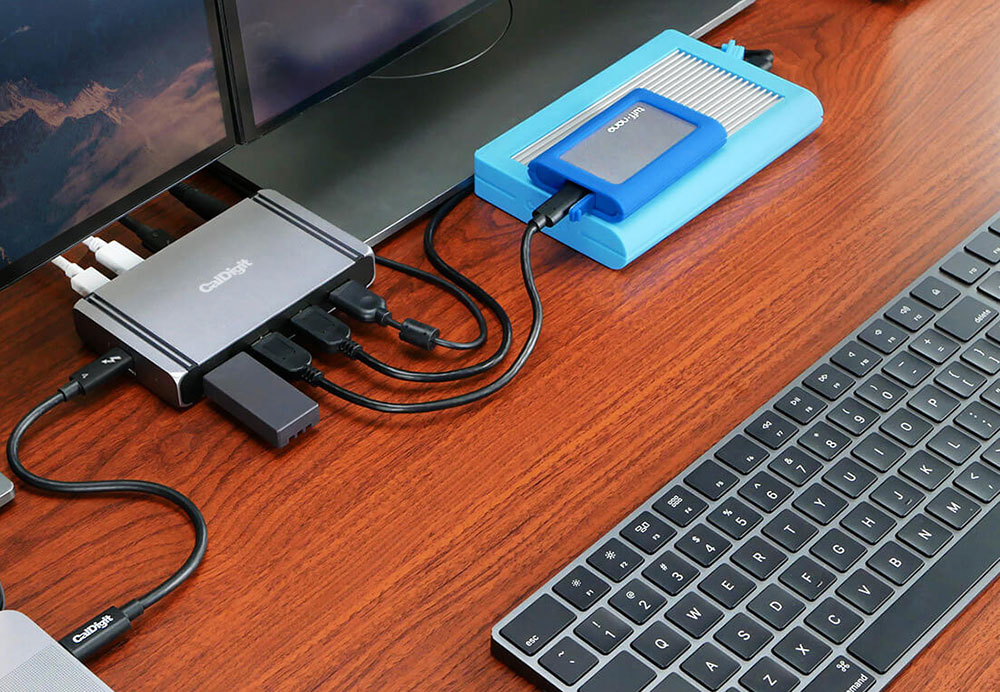
Another port-adding option is to buy yourself a Thunderbolt 4 hub. Our favorite is the Caldigit Thunderbolt 4 Element Hub, which features four 40Gbps Thunderbolt 4 ports (including one side-mounted upstream to the computer), four 10Gbps USB-A ports, and a power supply. We’ve tested the best Thunderbolt hubs and docks if you want even more ports than that. Granted, they won’t be as neat as the Satechi Stand or OWC ministack, but there are tons of options out there.
Upgrading the M2 Mac mini: Adding faster ethernet
One of the build-to-order options offered by Apple is to upgrade the Mac mini’s ethernet from Gigabit to 10 Gigabit. As with the RAM and storage, once you’ve picked your Ethernet speed, there’s no way to upgrade the internal connector later. But you can buy adapters quite cheaply. TrendNet has a 5Gb Ethernet adapter that connects to one of the mini’s Thunderbolt ports. OWC sells a 10G Ethernet Adapter, although it’s actually more expensive than the Apple built-in option.
Note though that just having a 10GB Ethernet port on your Mac doesn’t automatically 10x all your networking. There are few 10Gb routers available, and even fewer that don’t resemble a rack mount unit from a data center. And they aren’t cheap either. If your ISP is offering 2.5Gbps, 5Gbps or 10Gbps, be prepared to replace your existing network gear to actually use the higher speeds.
Upgrading the M2 Mac mini: Adding better speakers
The Mac mini does have a built-in speaker, but it’s really good enough only for system bings and bongs—even Zoom calls sound tinny, and music sounds like you’re listening to the cheapest portable radio.
Apple would prefer you get out your credit card for one of its HomePod speakers via AirPlay, but there are cheaper desktop speakers available that connect via USB or Bluetooth.
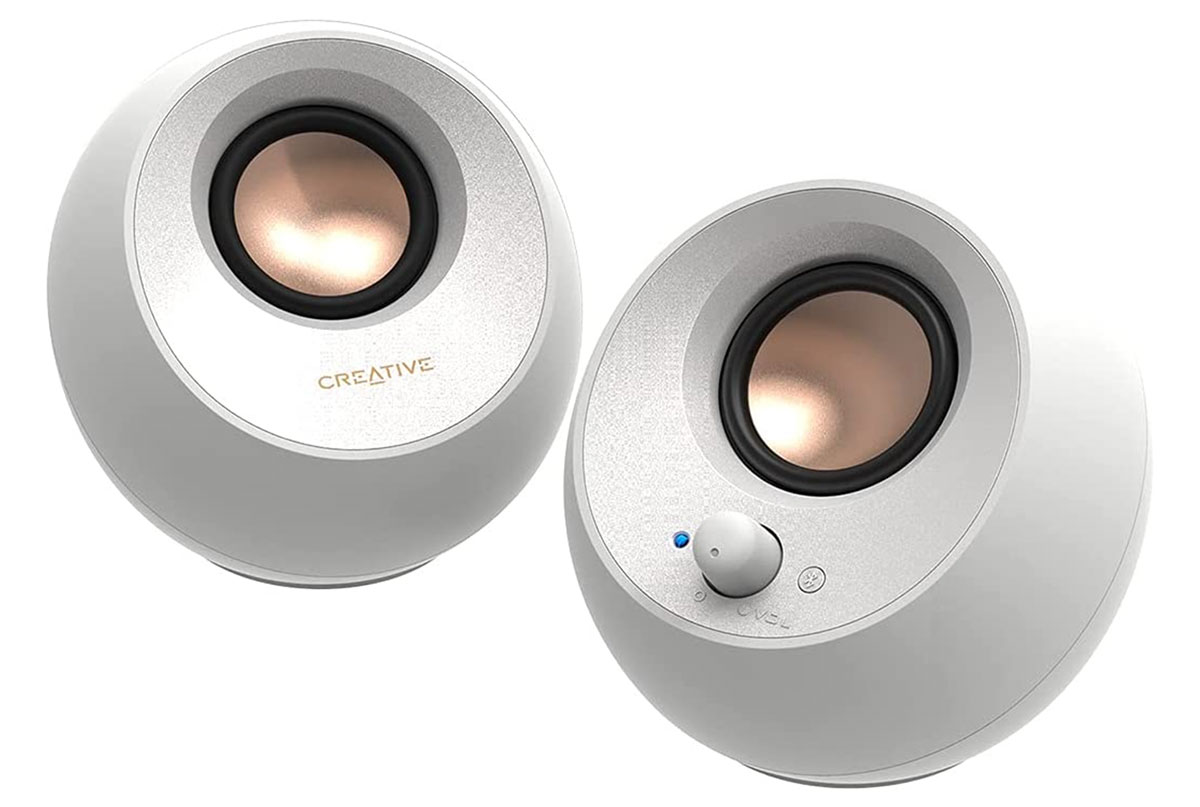
We are fans of the Creative Pebble V3, which can connect using either USB-A or USB-C or Bluetooth.
Upgrading the M2 Mac mini: Adding a webcam
It’s likely that you’ll be wanting a webcam for video calls, either perched on top of your screen or angled on your desk. There are a variety of recommended webcams available for Mac. We have rounded up the best Mac webcams for you.
Upgrading the M2 Mac mini: Adding a microphone
The Mac mini doesn’t have its own mic as Apple presumes that you’ll most likely want to use the one on the third-party webcam you use.
If you want a dedicated microphone, you can attach using USB or via an audio interface for the best audio quality. Check out our roundup of the best microphones for Mac.
Foundry
Upgrading the M2 Mac mini: The ultimate Mac mini setup
It may be over the top for many, but my eventual Mac mini upgrade solution incorporates both the Satechi and OWC hubs. At the bottom sits the OWC miniStack STX, with a 3.5-inch 4TB HDD and 1TB NVMe M.2 SSD, plus its four fast Thunderbolt 4 ports (one used to connect to the Mac mini). Above that, and with its handy range of front-facing ports, is the Satechi Stand & Hub for Mac mini with SSD Enclosure. Inside that, I have a 2TB M.2 SATA SSD—my setup started with the non-NVMe Satechi hub but I’ll upgrade to the NVMe version.
And sitting on top is my M2 Pro (12‑core CPU & 19-core GPU) with 32GB of RAM and an internal 1TB Apple SSD. As the Mac mini ships without a keyboard or mouse, I stuck with Apple’s trusty Magic Keyboard and Magic Mouse.
The same Mac mini with 8TB of storage would cost $4,399 (£4,499 in the UK) to build at Apple, but cost me under $3,000 (£2,850), and I get an extra 9 usable ports—an extra TB4 port, as two on the Mac mini are used to connect the two hubs, and three USB-A, one USB-C, an audio port and SD and microSD card readers at the front.
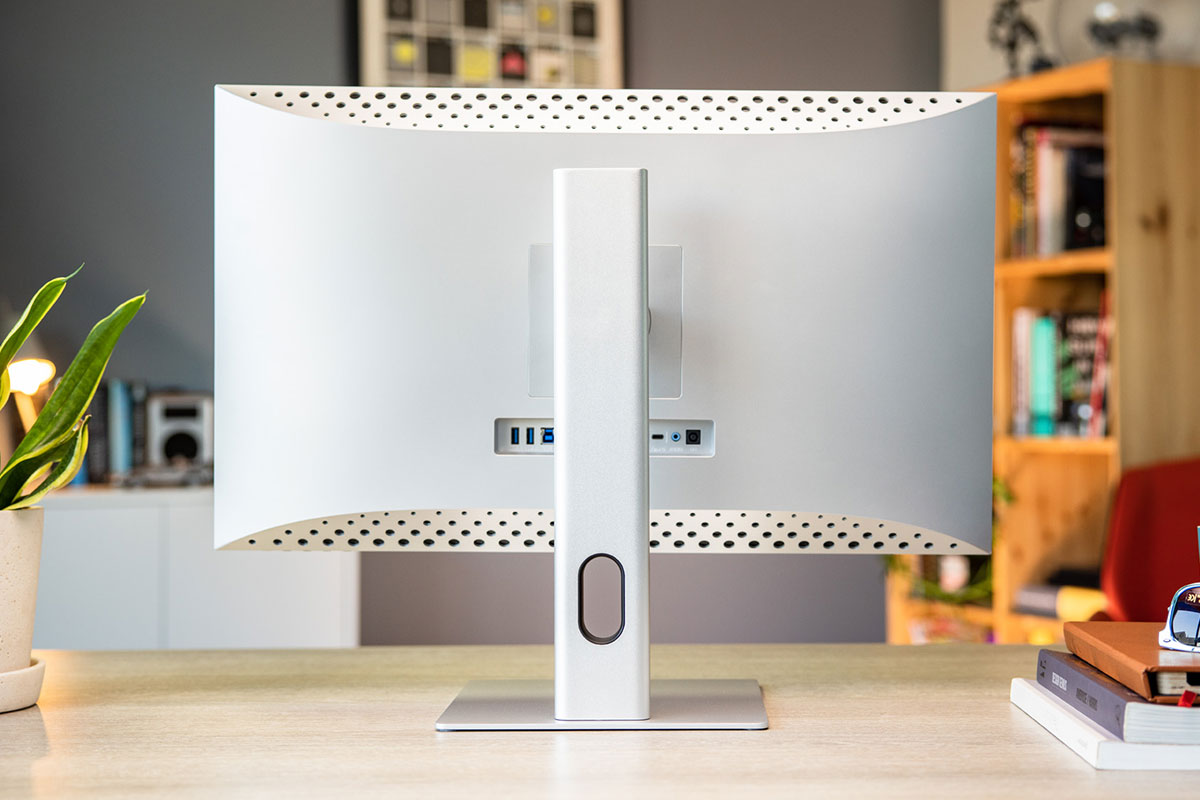
As I was replacing my trusty old 27-inch iMac (vintage 2015 and starting to show its age) I needed a decent-sized monitor for my new Mac mini. I chose the 27-inch Alogic Clarity display, which is 4K rather than a 5K Retina but features a terrific adjustable stand that makes the old iMac look positively static.
1. OWC miniStack STX
Pros
- NVMe M.2 SSD bay
- 3.5-inch HDD bay
- 4x Thunderbolt 4 ports
Cons
- No front ports
- No card reader
- Black only color choice
Price When Reviewed:
From $279.99
Compatible with: Mac Mini M2 & M2 Pro 2023; M1 2020; Mac mini 2018; Mac Studio 2022
Size: 7.8 x 7.8 x 1.5 inches
Ports:
- 4x Thunderbolt 4 ports (40Gbps, 15W)
- Internal SSD enclosure
- Internal HDD bay
This double drive bay Mac mini accessory is a decent Thunderbolt 4 hub in its own right—hence its higher price tag compared to the USB-C Satechi hub.
Its four Thunderbolt 4 ports allow you to create three independent daisy chains with up to five total Thunderbolt devices with a USB device on the end of each chain (eight devices total).
But the real benefit of the miniStack STX is its bays that can be pre-configured or self-installed with one 2.5-inch or 3.5-inch hard disk drive and one speedy NVMe SSD.
Buy an inexpensive (but trustworthy HHD for a Time Machine backup or secondary storage, and a faster SSD for operational file storage. The miniStack STX offers the best of both worlds in terms of storage flexibility.
2. Satechi Stand Hub for Mac mini with SSD Enclosure
Pros
- SSD bay
- Front-facing ports
- Supports SATA SSD and faster NVMe
- Card readers
- Silver color matches mini
Price When Reviewed:
$99.99
Compatible with: Mac Mini M2 & M2 Pro 2023; Mac mini M1 2020; Mac Studio 2022
Size: 7.8 x 7.8 x 0.9 inches
Ports:
- 1x USB-C (10Gbps)
- 3x USB-A (10Gbps)
- SD card reader (UHS-I, 104MBps)
- microSD card reader (UHS-I, 104MBps)
- 3.5mm audio jack
- Internal SSD enclosure
This inexpensive USB-C hub adds much-needed ports to the front of your Mac mini setup. These ports include SD and microSD card readers, which are lacking from the mini itself.
You can buy a slightly cheaper version without the SSD enclosure but we advise spending the extra $20 even if, right now, you don’t think you need any extra storage. If your Mac mini has a 512GB internal SSD, then a 1TB or greater SSD within the hub offers excellent and speedy Time Machine backup or just extra space for your files. Remember you can’t go back and increase the capacity of the Mac mini’s integrated SSD.
The latest version lets you choose between an SATA SSD or more modern NVMe SSD. Either way, it’s much faster than a mechanical hard disk drive.
The lack of Thunderbolt is not a problem if the two (M2) or four (M2 Pro) Thunderbolt 4 ports on the back of the mini are all you require. Note that one of the mini’s Thunderbolt ports will be used to connect the hub.
3. Caldigit Thunderbolt 4 Element Hub
Pros
- Four Thunderbolt 4 / USB4 ports
- Four 10Gbps USB-A ports
- 150W total power
- Compact
Cons
- Sits away from Mac mini
- No extra storage capacity
Price When Reviewed:
$199.95
Compatible with: Any USB-C/Thunderbolt computer
Size: 4.5 x 2.8 x 0.7 inches
Ports:
- 4x Thunderbolt 4 ports (40Gbps, 15W)
- 4x USB-A (10Gbps, 7.5W)
This super-compact Thunderbolt 4 hub differs from the OWC and Satechi hubs by being a different size and form to the Mac mini, and so it will sit outside of its footprint on your desk
It offers you seven fast ports—plus the upstream Thunderbolt 4 port that connects to your Mac mini—that will also ably charge connected devices.
If your Mac mini or Mac Studio has enough storage for your needs but not enough ports (step forward the more limited non-Pro M2 Mac mini), this excellent hub blesses you with multiple top-rated ports.
Read the full Caldigit Thunderbolt 4 Element Hub review
4. Alogic Clarity 27in UHD 4K Monitor
Pros
- 27-inch 4K 60Hz screen
- Excellent adjustable stand
- Extra ports
Cons
- Not 5K like the old 27-inch iMac’s screen
Price When Reviewed:
$799.99
Ports:
- 1x USB-C (upstream)
- 1x USB-B (upstream)
- 2x USB-A ports (5Gbps)
- DisplayPort 1.4
- 2x HDMI 2.0
- 3.5mm audio jack
If you want your Mac mini to replicate the screen glory of the discontinued 27-inch iMac, this same-sized external display is a great option. With its superb adjustable stand, it’s more flexible than the old static iMac screen.
It even has its own integrated hub offering a range of ports to complement the Mac mini’s own.
The Clarity’s two USB-A ports can be used to attach peripherals such as a keyboard, mouse or webcam to the computer. For the computer to see any attached devices, it must be connected to the computer by either the USB-C or USB-B upstream port.
There are now more advanced versions of the Clarity, with a Clarity Pro that adds a retractable webcam and a touchscreen version—both. available in either 27- or widescreen 32-inch sizes.
Read our full
Alogic Clarity 27in UHD 4K Monitor review
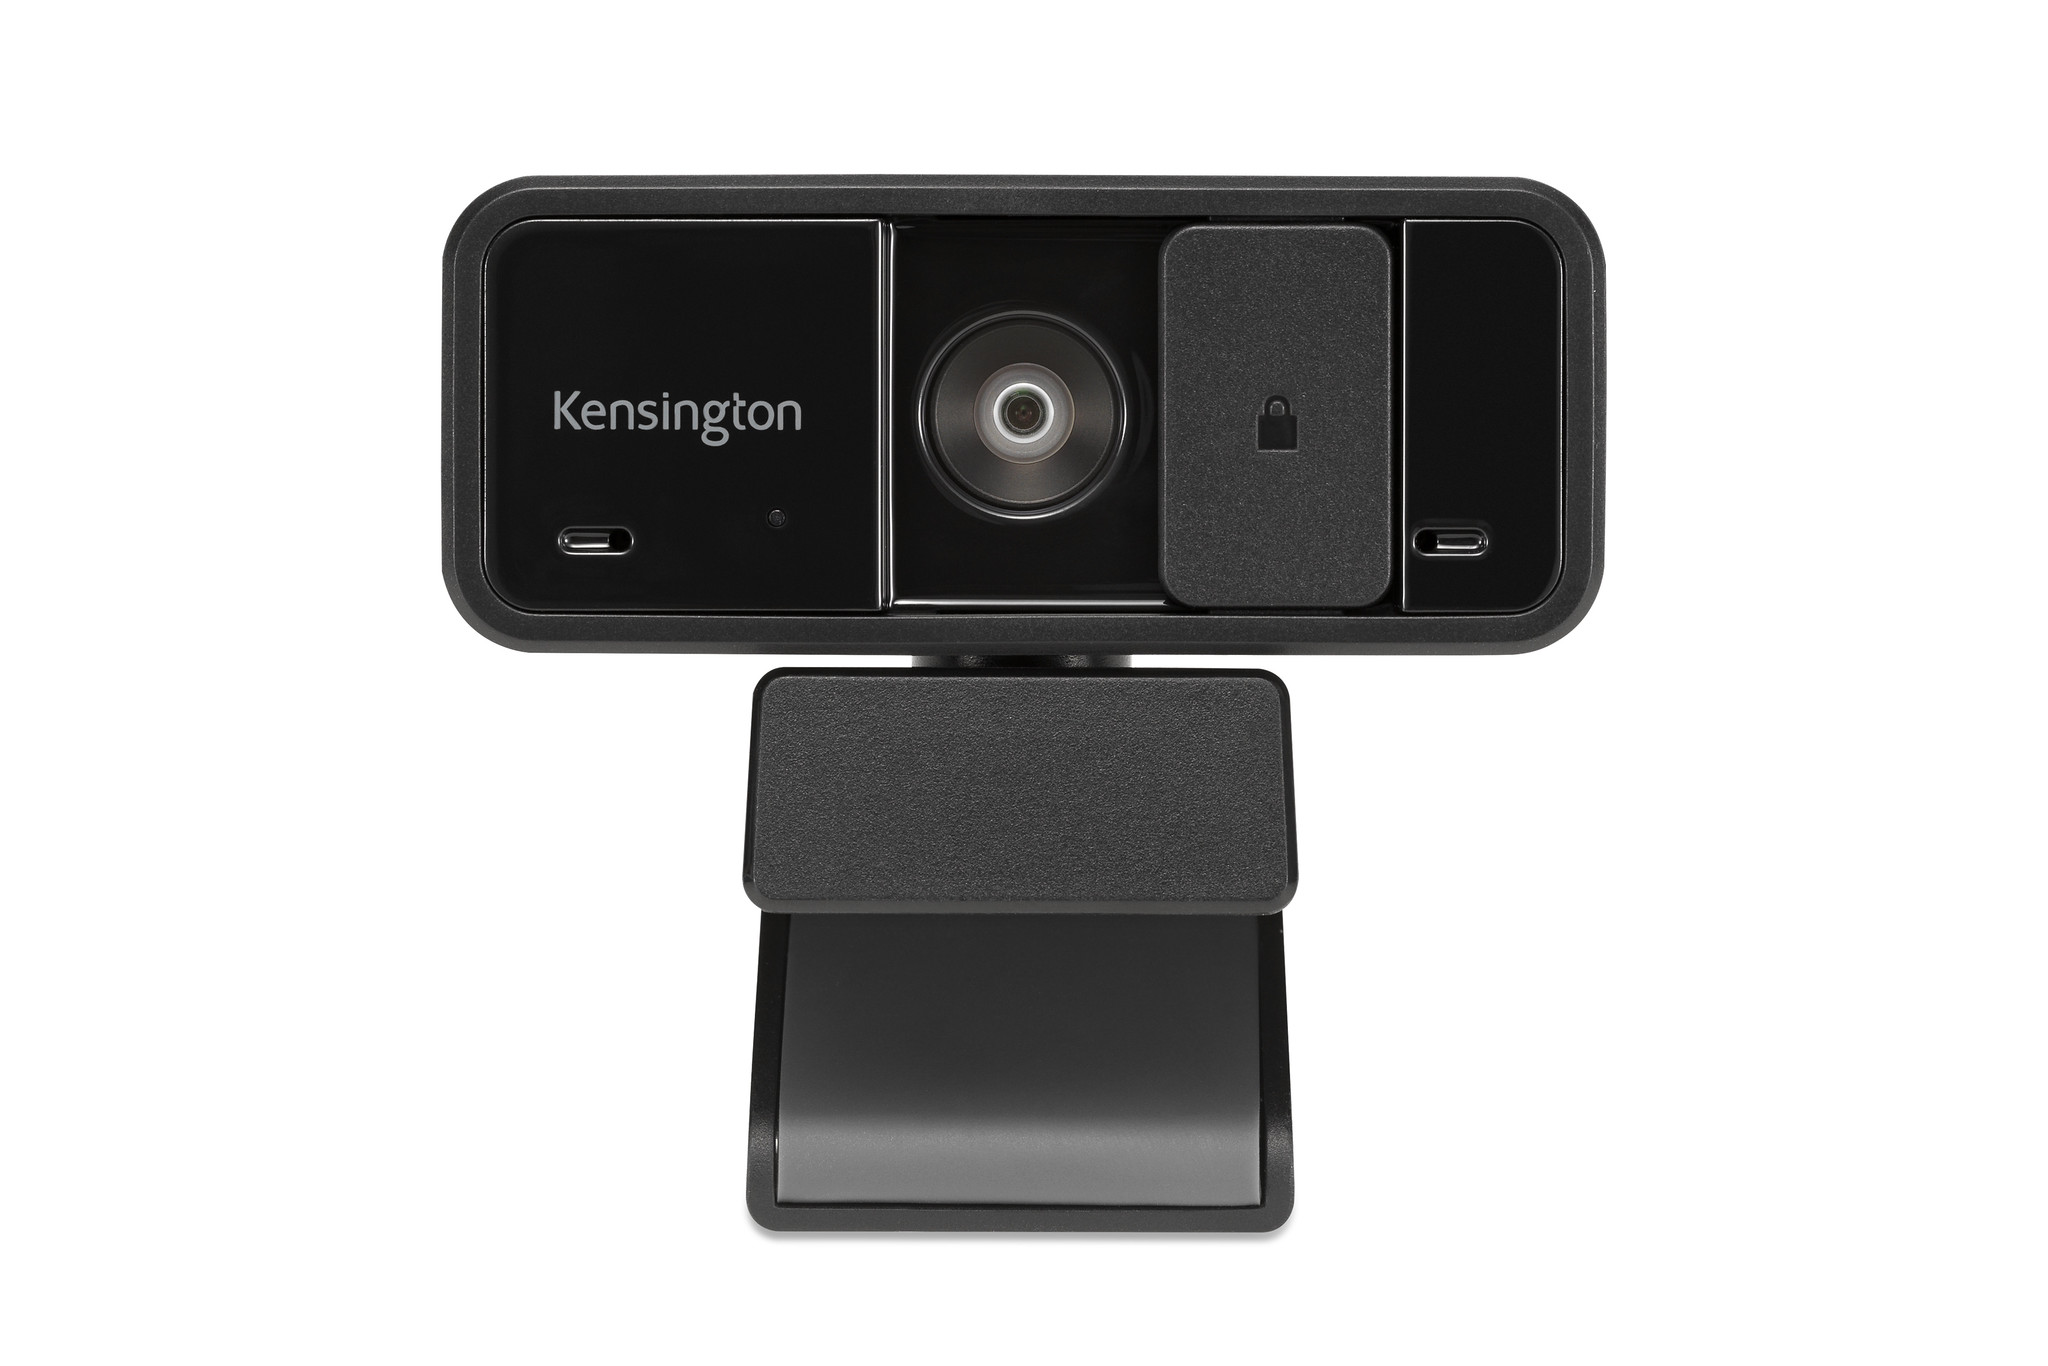
5. Kensington W1050 webcam
Pros
- Affordable
- 1080p resolution
- Good Mac app
Price When Reviewed:
$49.99
Kensington’s W1050 is one of the most affordable 1080p (1920-x-1080) webcams we’ve seen so far. It provides a bright sharp image that is clear, and provides a 95-degree viewing angle, with fixed-focus to ensure that the entire image remains in focus at all times.
The adjustable stand can rest on your desk or attach to your computer screen, and allows you to tilt and rotate the camera to get the right viewing angle. Twin microphones feature noise-cancelling to reduce background noise, and there’s a privacy shutter on the front of the camera too.
The W1050 uses a USB-A interface, which maybe isn’t a bad thing as it doesn’t use up one of the Mac mini’s precious Thunderbolt ports.
Kensington’s Konnect app provides additional controls for adjusting brightness, contrast and other settings, but its most useful feature is the ability to create and save profiles with settings that are suitable for different locations or lighting conditions.
6. Creative Pebble V3 speakers
Pros
- Much-improved audio on Mini’s speaker
- Compact
- Bluetooth, USB-A or USB-C
Cons
- Deep bass lovers might be disappointed
Price When Reviewed:
$39.99
The Mac mini’s built-in speaker is a feeble affair, which is fine for system alerts but woeful if you want to fire up Apple Music or stream video.
These dinky (123-x-120-x-118mm) stereo speakers stick with the mini’s mini-ness, and are available in either white or black. They connect via either USB-C or USB-A, with the added option of wireless Bluetooth if you want to pair with your iPhone.
Sound quality is remarkable for the size and price. The bass could be stronger but it’s a great improvement on the mini’s speaker.
FAQ
Can you upgrade the M2 Mac mini hard drive?
Apple solders the solid-state drive (SSD) directly onto the logic board of the Mac mini when you choose the capacity at the point of purchase. While it is not possible to later upgrade the drive, you can add extra SSDs or hard-disk drives (HDD) via accessories, which we have reviewed here.
Can you upgrade the M2 Mac mini memory?
Apple builds the RAM directly as part of the M2 processor of the Mac mini when you choose the amount of memory at the point of purchase. It is not possible to later upgrade the RAM, so you must choose the most you are likely to need when buying the computer.

$1,199

$1273

$1299

$1299

$1299


