Often you’ll be required to fill in a PDF. Maybe you are applying for a loan, returning an item to a shop, making a request, or applying for a job. Whatever it is, it’s likely that the document you need to fill in is a PDF. This is because PDF is a universal format for documents and it works on Windows, macOS, Android or iOS–and looks the same on whichever platform you open it on.
That’s all fine, but it can be annoying to have to print it out, fill it in with a pen (which requires actual writing!) and then either scan it so you can email, or put it in the mail. Nobody wants to be wasting their time with those shenanigans.
So, what do you do when faced with PDF forms? Luckily it is easy to fill in a PDF on your Mac, and you don’t have to buy expensive software to do so.
The built-in macOS features make filling in and even signing a PDF easy. Depending on the version of macOS you are using, the PDF editing tools are either built in to Quick Look (which shows you a preview of a document when you press the spacebar), or you can open the PDF in the Preview app and access tools to add text to the PDF as well as highlight, underline and strikethrough text, rotate pages, add and remove pages, add arrows and other shapes, and add comments to PDFs.
It’s also really simple to add your signature to a PDF as we explain here: How to sign a PDF on a Mac.
But if you’d like to have a bit more flexibility when it comes to editing a PDF (including changing the existing text) there are a number of dedicated apps that can take your PDF editing to the next level. We look at some of them here: The best PDF editors for Mac.
In this article we show you how to edit PDFs on your Mac for free.
How to edit a PDF on a Mac using Quick Look
Quick Look is a great tool for opening a preview of anything on your Mac without needing to open the software associated with it. You can preview any document by locating it in the Finder (or if it’s on your desktop you can access it there). Just click on the file to select it and press the spacebar.
Here’s how to use the edit tools in Quick Look to fill in a PDF on a Mac:
- Find the PDF you want to edit.
- Select it and press the spacebar.
- When you press the spacebar a preview of the file will appear on your screen.
- In the top right of the preview, look for the icon that looks like a pencil. Click on it.
- Now you will see the editing tools (we cover how to use all of these tools in more detail below). The tools include a drawing tool, shapes, and in third position a text tool (an A in a box). Click on that.
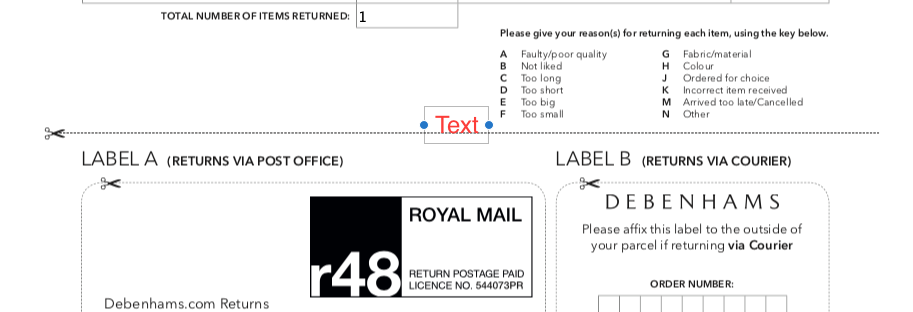
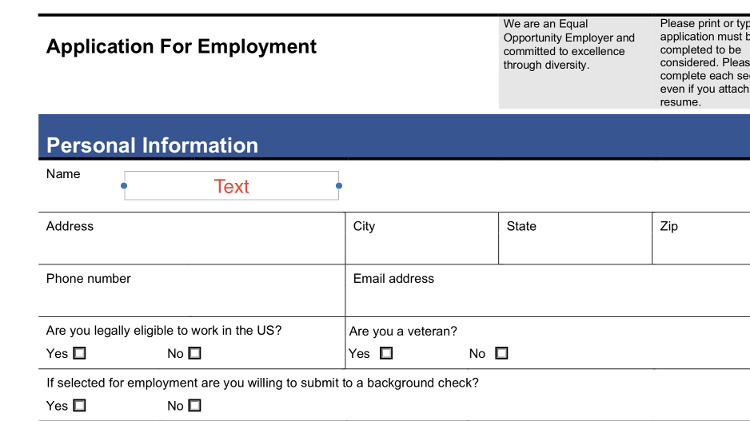
- When you click on the text tool a box will appear with the word Text inside. You can move this to position on your screen and type in whatever you want to add to the PDF. You will be able to move it around if you click inside the box so that a hand icon appears to turn into a fist.
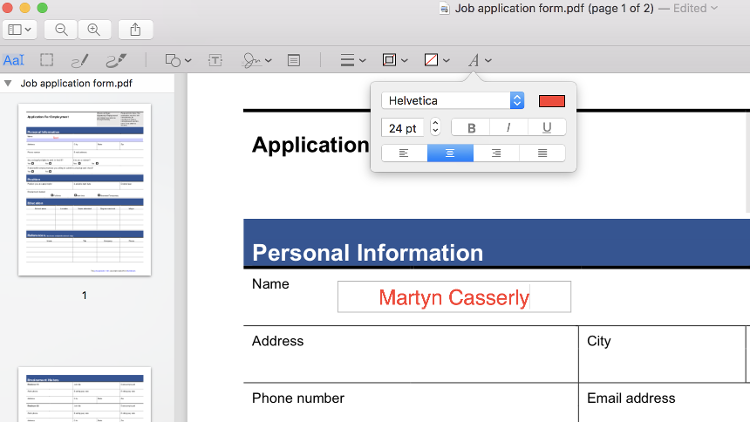
- The text might be red by default. To change the appearance, select the text and then click on the “Aa” icon in the menu. A drop-down menu appears where you can choose the color, font and size of the text.
- Some forms are designed so that it is easier to fill them in and you may find that text boxes automatically appear where you need to type. It may even be the case that you can add a tick (or check) just by clicking in a box.
- Once you are finished, click on Done to save the changes.
- Now you can share the completed PDF.
How to add a signature using Quick Look
You can also add your signature all from within this Quick Look preview. To do so, follow these steps:
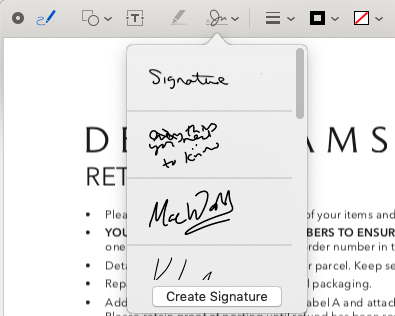
- Click on the Signature icon in the menu.
- Choose Create Signature from the options.
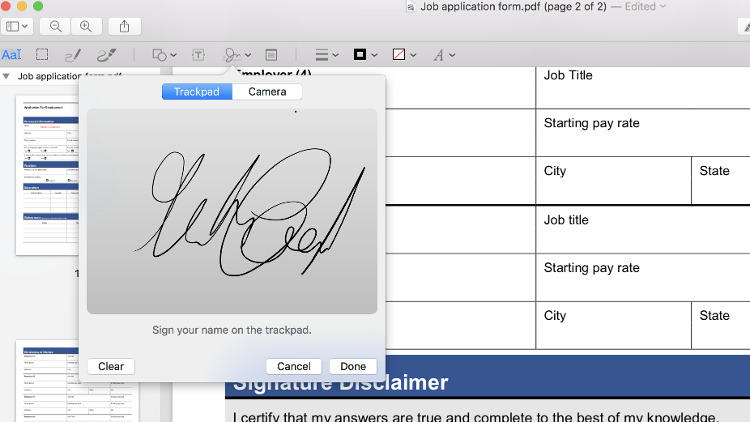
- Either use your trackpad to add the signature, or sign your name on a piece of paper and hold that up to the camera. You’ll get a better result if you use a thick black pen.
- Now just click on your signature and it will be added to the document.
- Drag it into place.
How to edit a PDF on a Mac using Preview
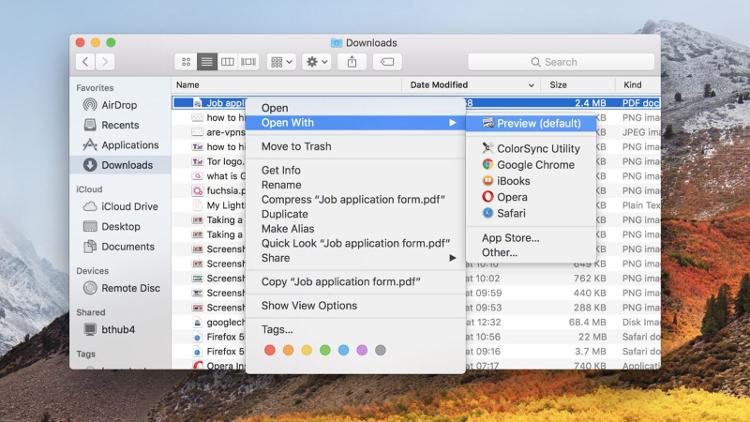
- If you click on the PDF it should automatically open in Preview, unless you have installed another PDF viewer. In that case, to ensure that the PDF opens in Preview, right-click on the PDF, then choose Open with > Preview.
- Click on the icon that looks like a pencil in a circle, this will open the Markup tools which include: a tool for text selection, a rectangular selection tool, sketch and draw tools, shapes, text and sign, note, shape style, and border, fill colour, and text style.
- You can use the various tools in Preview to add text, underline, highlight, draw on, and more to the PDF. We’ll walk through how to use these tools below, but for just adding text to a PDF the method is the same as that described above for Quick Look.
How to add text to a PDF on a Mac
Once you have the PDF document open in Preview (or Quick Look), try clicking in the space where the PDF indicates you should enter some data. It is possible you will be able to type there; sometimes PDFs have been set up in such a way that Preview can tell where text should be entered. If that is the case adding text is a simple case of clicking in the correct area and typing.
If the text boxes aren’t set up correctly, you’ll need to create a text box yourself, here’s how.
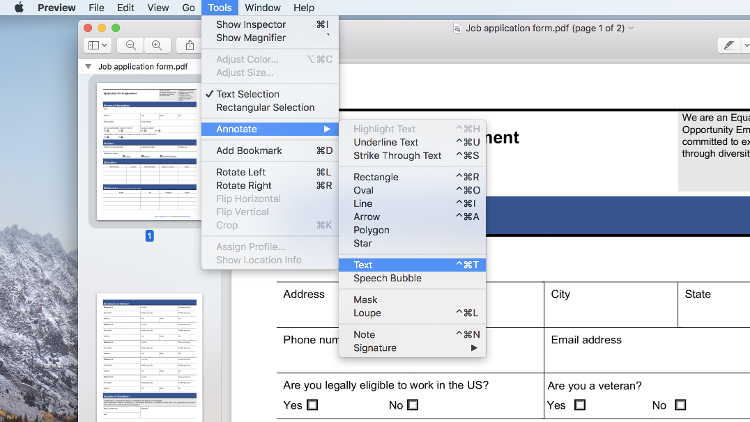
- Either click on the icon that looks like an A with a box around it, or select Tools > Annotate > Text.
- A small box will appear in the center of the page with the word “Text” inside. This can be moved by dragging it anywhere on the page. You can also resize it to fit the layout of the PDF. Once you’re happy with the placement, just start typing.
- If you want to change the font, size or colour of your text then click on the “Aa” icon in the toolbar. This will open up the standard formatting option so you can alter the text and the justification (if it’s centred and you’d prefer it to be justified left, for example).
- If you want to move text boxes around just click on them and drag.
How to tick (checkmark) a box in a PDF
It’s quite common for PDFs to have boxes that you are supposed to add a tick (√) or a cross (X). To add a cross, just use the X key, but what if you want to add a tick?
Sometimes a PDF is set up in such a way that the tick sign appears automatically (sometimes you need to click twice), but if it doesn’t here’s how to put a tick in the box:
- Click on the Text box (the T in a square).
- Move the text box onto the place where you need to add the tick.
- Type Option/Alt + V. This is how to type a tick on a Mac keyboard.
- If you don’t like the appearance of that tick (checkmark), try changing the font until you find one you like.
- When you are happy with your tick, copy and paste it to every place you need to use it in the document.
Alternatively you could cut and paste this: √
How to copy text from a PDF
There are times when you’ll want to copy text from one document into another, but this can be awkward in PDFs.
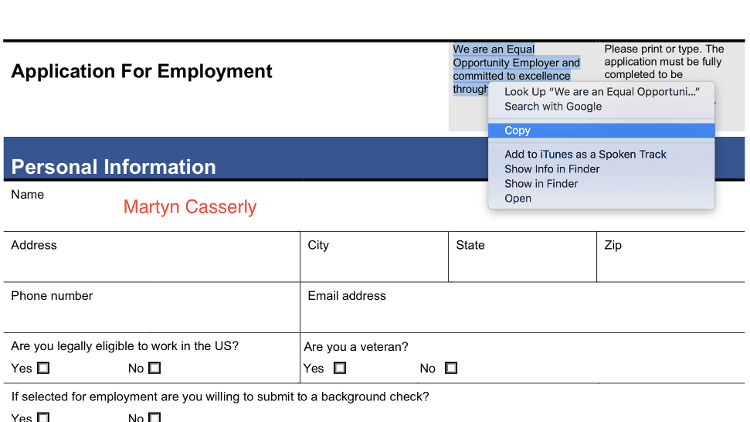
Preview has an easy solution, though. The first icon in the toolbar, which has an “A” with a bar that looks like the one you usually see in a word processor, enables the text selection option.
- Click this then find the words you want to save.
- Highlight them then Command + C, or right-click to bring up the Copy option.
- Now you can paste the text into any document, or anywhere else in the PDF (as long as you create a text box).
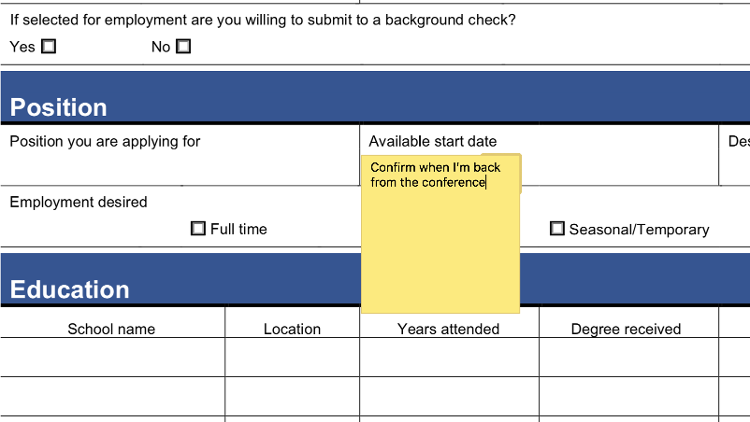
Another useful feature found in the toolbar of Preview is Notes. This allows you to select an area on the document (text containing errors, say) and highlight it to alert your colleagues, or leave a reminder for yourself.
- To access Notes go to Tools > Annotate > Note. This will produce a yellow box in the area you have highlighted.
-
Now type in any thoughts you have, click on another part of the document, and the box will close into a yellow square.
-
If you want to see what’s in a note just click on it and it will expand.
How to create shapes in Preview
Preview also includes the ability to create shapes where you can highlight certain areas that you want to standout.
- Click on the icon that has a Square and Circle then select your shape from the menu.
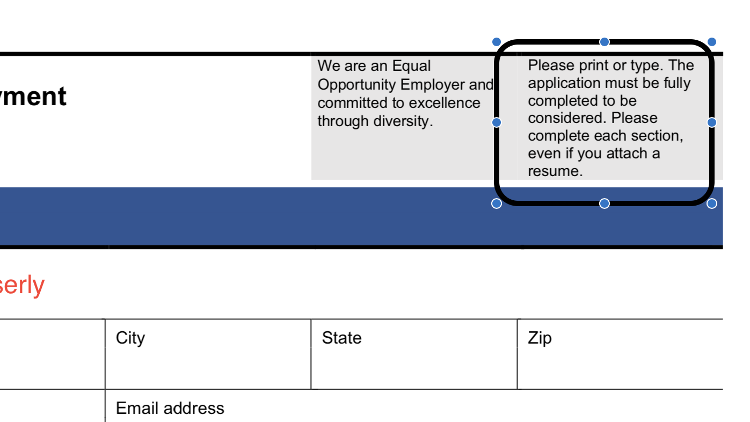
- Shapes include a square, speech bubble, star and hexagon among others. There is also an arrow and a line.
- The shape will appear on the document and can be moved and resized as you see fit by dragging either of the blue circles along the sides or ends, depending on the shape.
- If you want to change the color of the shape, select the shape and click on the box with thick lines around it in the menu, this will bring up a color pallet.
- You can also change the thickness of the lines by clicking on the icons of three lines. There’s also the option to add a shadow to make the shape really stand out.
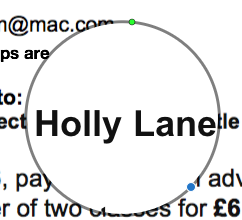
- If you want to highlight something in particular you could select the magnify option at the bottom of the shapes pallet. You can make this circle larger by dragging out the blue dot, and magnify the text inside it by dragging the green dot.
How to rearrange and add pages to a PDF
If the PDF you are editing has multiple pages, or if you want to add more pages to it, this can be easily done in Preview, here’s how.
- Start by clicking on the View Menu button in the menu (above the Aa tool).
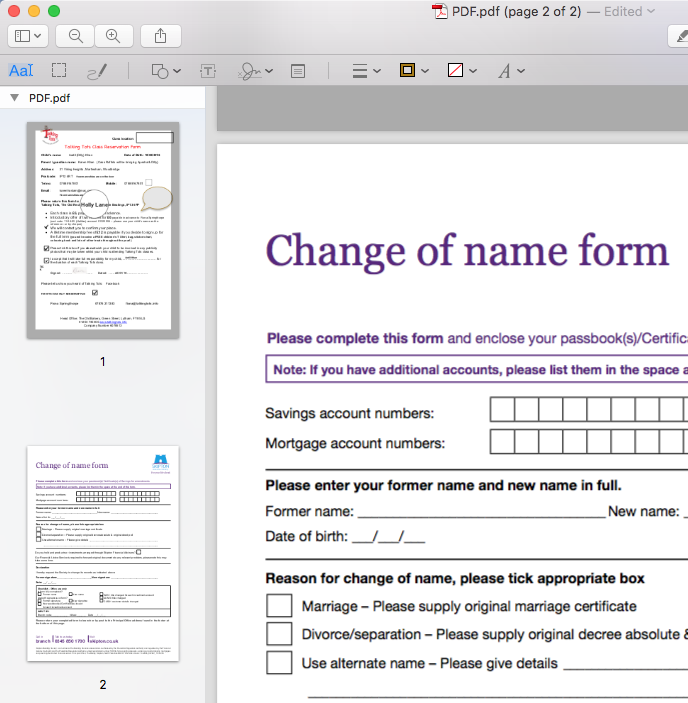
- Choose Thumbnails. This will give you an overview of all the pages in the document.
- To add a new PDF you can just drag it from the Finder onto this sidebar.
- To remove a page from the PDF, click on the thumbnail of the page to select it and then press the delete key.
- To rearrange the pages in the PDF just click on a page thumbnail and drag it to move it up or down in the sidebar.
How to reduce a PDF file size
If you are trying to email a PDF to someone and the file size is a little on the large side you might like to reduce the size. This is a good idea if you were thinking of texting the PDF to someone, too.
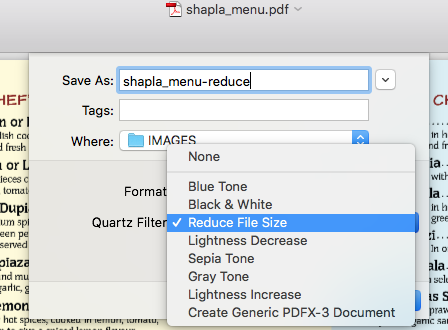
- To reduce the size of the PDF, click File > Export as PDF.
- Click on the drop-down menu beside Quartz Filter and choose Reduce File Size.
- Click on Save.
- The resulting document will have a much smaller size.
Add a signature to a PDF
You may want to sign the document, and this too can be done in Preview. We have a more detailed tutorial about adding a signature to a PDF here, but the steps are as follows:
- Go to the icon in the toolbar that looks like a scribble and select Create Signature.
- A window will appear where you can use your trackpad as a virtual notepad. Either via your finger or a stylus you simply draw the signature and tap any key once you’re finished.
- If you don’t get it right first time just click the Clear button and try again. Once you’re happy click the Done button and your signature will be saved into Preview, ready to use whenever you want to sign a document in the future.
- To actually insert the signature, click the scribble icon once more, then click on the signature you’ve created and it will appear on the document in a text box.
- Now drag the signature to the appropriate area, resize it if necessary, then click anywhere else on the document and the box will disappear, leaving behind your autograph.
Third-party apps
Preview is an excellent solution for quickly making changes to PDFs, but if you want to take things up to a professional level then you might consider a dedicated package. We have looked at a few tools for editing PDFs here.
PDFelement for Mac, for example, has been purpose-built to create, edit and annotate PDFs. It can automatically reflow text and use OCR to turn paper documents or digital scans into editable PDFs; plus there’s the ability to create interactive forms out of Microsoft Word docs, and a whole host of other features.
If you frequently use or create PDFs then it’s certainly worth a look. There’s a free trial version of the software available where you can explore its capabilities, and if it meets your requirements then the prices start at £64.99/$69.99 for a one-year single-user standard license from the Mac App Store here, you can download the free trial here.

