When Apple’s Live Photos feature arrived with iOS 9 on the iPhone 6s, they were fun for a minute. As a hybrid photo-video, Live Photos capture a still image plus one and a half seconds of video before and after the shutter tap, complete with sound.
They never really caught on—mostly because the “live” part usually just records a useless few seconds of nothing. But occasionally you capture something pretty great that you didn’t know was even happening and you want to share it with your friends. However, unless you have a Mac, iPhone, or iPad you can’t view the moving part of the picture. Viewers on other platforms miss out on the special before-and-after video feature and instead, see only the static image. But there’s actually an easy way to share it.
First, make sure you are actually shooting a Live Photo by enabling the feature in the Camera app. On your iPhone (or iPad) launch the Camera app and tap the bullseye icon at the top right of the screen. The Off position is a white circular bullseye design with a line through it, while the On position removes the line. Tapping the bullseye sends a quick alert that reads Live in yellow or Live Off in white.
On iPhone 11 or later models, you can switch Live Photos on and off via the Camera control panel, in which case the bullseye up top will be yellow instead of white. Live Photos are enabled by default, but you can choose when to use the feature by toggling on Preserve Settings in Settings > Camera, which honors whichever setting you last chose.

Foundry
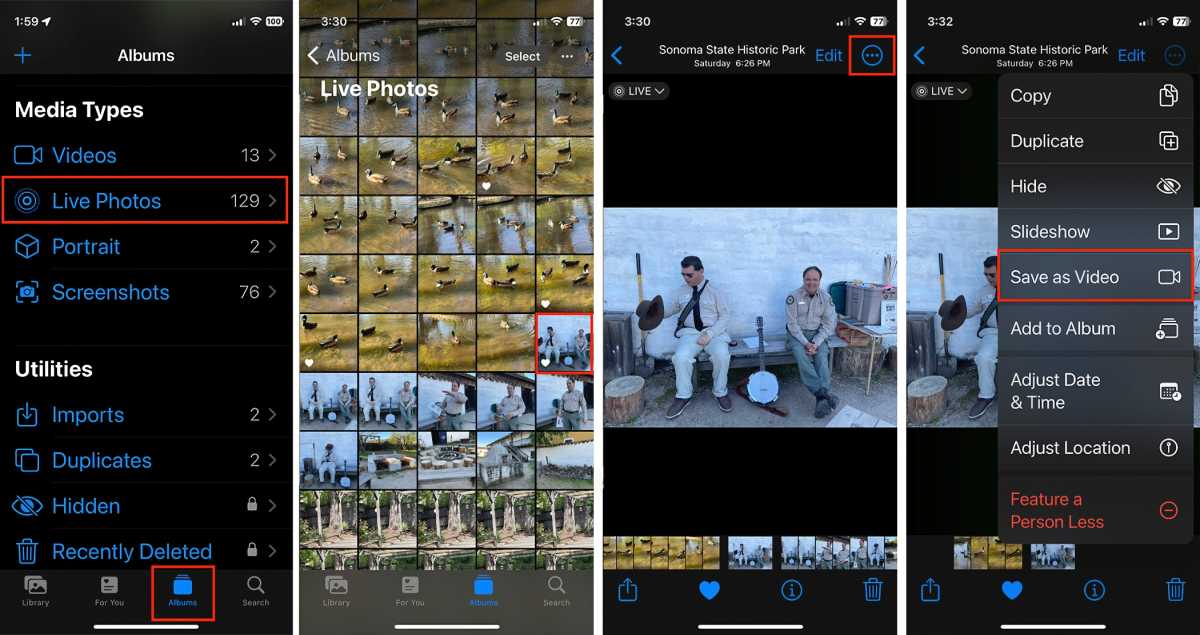
After you’ve shot your picture, you can make it universally sharable by converting it into a video. Go into the Photos app and under Albums choose Media Types and then tap Live Photos. Choose the photo you want to share. At the top right, tap the three-dot More button, and from the resulting menu, choose Save as Video. That’s all there is to it.
To find the new video, go back to Albums and choose Recents. Your video will appear as the last entry in the Camera Roll. From there you can trim or edit it as you would any other video or immediately share it as is.
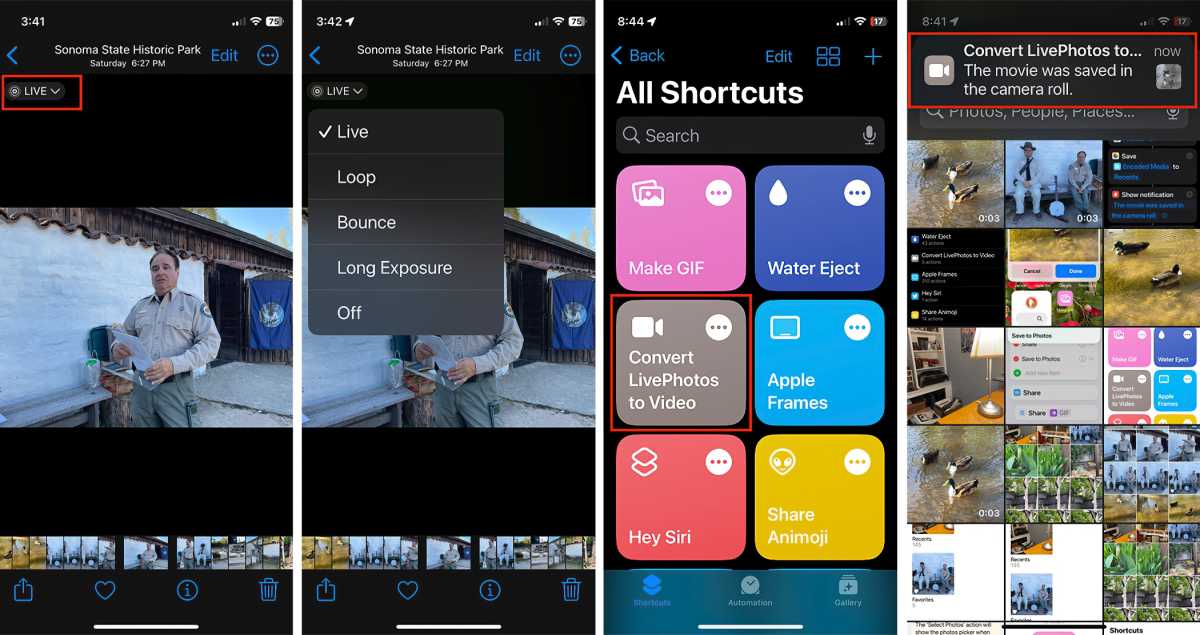
You can also use a Live Photo with special effects such as Loop and Bounce which, functioning more like a GIF, either replays the Live Photo forever in a loop or plays the video in perpetual forward and reverse motion. To do that, tap the Live arrow at the left above the photo. A drop-down menu lets you choose the effect you want. Once created, you can share the video via the normal channels: email, text, social media, website, you name it.

The two screenshots on the left show how to use Live Photo effects. The two on the right show the LIve Photo shortcut for the Shortcuts app.
Foundry
If you’re fond of the Shortcuts app (which was integrated into iOS 13), you can achieve the same result via the Convert LivePhotos to Video shortcut, located in the Shortcuts Gallery. If you don’t already have it you can search for it to add it to your collection. Once you locate the shortcut, tap it and navigate to the Live Photo you want to convert, and then tap that. The shortcut goes through its routine and then sends a notification that your new video is located in the Camera Roll.
Today I Learned is a Macworld column that spotlights lesser-known but useful tips and tricks for Apple users. If you have any ideas for future columns, send an email to [email protected].


