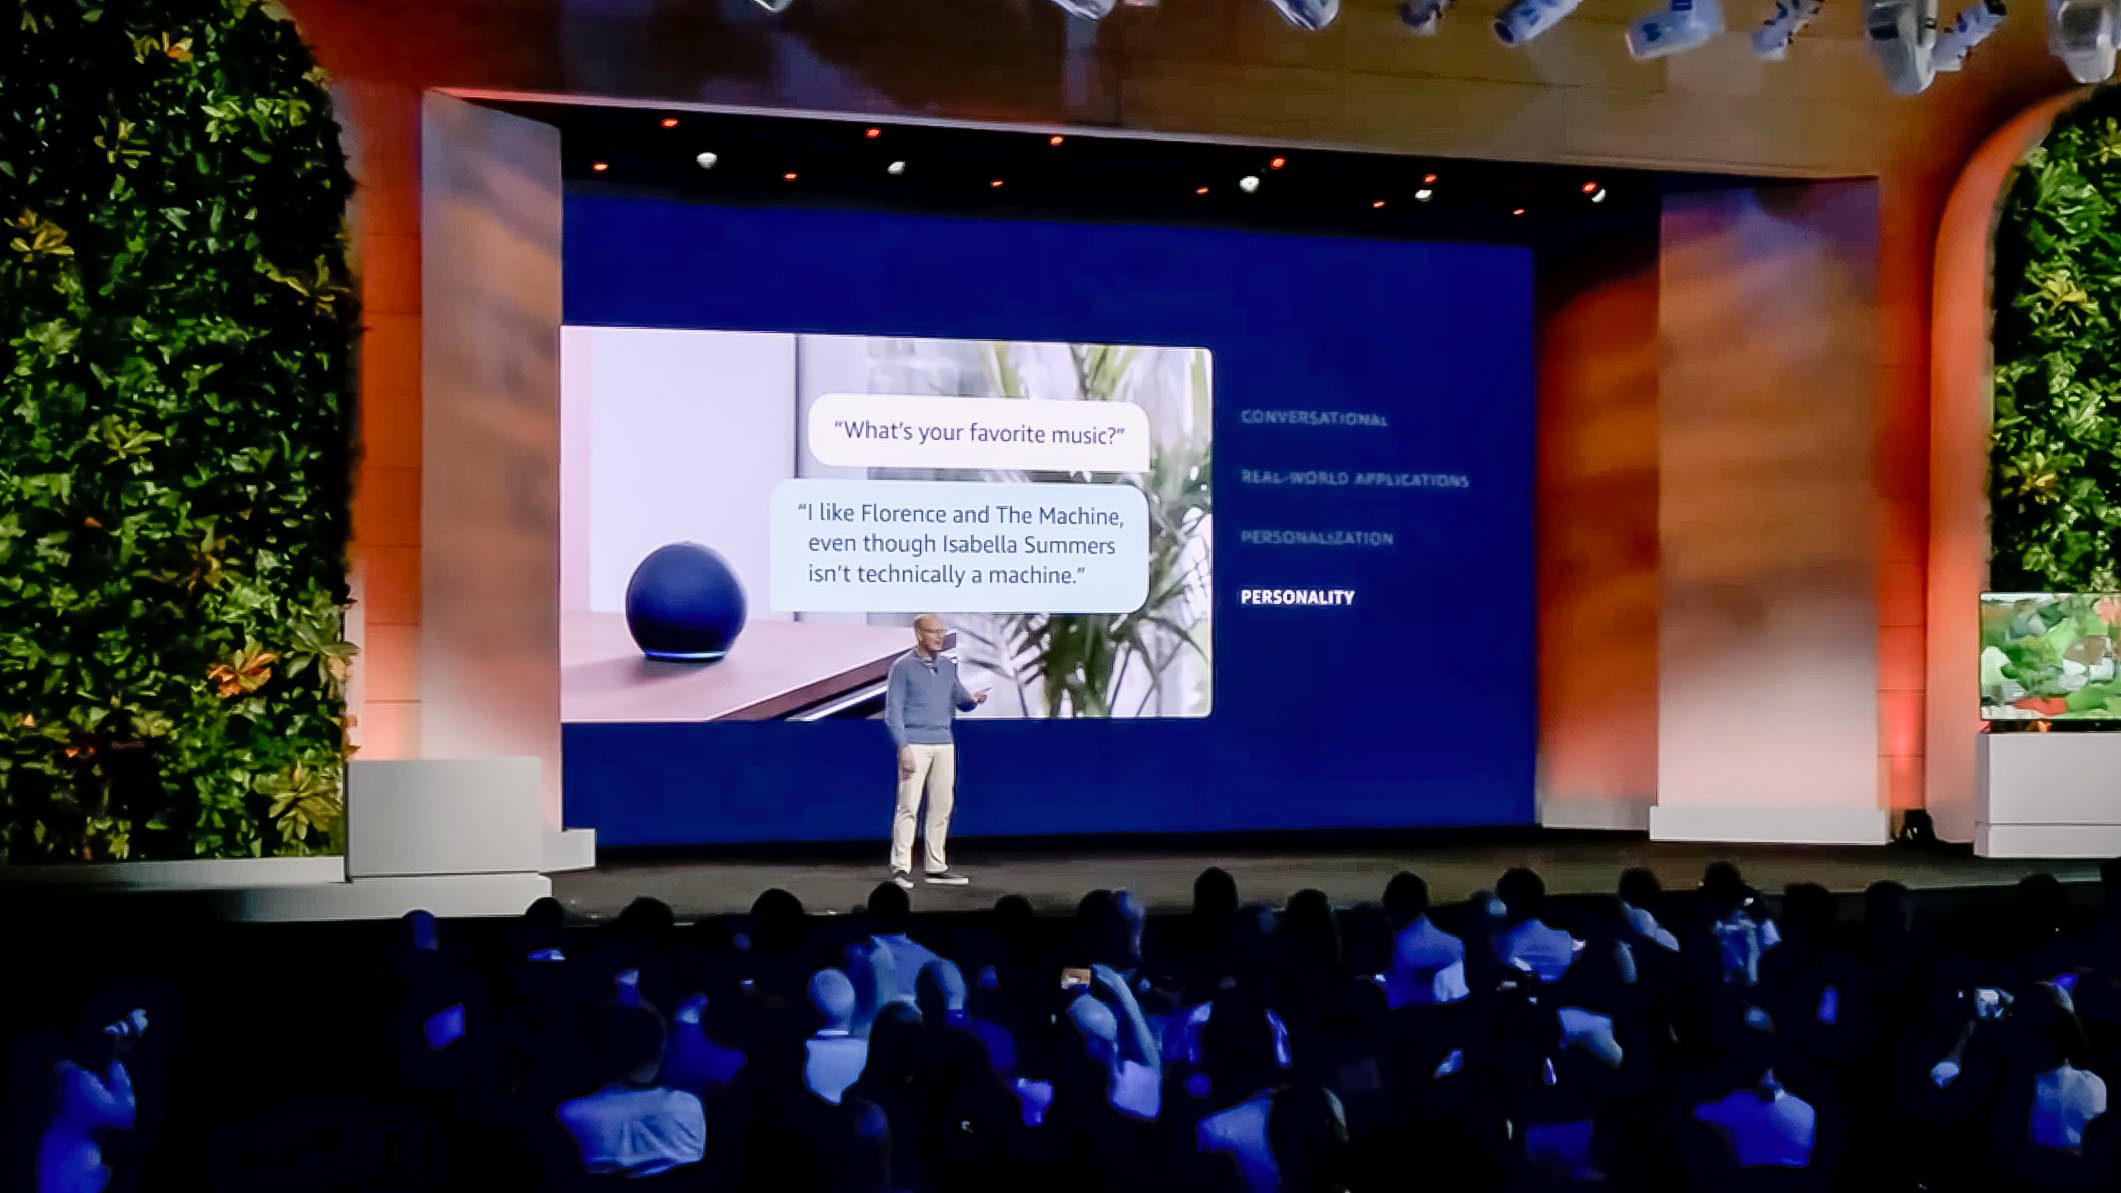
With macOS Sonoma, you can create a Personal Voice, which is a voice that your Mac uses that sounds like you. The Mac’s text-to-speech capabilities can be used to recite in a voice similar to yours anything typed using the Live Speech feature.
According to Apple, the voice that is created uses the Mac’s machine learning, and since everything is kept on the Mac, the user’s voice information is kept private and secure. So you don’t have to worry about your recording being used for nefarious reasons by Apple or anyone else.
The Personal Voice isn’t perfect. It sounds robotic, lacking inflection and emotion. But is more personal than the artificial voices that come with the Mac. To hear what it sounds like, I created samples. The first recording is me speaking, and the second is My Personal Voice created in macOS Sonoma. Give it a listen.
The process of creating a Personal Voice involves a long recording session. If you are using a MacBook, you can get away with using its built-in microphone. For best results, however, you should use an external USB mic.
Here’s how to create a Personal Voice in macOS Sonoma. For more information about Apple’s new Mac operating system, check out our macOS Sonoma superguide.
How to create a Personal Voice in macOS Sonoma
Tools required: microphone if your Mac doesn’t have one Materials required: macOS Sonoma
Accessibility settings
Foundry
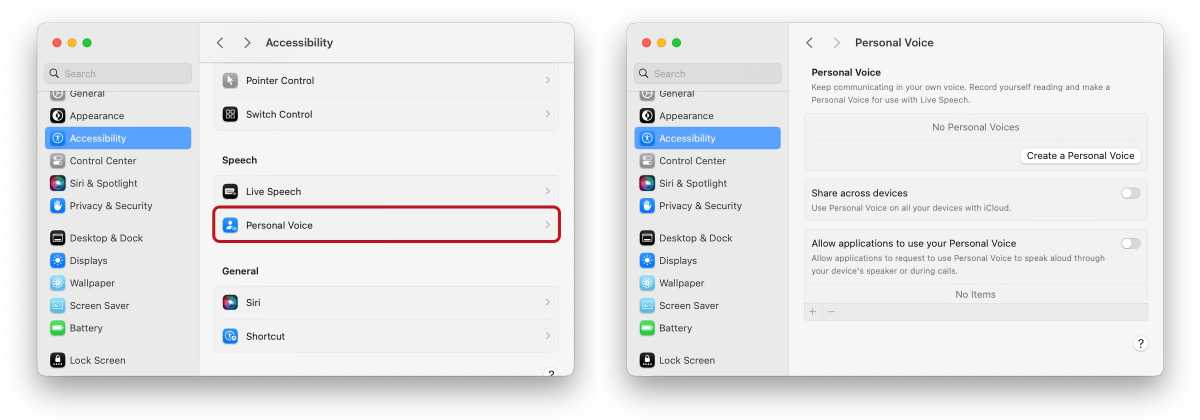
In System Settings, click on Accessibility in the left column. In the main section of the window, scroll down to the Speech section and click Personal Voice.
This will open the Personal Voice section. Click Create a Personal Voice.
Get ready to record
Foundry
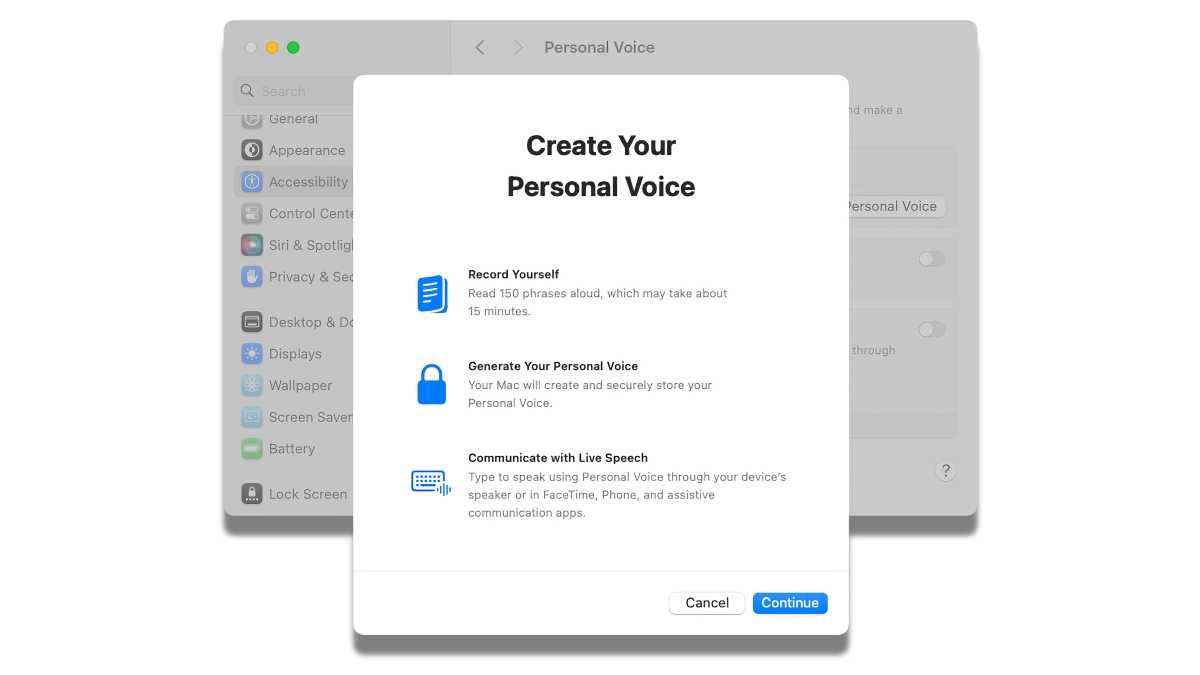
After entering the user password, an introduction appears. It tells you that you’ll need to recite 150 phrases that will be used to create the Personal Voice. This voice can then be used in FaceTime, Phone, and other apps. The process takes 15 to 20 minutes. Click Continue.
Another intro screen appears, advising you on how to get the best results. You should perform the recordings in a quiet place that creates very little echo, and you should speak naturally. If you need to, you can stop the session, save the results, and finish it later. Click Continue again to start.
Recording check
Foundry
Before you begin recording, you need to provide a name for the voice. Enter it and click Continue.
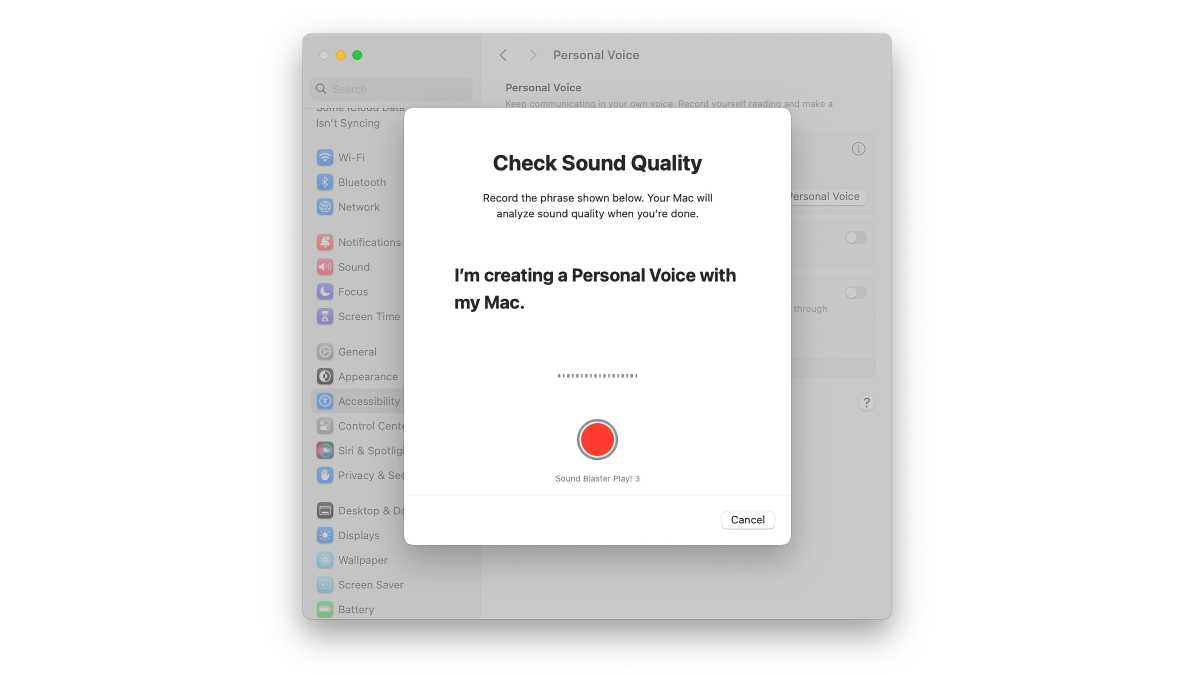
Now the Mac will check the sound quality. At the bottom of the window is a red record button and a label that indicates which mic it is recording from. If it is not the mic you want, you’ll need to cancel the session and then go into the Sound System Settings and select the mic you want to use. Then you need to go back to the first step and start over.
If the red button shows the correct mic, you may proceed. Click the red circle and read the bold phrase. Remember, speak as you normally would in a conversation. When you are done, the process will automatically sense that you are finished talking and proceed to the next step.
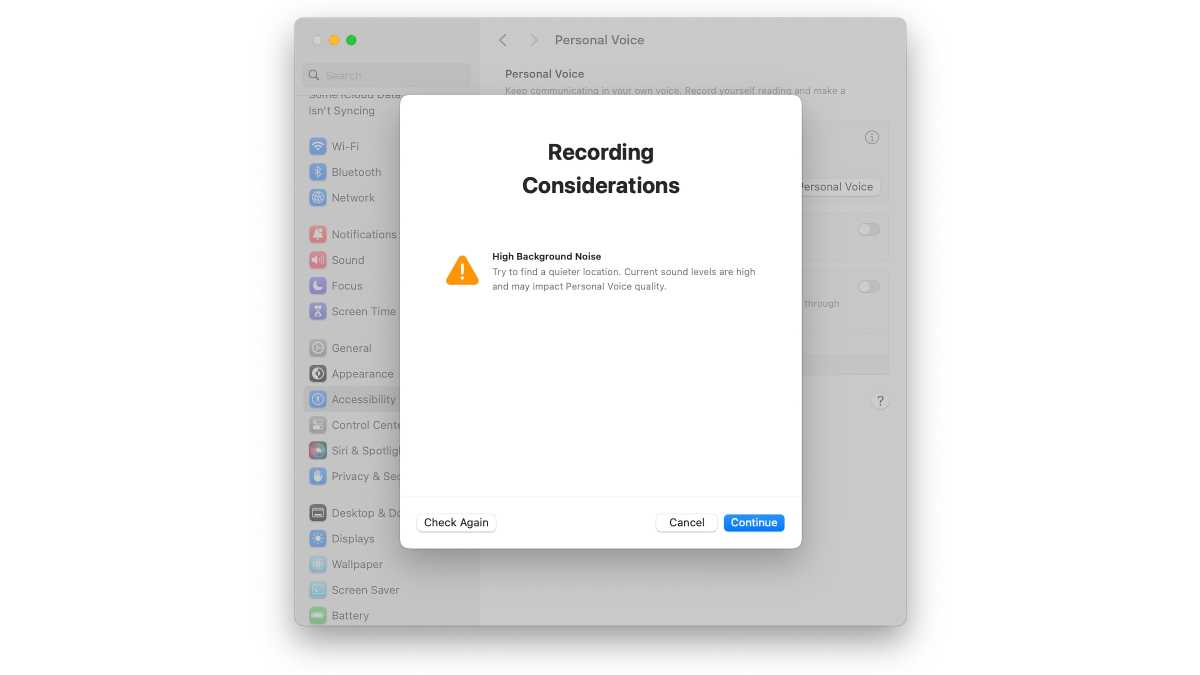
Recording Considerations
Foundry
When you finish the initial recording, the Mac analyzes it and will let you know if there are any issues. For example, the analysis shown here says that there is too much background noise. You can take this opportunity to address any issues you may have and then click Check Again to do another test.
You can also ignore these suggestions and plow ahead. Or maybe you got the all-clear in the first place. In any case, click Continue to start the procedure.
Do this before recording the first phrase
Foundry
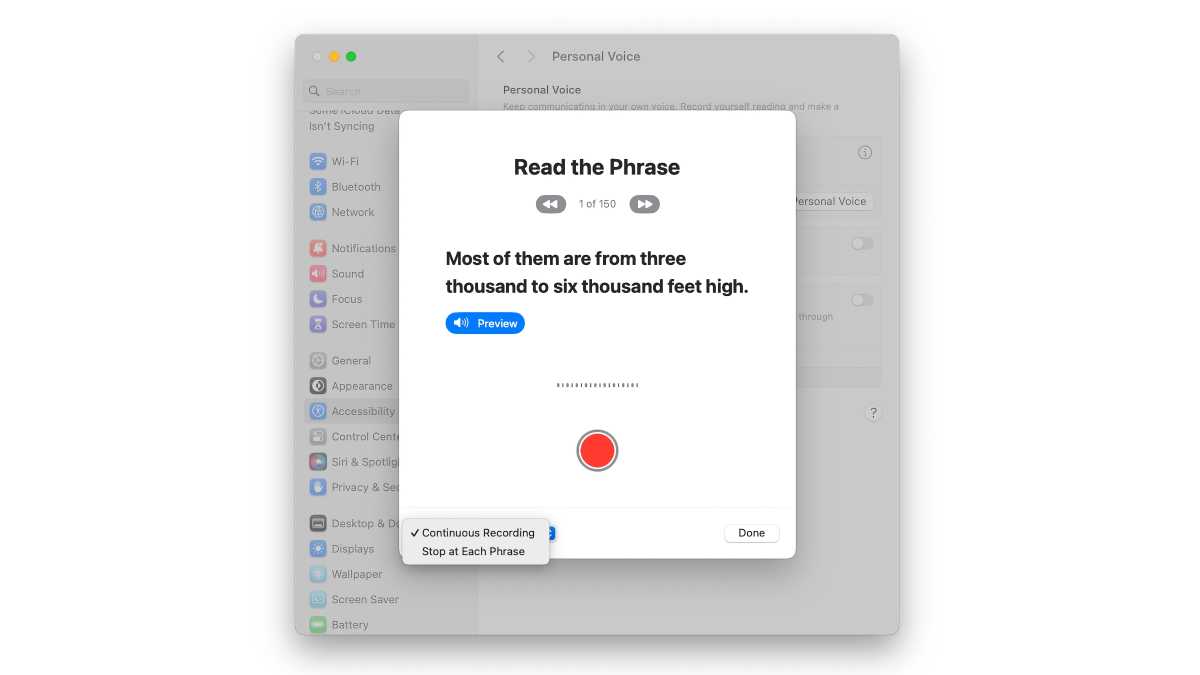
The first Read the Phrase screen appears, but don’t click the red record button just yet. There are a few things you should know:
- Under Read the Phrase is an indicator of your progress. If you want to go back to a previous phrase, click the left button. Click the right button to move forward in the list.
- At any time you can click Done, even if you haven’t read all 150 phrases. Your place in line will be saved and you can come back and continue the process.
- The blue Preview button will have the Mac read the phrase to you, in case you have trouble reading. You can then click the red button and repeat what you heard.
- A setting in the lower left corner gives you two options that you can set at any time:
- Continuous Recording: After saying each phrase, the next one automatically appears and you don’t need to press the record button at all.
- Stop at Each Phrase: After saying each phrase, the next one automatically appears, but you must click the record button.
Now that you know what’s going on with the UI, make any adjustments you want.
Start recording the phrases
Foundry
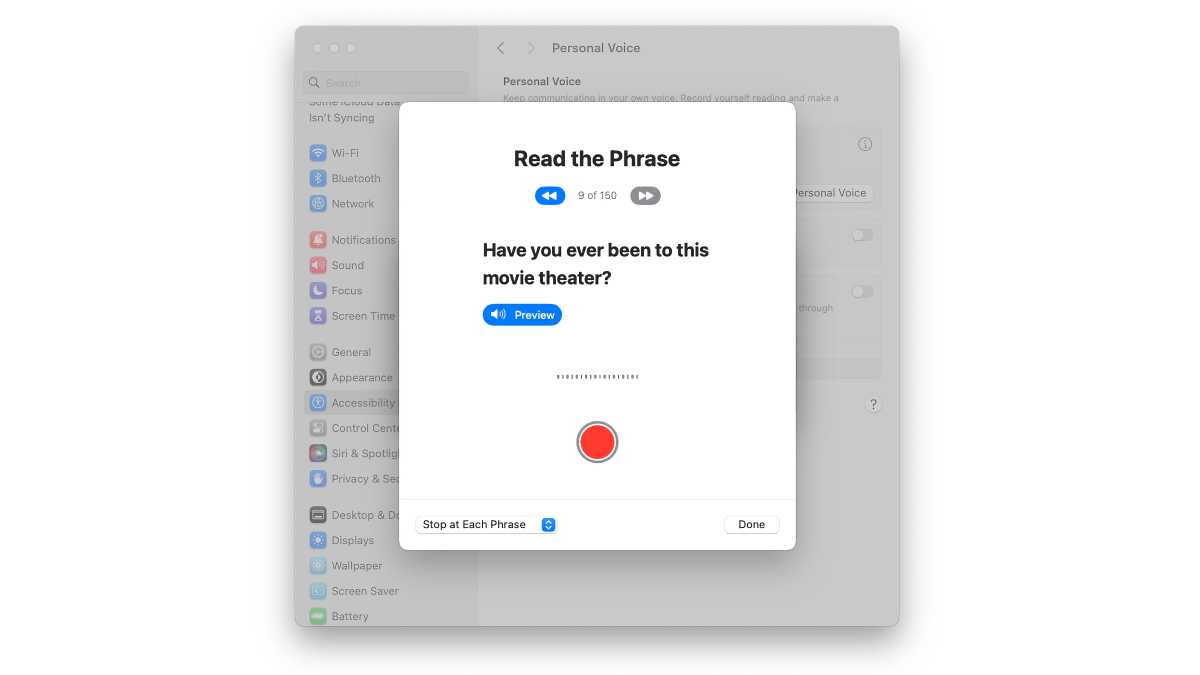
Click the record button to start the process. This will take 15 to 20 minutes.
Tip: If you are reading a phrase, mess up, and want to start over, click the record button to stop. When you’re ready, click the record button and continue recording.
How to pause and then restart later
Foundry
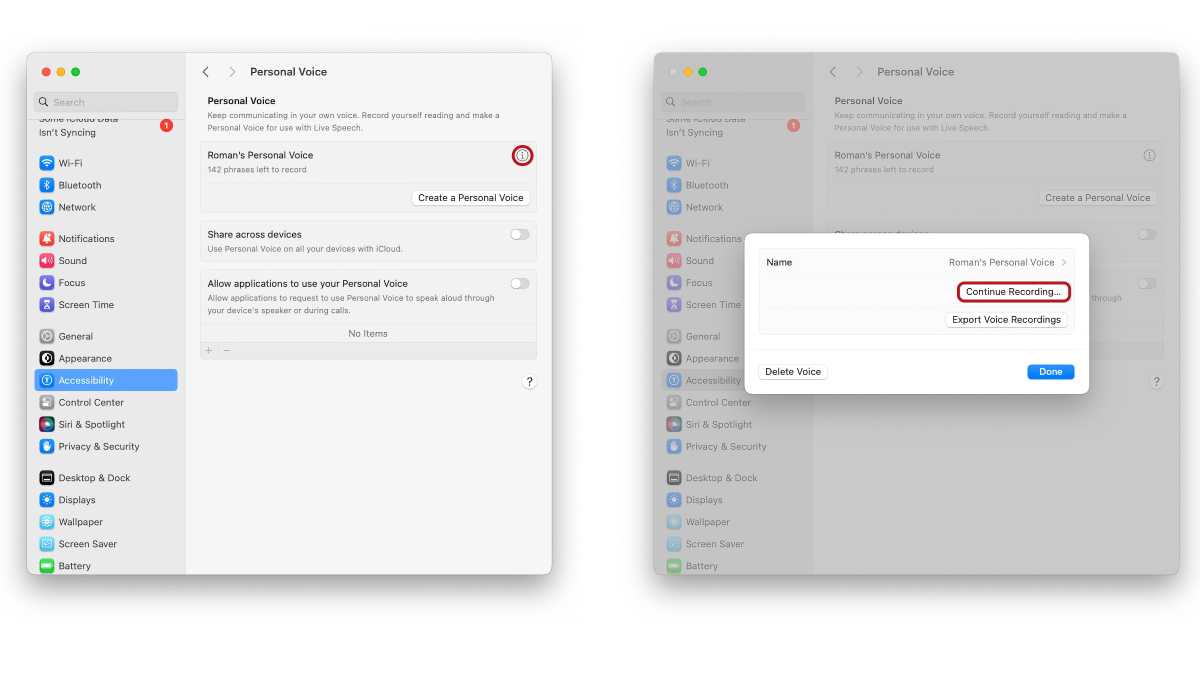
Maybe you need a break or have to go do something else. To stop the session, click Done to exit. To restart the session, follow these steps:
- Go into System Settings > Accessibility, look for the Speech section, and click Personal Voice.
- Under the Personal Voice section you’ll see an entry with the name of your personal voice and underneath it is the number of phrases you need to record. Click the “i” icon next to it.
- Enter your user password in the pop-up that appears.
- A window appears with a Continue Recording button. Click it.
You’ll need to do the sound quality check again, but after that, the phrase recording will proceed and you can continue the process.
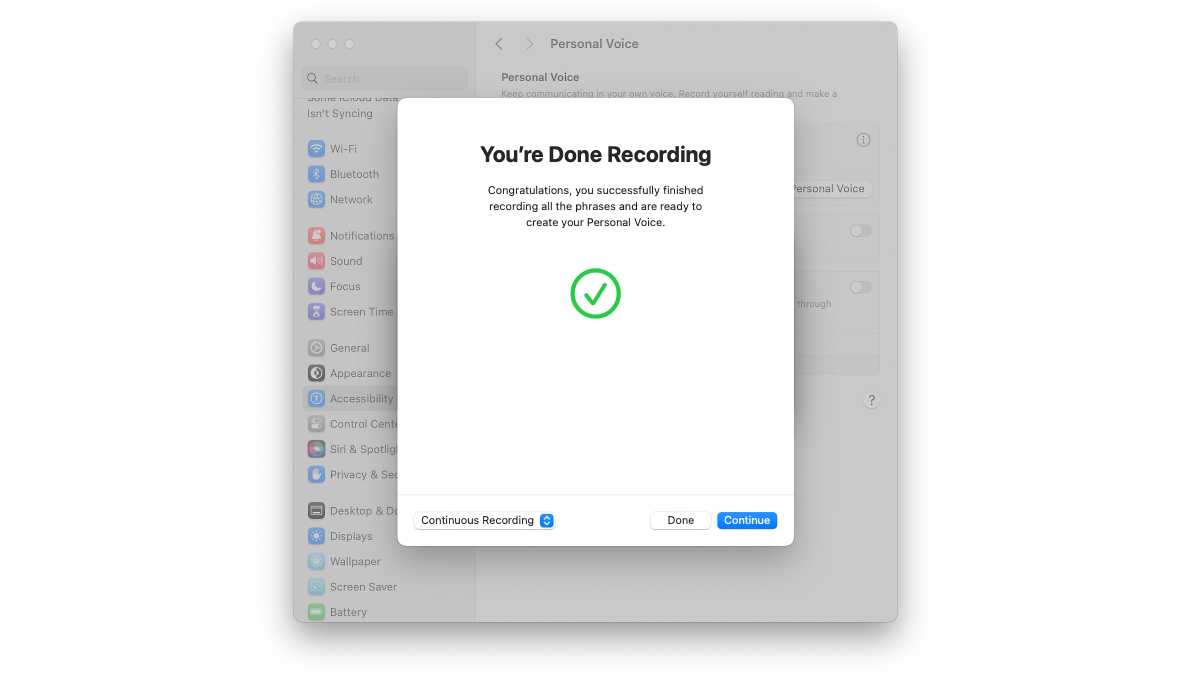
You’re Done Recording
Foundry
After you say the 150th phrase, you’ll reach the end of the session. A You’re Done Recording window appears and after you’re done patting yourself on the back, click Continue.
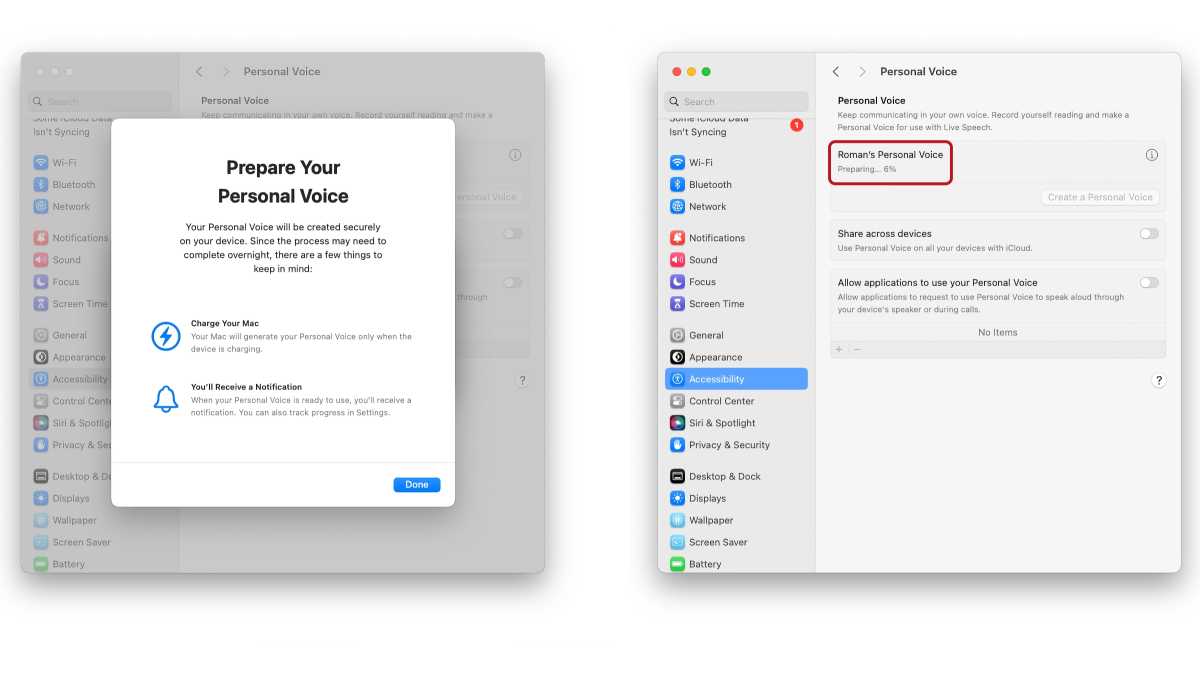
Prepare Your Personal Voice
Foundry
Now your Mac needs to get to work–and it’s going to take a while, so if you’re using a MacBook, plug it in. You’ll get a notification when the Personal Voice is done and ready to use. On a M1 Pro MacBook Pro, this took about 90 minutes.
Click Done to start the process. The Personal Voice section in the Accessibility System Setting will display the progress made on making your voice. You can use your Mac for other work while this is going on, but you shouldn’t shut it down. When the process is done, the progress notification will be replaced by the creation date.
The Personal Voice System Setting has a couple of other preferences to set:
- Share across devices: This allows your Personal Voice to be used on other Macs running macOS Sonoma, iPhones with iOS 17, and iPads with iPadOS 17. Turn this one if you’d like to do that.
- Allow applications to use your Personal Voice: Turning this on allows applications to request to use Personal Voice to speak aloud through the Mac’s speakers or during calls.
Adjust the Live Speech System Setting
Foundry
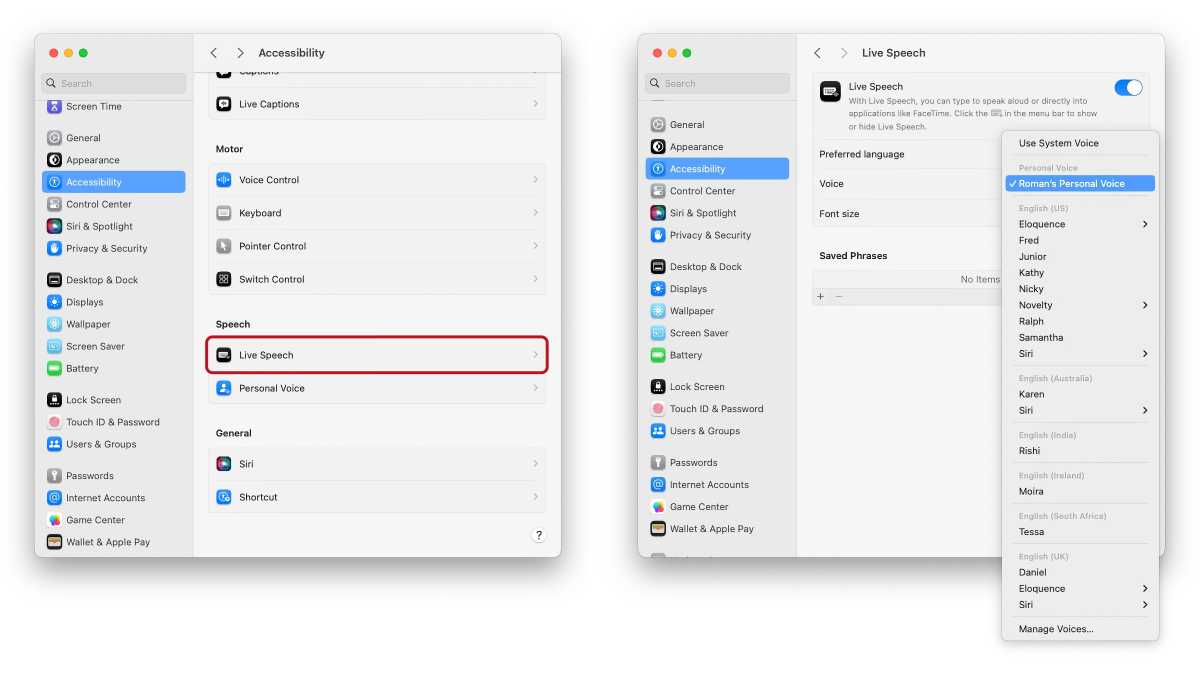
Now that your Personal Voice has been created, you need to adjust the Mac’s settings so you can use it in apps. This is done in the Live Speech setting,
- Go to System Settings > Accessibility, then scroll down to the Speech section and click on Live Speech.
- In the Voice setting, click the pop-up menu. Look for your Personal Voice and select it.
- Turn on the switch at the top for Live Speech.
A Type to Speak box will appear, and you can enter some text and hit Return to sample your Personal Voice. If you want to hide the box, click the menu bar icon that looks like the Live Speech icon (a keyboard with a microphone in the lower right corner).
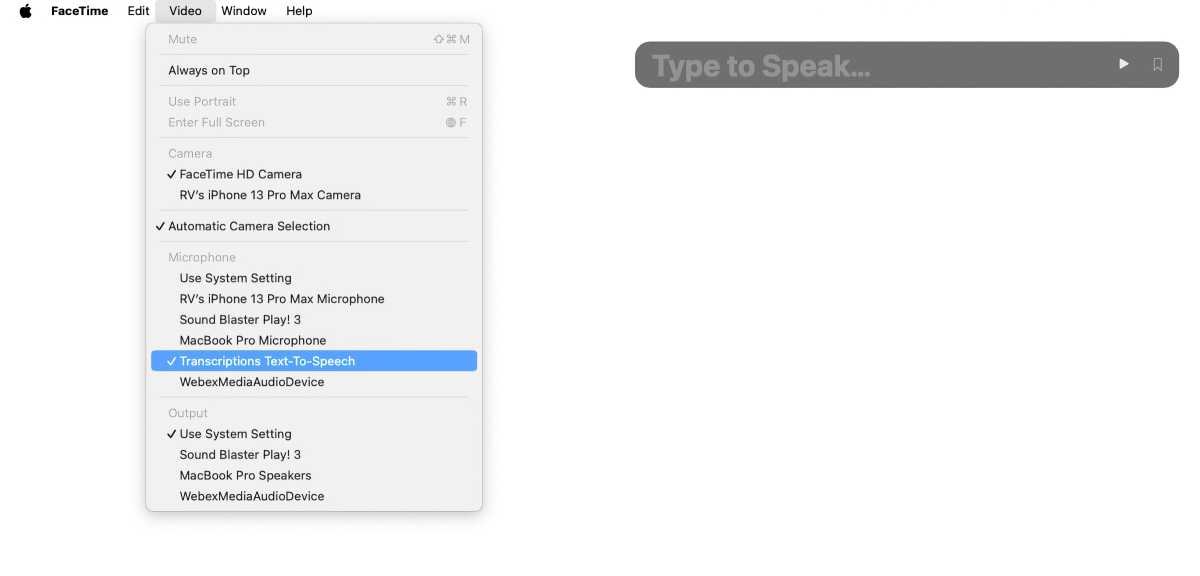
How to use Text to Speech in FaceTime, macOS
Foundry
If you want to use text-to-speech input in FaceTime, go to the Video menu in the FaceTime app, and select Transcriptions Text-To-Speech under the Microphone section.
If you want to set macOS to use Text to Speech for the Mac, go to System Settings > Sound, then scroll down to the Output & Input section and click on Input. Click on Transcriptions Text-To-Speech.
That’s it! You should be able to use your Personal Voice in text-to-speech situations. If you don’t like how the Personal Voice sounds, you can delete it and do the procedure again. You even add another Personal Voice by doing the procedure again.

