A diary can be a great and invaluable record of your life, but who has time for that? Well, now you do: Apple’s new iPhone Journal app makes keeping a diary a breeze. Really, it couldn’t be any easier.
The new Apple Journal app released in iOS 17.2 lets you build a record of your life into a multimedia digital diary. Your iPhone will pull together details from your photos, locations and events to give you prompts for memories worth writing about.
Here’s the nitty gritty on using the new Journal app.
How to start journaling with the new iPhone Journal app
To get the new Journal app, you’ll need to update to iOS 17.2, if you haven’t already. After you update to iOS 17.2, you’ll see the new Journal app on your Home Screen. To start the update, head over to Settings > General > Software Update. It’s compatible with iPhone XS, XR, SE (second generation), 11 and all newer models.
Note: Journal is not yet available for iPad or Mac.
Table of Contents:
- How to start using Journal
- Pick a prompt to start a Journal entry
- Create a Journal entry
- Edit or delete a Journal entry
- Turn on notifications and Face ID
- Filter your entries
- Journal vs. mental health tracking
1. How to start using Journal

Screenshot: D. Griffin Jones/Cult of Mac
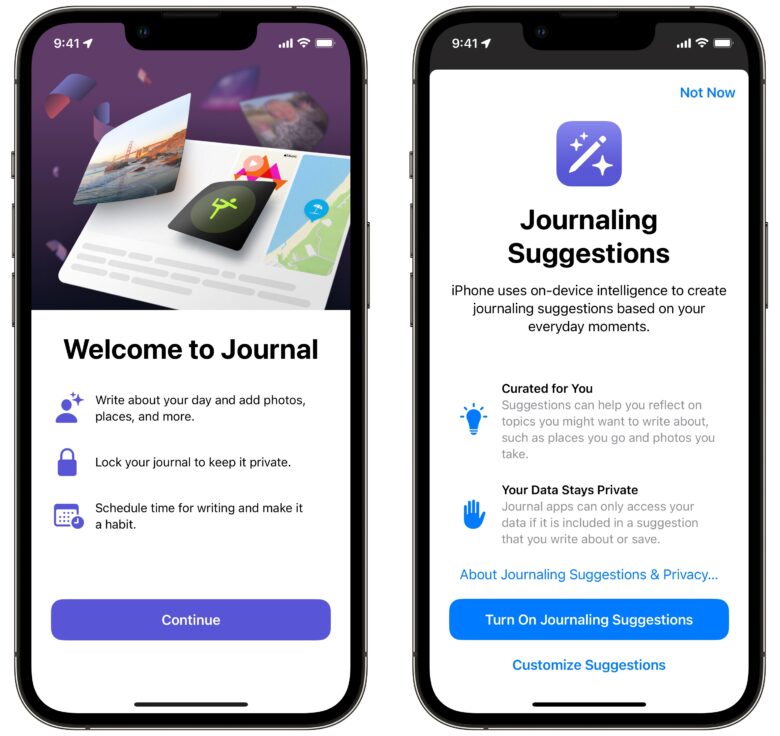
Open the Journal app to get started. You’ll see just one screen explaining how it works.
You can write about anything and everything — what you got up to, the places you went, the photos you took, how you felt. Your journal can be locked by Face ID and/or your iPhone’s passcode, so only you have access. You can also optionally turn on notifications to remind you to write. This is a good idea if you want to keep it up. Once you establish the habit, keeping it up is easy.
After you hit the + for the first time, you’ll see a pop-up recommending you turn on Journaling suggestions. If you allow this, the app will suggest activities you’ve recently done, people you’ve connected with, highlights from Photo Memories and prompts for journaling ideas, like taking a photo of an object that makes you feel nostalgic.
This also gives the app permission to be able to look through your photo library, events and on-device location history to piece together what it thinks would make for great journal entries. As with many iPhone features, this happens in a privacy-first manner; Apple itself doesn’t need to see your data or personal life for this feature to work.
Tap Allow to turn on suggestions.
2. Pick a prompt to start a Journal entry

Screenshot: D. Griffin Jones/Cult of Mac
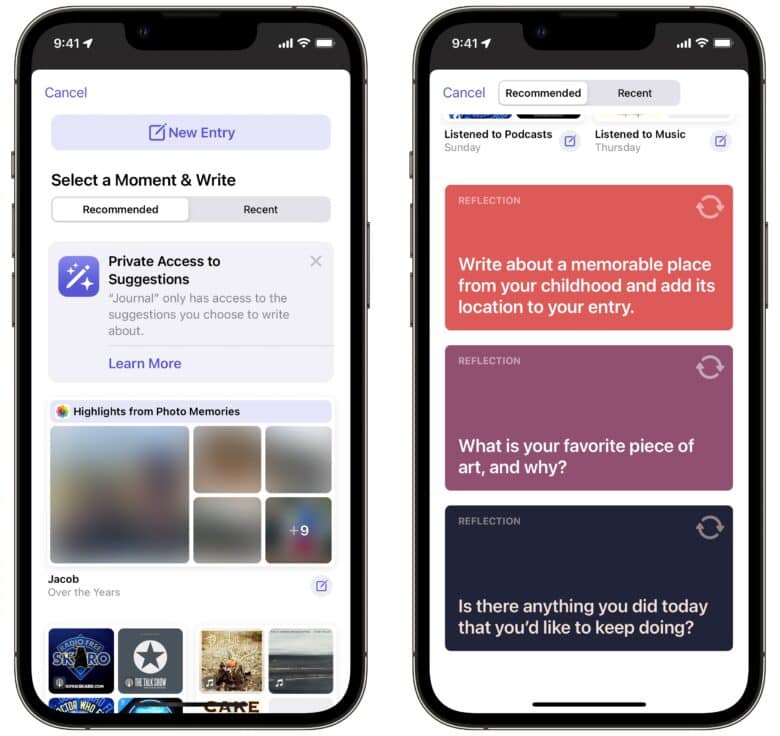
Tap the + button to create a new entry. Tap New Entry to start one, or scroll through the list of recommendations.
The best recommendations come from your photo library — fun events you have pictures of, that you can add to by writing about the experience. Maybe you have a set of nice pictures of the beach, and in your journal entry, you can write about the cool breeze and fun you had in the water. You may have pictures from a scenic view, and in your journal entry you can write about the hike you took to get there.
Tap on the Compose button underneath a set of pictures to write about that event.
Some suggestions offer you personal questions — your favorite piece of art, a childhood memory, something you did today. Tap on any of these to get started.
Maps will suggest points of interest (restaurants, stores, museums) that you’ve visited. However, these can be somewhat bizarre. For example, it suggests my visit last Wednesday evening to the grocery store. If I actually had a memorable experience at Meijer, I’d probably have snapped a few pictures of it.
Others are pulled from your listening habits in the Music and Podcasts apps. These I don’t find very helpful. I don’t forsee myself years in the future fondly reflecting upon episode 622 of The CultCast, nor do I have anything new to say about Adele’s latest album after I’ve listened to it for the hundredth time. But your mileage may vary.
3. Create a new Journal entry

Screenshot: D. Griffin Jones/Cult of Mac
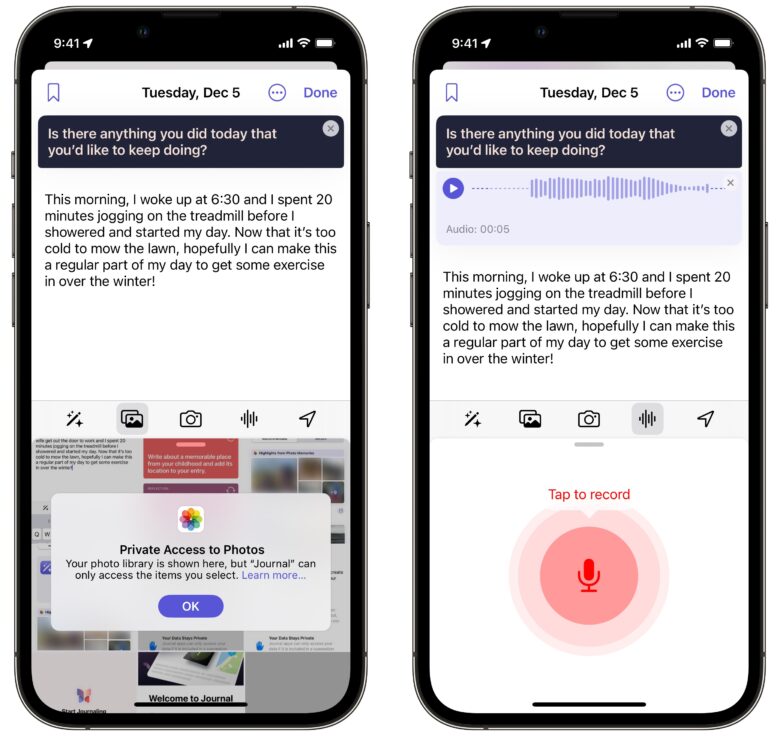
Start writing to create an entry. Entries can be as long as you want, but without any formatting options for section headers or even bold text (as in Notes), you probably won’t want to write more than a paragraph or two.
Above the keyboard, you have options to add media to a note. From left to right:
- The Suggestions button brings up the list of suggestions from before.
- The Photos button lets you pick from your photo library.
- The Camera button takes a picture without saving it to your photo library.
- The Voice Memo button lets you record a brief audio message.
- The Location button lets you search for a point of interest using Apple Maps. You’ll build up a list of frequently used locations over time.
In the upper toolbar, there are two more buttons. You can bookmark an important entry to find it easier later. Tap ⋯ to edit the date — the time you’re writing the entry, the time of the event itself or a custom date. (You can always edit this later.)
4. Edit or delete a Journal entry

Screenshot: D. Griffin Jones/Cult of Mac
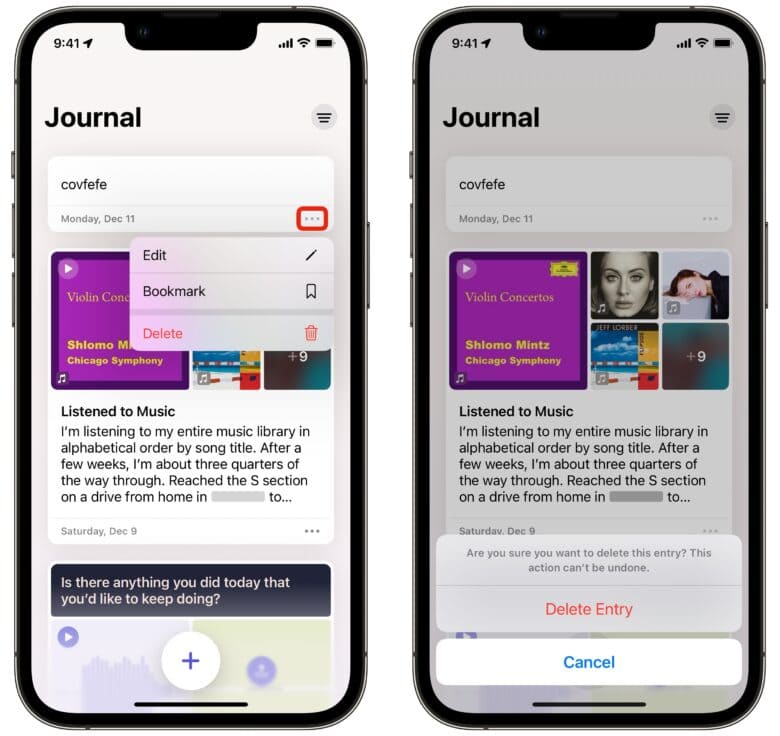
From the main screen, tap the ⋯ in the bottom right of an entry and tap Edit or Delete.
Editing an entry will bring up the full composition screen with all the features as before; you can add photos, a voice memo, location and more. You might want to go back and add pictures to an entry if you get new ones later, or edit the date/time if you got it wrong the first time.
Deleting an entry is instant and permanent; there’s no “Recently Deleted” folder like there is in Photos and Notes.
5. Turn on notifications and Face ID
The second and third time you open the Apple Journal app, you’ll be prompted to turn on additional features.
Setting up a schedule is a good way to remember to log the things happening in your life. If you tap through Continue and Allow, it’ll bring you to Settings, where by default it will set up a schedule at 8 PM every Sunday, Tuesday and Thursday. If you don’t live a particularly exciting life, like yours truly, pare it down to once a week on Tuesday. If you get too many notifications, you’ll just train yourself to ignore them, and that defeats the purpose.
Locking your journal with Face ID (or Touch ID on older iPhones) will give an extra layer of protection. Maybe there’s a mischievous someone who spies on your phone left unlocked on a table — they won’t be able to pilfer through your precious memories. I recommend turning it on if that concerns you.
6. Filter your entries
If you build up a lot of Journal entries, you have a few options for filtering them in the timeline. Tap the Filter button in the top right to filter bookmarked entries, entries with photos, audio, music, reflections and places.
The Journal app is new to everyone, so you aren’t bound to have a lot of entries yet. In the future, I can imagine Apple will add a smart search feature.
Journal vs. mental health tracking
I think it’s important to differentiate the new Apple Journal app from the new iOS 17 feature in Health that lets you log your feelings. It’s easy to confuse the two — in a broad sense, they’re two features centered around your phone asking you about your day. The former is for building a personal diary; the latter is for tracking your feelings and seeing how they’re affected by things like sleep and exercise.
I’m not a journaler, but I can see the Journal app being a very useful if you’re the right kind of person. I would never make a physical scrapbook, but Journal is kind of like its digital equivalent. All your photos are in your photo library, but here, you can pick out a select few and write about a vacation or a nice day out. Looking back, you’ll probably be very glad you recorded your day-to-day.


