Check In is a new iOS 17 feature that tracks your travels and lets contacts know when you’ve safely reached your destination. It’s great for traveling, or kids going to and from school, or even going on a date. You no longer have to count on remembering to text someone when you make it home safely — your iPhone will let them know for you.
Check In is like sharing your ETA in Apple Maps, but tweaked for personal safety. Friends, family and loved ones will be automatically notified if you’re stopped for any reason before reaching your destination. It also has timer-based check ins, which come in handy for situations like meeting a stranger from Craigslist. If you don’t check in after a set time, your contacts will be alerted.
Here’s how to use it — frankly, every parent should know how this works.
How to use iOS 17’s new Check In feature
Similar to sharing your ETA in Apple Maps, Check In will notify the recipients if you get lost, kidnapped or simply have a car breakdown. If you deviate or stop making progress on a trip, you have fifteen minutes to respond to a notification to confirm you’re all right.
If you don’t respond, they’ll be notified of your current location, the route you went on, and in case they want to contact you: your iPhone’s battery level and cell connectivity.
Check In is a built-in feature of iOS 17, which you and the recipient need to have for this feature to work. If you bought a new iPhone 15, you’ve got it already. Otherwise, head over to Settings > General > Software Update to get it. Upgrading may take about 20 minutes after downloading, so make sure you don’t start it at a bad time.
Table of Contents:
- Start Check In from Messages
- Choose what details to share
- Edit and send the message to start Check In
1. Start Check In from Messages

Screenshot: D. Griffin Jones/Cult of Mac
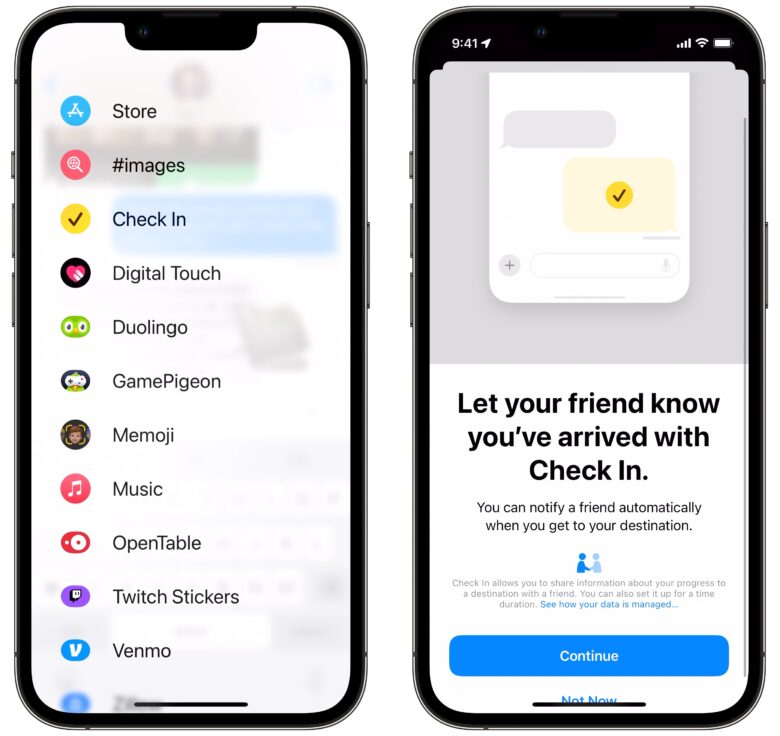
Check In a new feature in the Messages app. In Messages, tap the + menu to the left to open the app list. Swipe to scroll down and tap Check In. Tap Continue to get started.
There are two ways to check in. A location-based check in is ideal if you have directions running in Apple Maps, as it uses your location to track your progress as described above.
You can also set a timer-based check in if you’re doing something potentially risky, like meeting a stranger to sell something on Facebook Marketplace, climbing a cliff or going to a seedy bar.
Tap Continue to read through the explanatory screens.
2. Choose what details to share

Screenshot: D. Griffin Jones/Cult of Mac
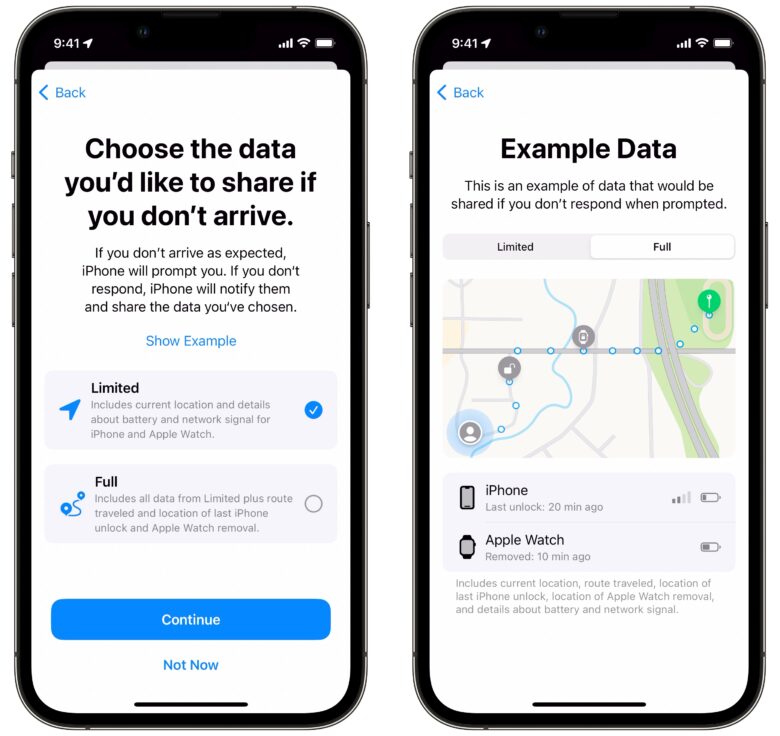
If you don’t respond on time to a check in notification, the recipient will be notified you failed to check in. You can choose to show them your current location (Limited) or the entire path you took (Full).
Limited will preserve your privacy better, but if you enter a potentially dangerous situation, it may be easier to find you if you share the Full data.
Tap Send a Check In to create the invitation.
3. Edit and send the message to start Check In

Screenshot: D. Griffin Jones/Cult of Mac
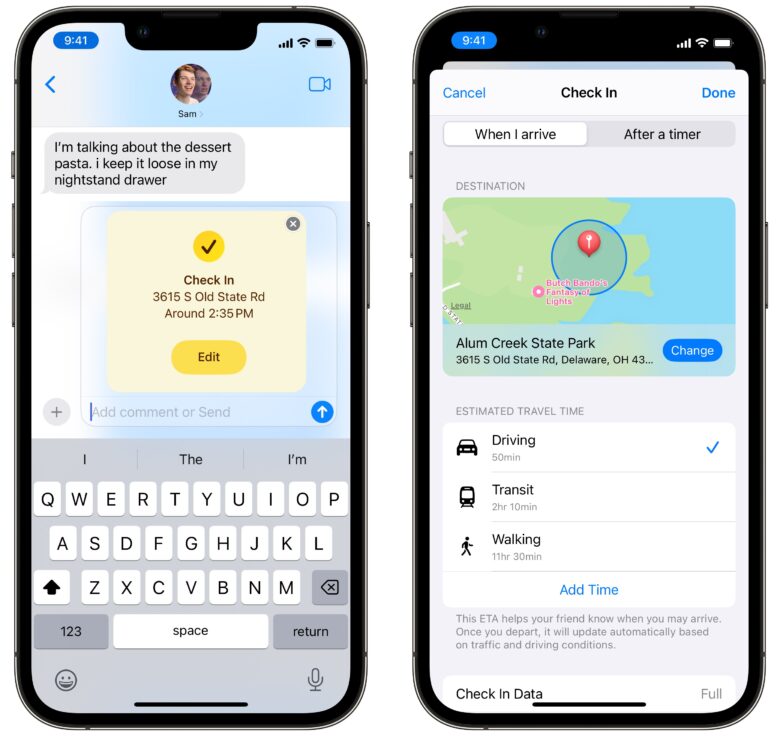
Before you send the message, you’ll see a preview in the message compose window. You can tap Edit to make changes.
If you’re sending a location-based check in (the “When I arrive” tab), you can change the destination, edit which mode of transportation you’re taking or add additional time to the journey if you plan on stopping along the way.
For a timed check in (the “After a timer” tab) you can adjust the length of the timer.
Tap Done to save changes and send the iMessage to start sharing.
A better way to stay in touch
Check In might seem at first glance to be redundant to sharing an ETA in Maps, but Apple has really gone above and beyond, extending this feature with a bunch of handy new information that might be critical if you or a loved one get lost.
See our master list of other great iOS 17 features here.


