One of the benefits of investing in Apple’s ecosystem is the easy interoperability between devices. That interoperability is showcased in the Apple Vision Pro with its Mac Virtual Display feature, which allows the headset to function as a 100-foot display for your Mac.
Why would you even bother with Mac Virtual Display? For one, it’s a much bigger display than anything Apple sells. For another, you can use Vision Pro apps alongside the Mac Virtual Display for greater multitasking. (For example, you could play a video on Vision Pro while working on the Mac Virtual Display.) And finally, since the Mac’s display goes blank, you–and only you–see your Mac desktop in the Vision Pro, so it’s a way to create a private display.
Here’s how to set up a Mac Virtual Display on Vision Pro and what you need to know to run it properly.
What’s required to use Vision Pro Mac Virtual Display?
- A Mac running macOS Sonoma or later
- Vision Pro
- A single Apple ID with two-factor authentication on running on both
- Wi-Fi and Bluetooth turned on
Apple says the Mac Virtual Display works with Intel Macs, but Apple doesn’t specifically say which Intel processors will work. (We won’t be surprised if the Intel Macs compatibility list for Universal Control is the same for Mac Virtual Display.) Also, the Intel Macs that do work are limited to a maximum of 3K resolution, while Apple silicon Macs support 4K resolution.
What happens to the Mac display when running Mac Virtual Display on Vision Pro?
When Mac Virtual Display is running, the Mac’s display goes blank, and the desktop appears in a resizable window in visionOS. However, the feature works with only the main display of your Mac–if you have a multi-display setup, you won’t see the others in the Vision Pro.
To adjust the resolution of the Mac Virtual Display, you go to the Displays System Settings on the Mac.
How do you turn on Mac Virtual Display?
The Mac needs to be on with the display active. MacBooks can’t be closed and you can’t run a headless Mac mini or Mac Studio.
For a MacBook, here’s how to start Mac Virtual Display:
- Put on Apple Vision Pro and look at the MacBook.
- A Connect button should appear. Tap it and you’re set.
For a desktop Mac, do the following (these instructions also work with MacBooks):
- In the Apple Vision Pro, tap the “v” button at the top of the display.
- Tap the Control Center button. It looks like two switches.
- Tap the Mac Virtual Display button. It looks like a MacBook with a Vision Pro in the foreground.
- Look for your Mac in the list and select it.
When you are done using Mac Virtual Display, tap the close button at the bottom of the Mac window in visionOS.
How do you control your Mac when running Mac Virtual Display?
You use the Mac’s keyboard and mouse/trackpad to work on the Mac when it appears in Vision Pro. The Mac’s audio will play from the Mac, not through the Vision Pro speakers.
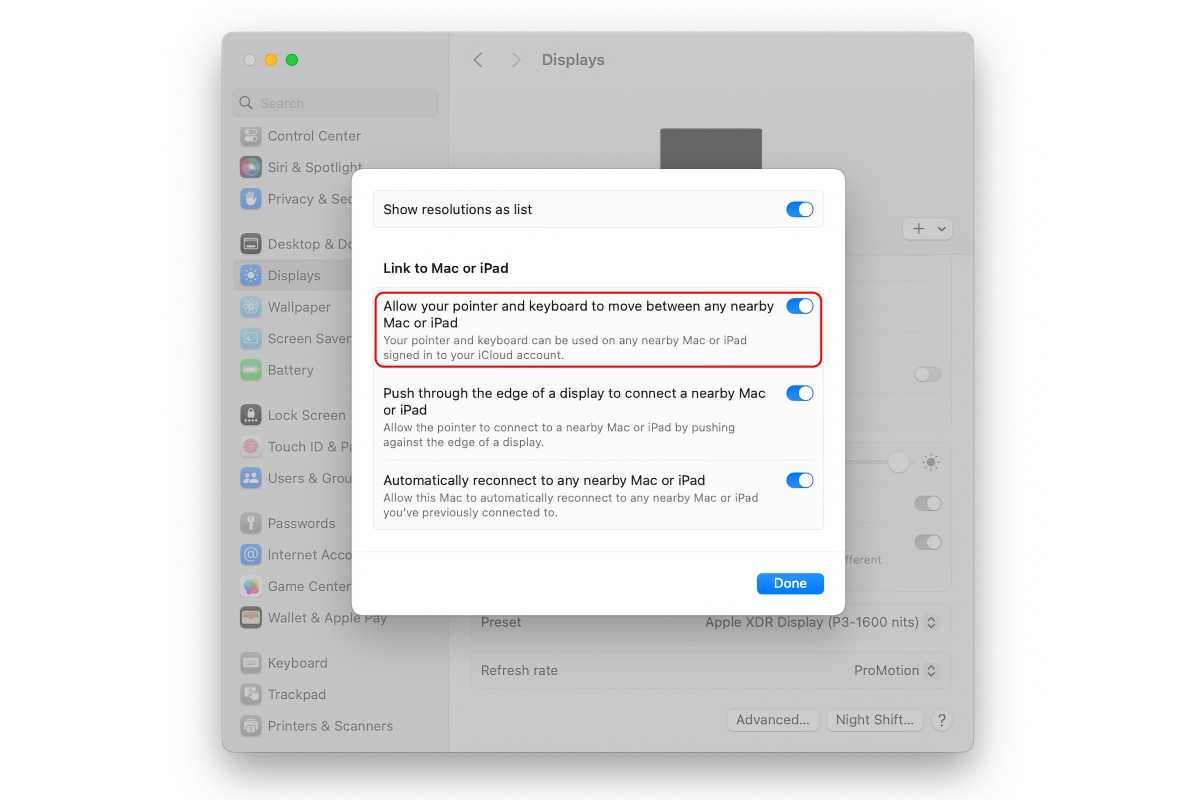
You can set up Mac Virtual Display so that the Mac input devices can be used for visionOS, too. This way, you don’t have to switch back and forth between keyboard/mouse/trackpad and gestures. Here’s how to set it up:
- In macOS, open the Displays System Settings.
- Scroll to the bottom of the main window and tap the Advanced button.
- Flip on the switch for “Allow your pointer and keyboard to move between any nearby Mac or iPad.”
- Close the settings.

Foundry
For more information, check out our Apple Vision Pro superguide.


