
Most of us store thousands of pictures and videos on our iPhones. There are multiple ways to make backups, but you might not realize that it’s easy to copy these onto an external drive straight from your iPhone — assuming you have the right software and adapter. It’s even easier from an iPad with a USB-C port.
Here’s how.
Back up your iPhone pics for safety
Apple provides multiple ways to back up the pics and vids on your iPhone. They can transfer to your Mac or Windows PC when you sync your handset, and/or go to iCloud if you pay for enough storage space. But you might also be interested in a third option: copying all these files directly from an iPhone to an external drive.
This lets you easily make interim backups on the fly. Suppose you’re on a once-in-a-lifetime vacation hiking through Yellowstone National Park. With the push of a button, you can copy all the pictures you take each day onto a flash drive so you lose the minimum amount if something disastrous happens to your iPhone.
You might also need to free up storage space on your iPhone while on a trip. If you find yourself in that situation, you can copy the images and videos to a drive, then delete them from your handset. The app I recommend can do that automatically.
Or you might be like me. An iPad is my primary computer, so what I’m about to describe is the easiest way for me to save all my pictures onto an SSD.
How to back up pictures from iPhone to external drive
Because iPhone uses Lightning, plugging in a standard external drive proves a bit of a challenge. You’ll need Apple’s Lightning to USB 3 Adapter ($39). This lets Apple’s handset access the contents of flash drives through the Files app.
I mentioned earlier that this process is easier if you have an iPad with a USB-C port. In that case, you can simply plug the SSD into the tablet. That might also be true with the upcoming iPhone 15, which is supposed to come a USB-C port instead of Lightning.
Once you have the hardware connected, check the Files app to be sure your drive shows up. If it isn’t there, something went wrong.
The app I use to easily transfer images and videos from an iPhone or iPad to an SSD or flash drive is OWC Copy That Mobile. The basic version is free. You can unlock additional features for $2.99. I recommend you pay that very modest amount.
Specify what types of files to back up
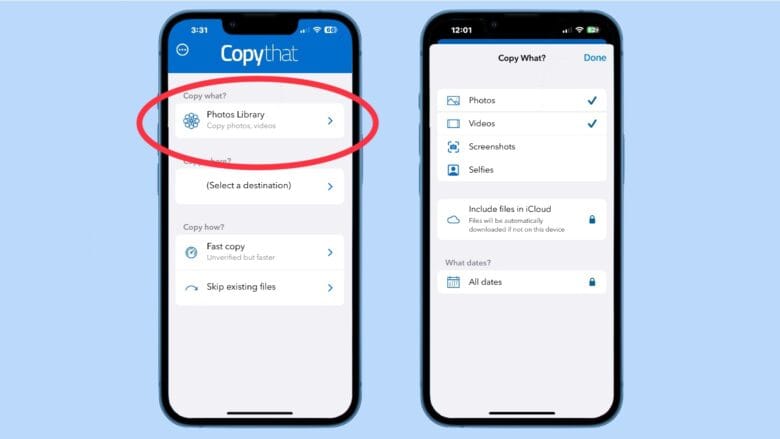
Image: Ed Hardy/Cult of Mac
On the app’s home page, tap on Photos Library. This will open a pop-up window with options for what types of files you want to copy. This can be Photos, Videos, Screenshots and Selfies. Tap to select or unselect the ones you choose.
Below that you will find an option to Include Files in iCloud. (Note: This is available only on the full, for-pay version of the app. If you stick with the free version, you won’t get your complete photo collection, just the ones on your iPhone right now.)
You also have the option to specify a date range to pull pictures and images from. (Again, this feature is only available in the for-pay version.)
When you’ve done the necessary configuration, tap on Done in the upper right-hand corner of the pop-up window.
Select where to save the photos and other files
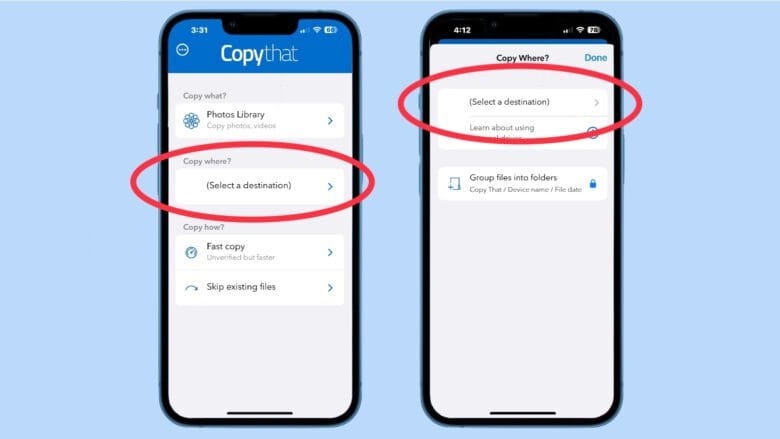
Image: Ed Hardy/Cult of Mac
On the main screen of OWC Copy That Mobile, tap on Select a destination. That will open a pop-up that lets you specify where to send the files. That requires that you click on another link labeled Select a destination.
On the resulting screen, tap on Browse at the lower-right corner to see a list of available drives. Find the drive you connected to your iPhone via the adapter I talked about earlier. Tap on its name, then hit the Open button in the upper-right corner of the display.
On this same pop-up, you have the option to Group files into folders… if you pay for the app.
Now hit the Done button to close this window.
Make a verified copy if your images are important
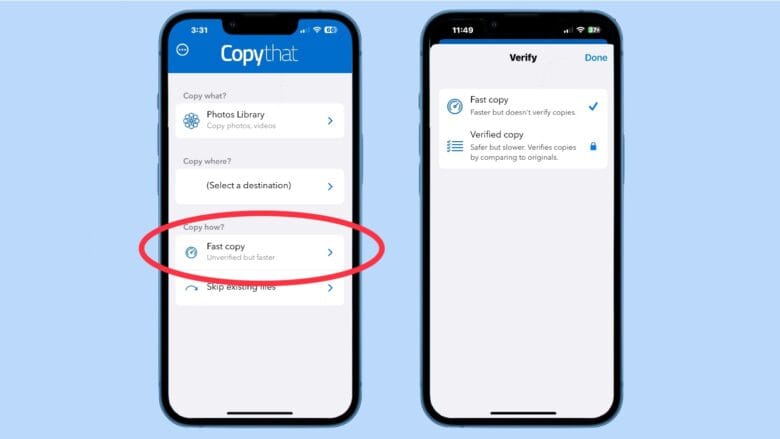
Image: Ed Hardy/Cult of Mac
Back on the home screen, tap on Fast copy. You’ll get another pop-up with the choice of Fast copy or Verified copy if you paid for OWC’s software. You should really choose the second option if you are moving around precious images.
This is a good opportunity for me to urge you once again to pay $3 to get valuable features. Seriously, we should all support developers who write quality software like this app.
Hit the Done button to close this window.
Deal with duplicates and finalize your file backup
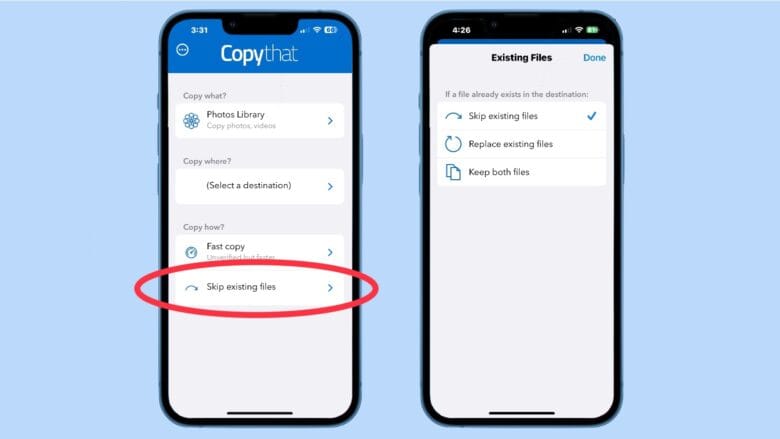
Image: Ed Hardy/Cult of Mac
Back on the home screen of OWC Copy That Mobile, tap on Skip existing files. That opens yet another pop-up, this one with the choice of copying over, ignoring or making duplicates of files from previous backups you’ve made onto this same drive.
Hit the Done button to return to the home screen.
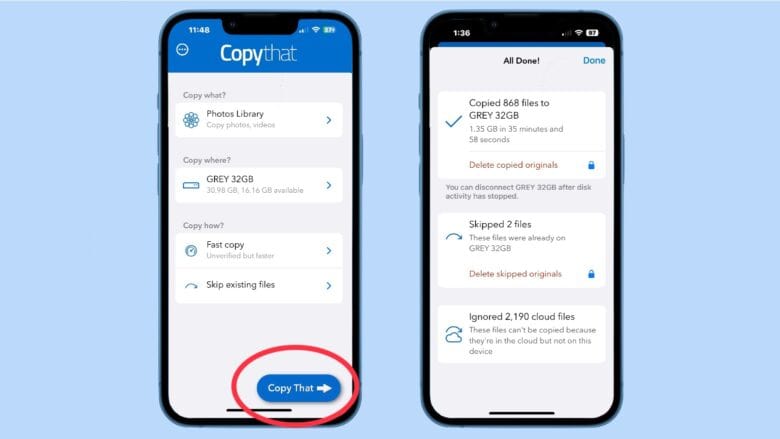
And you’re ready to go. Tap on the big, blue Copy That button at the bottom of the screen.
Now be patient. It’s possible you’re moving thousands of files — gigabytes of data — and the process could easily take a long time. Fortunately, OWC’s application keeps you constantly updated on what it’s doing so you won’t be left wondering if it’s locked up.
When the app is finished making a backup of pictures and videos from your iPhone or iPad, you have an external drive you can stick somewhere secure. Maybe even a safety deposit box or a fireproof safe.
See, I told you it would be easy, mostly thanks to OWC Copy That Mobile.


