Key Takeaways
- To repair and reset the Windows Security app, go to Settings > Apps > Installed Apps > Advanced Options > Repair (or Reset).
- Try uninstalling the latest Windows update by going to to Settings > Windows Update > Update History > Uninstall Updates > Uninstall.
- Repair the corrupt system files, scan for malware infections, or remove the third-party antivirus software installed on your device.
Experiencing issues with the Windows Security app? Is it not opening, displaying a black screen, or showing an error like “Windows Security Center service is turned off?” These problems can stem from a faulty Windows update, infection, and corrupted files. Here are a few ways to fix it.
1. Perform Some Preliminary Checks
To begin, perform some quick checks to rule out temporary issues. Close the unresponsive Windows Security app and restart your device. Then, uninstall recently installed software, downloaded files, or any recently added items. If the issue remains unresolved, check for any potential hijackers installed on your system.
Right-click on the Start button and open “Task Manager.” Identify any processes consuming significant system resources, right-click on each, and select “Properties.” Then, navigate to the “Digital Signatures” tab, double-click the signature information, and look at the “Name” field.
The process is likely genuine if the signature belongs to a well-known company, like Microsoft or Google. whose products you use. If the signer information is missing or associated with an unfamiliar company, you need to investigate further. So, right-click on the process and select “Open File Location.”
If the process is associated with an unfamiliar app you don’t recall installing, proceed to delete that app from your device. If you want to dig deeper, you can also search online for more information about the process and its authenticity.
2. Repair and Reset the Windows Security App
Repair and reset the Windows Security app. Repairing the app checks for potential corruption and often fixes broken apps. If the repair process remains unsuccessful, resetting the app is an option that clears all configurations and restores settings to default, effectively fixing critical issues.
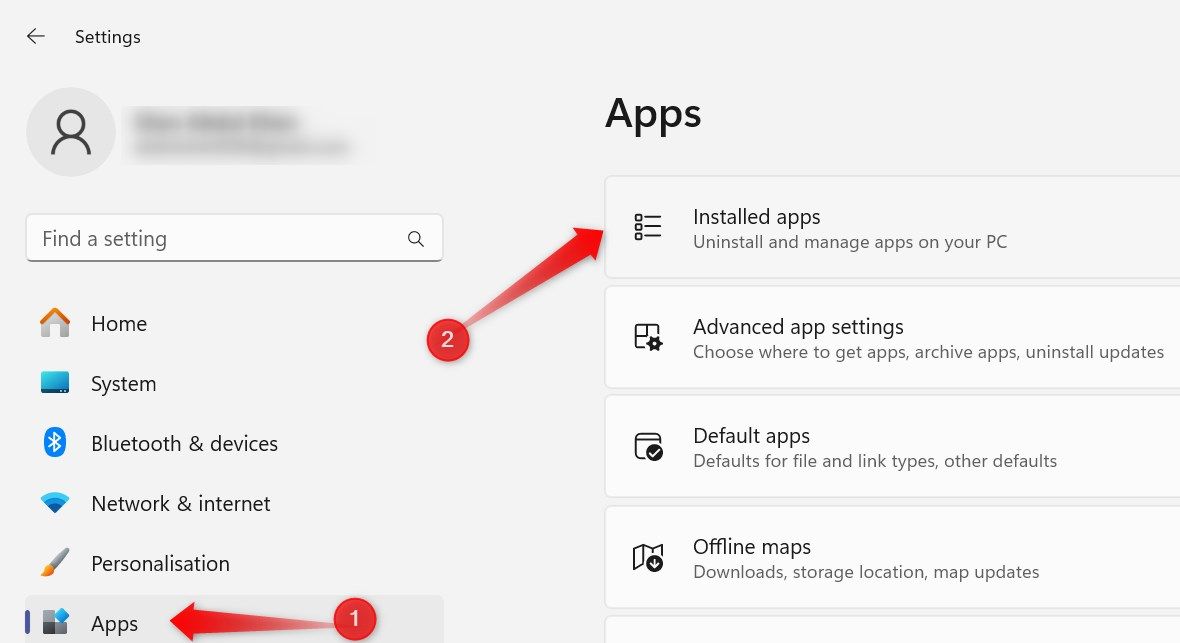
To repair or reset an app, right-click the Start button and open Settings. Then, navigate to the “Apps” tab on the left and go to “Installed Apps” in the right pane.
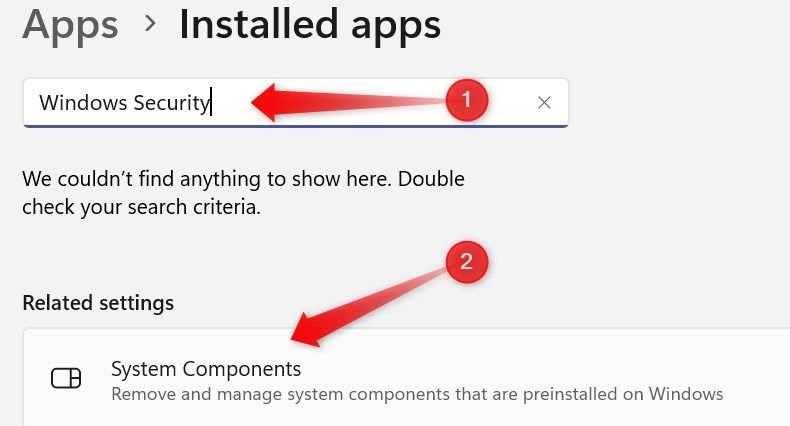
Type “Windows Security” in the search field. If the Windows Security app doesn’t appear in the search results, click “System Components” under “Related Settings.”
Click on the three horizontal dots next to “Windows Security” and select “Advanced Options.”
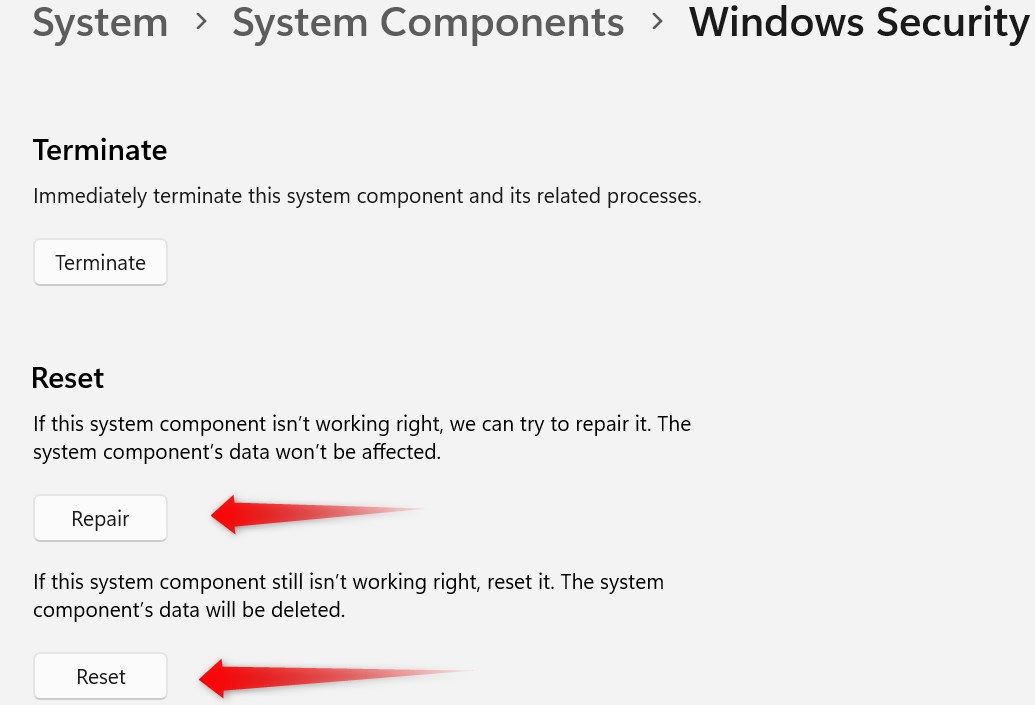
Scroll down and click on “Repair.” Allow the repair process to complete, close the Settings app, and reopen Windows Security. If the issue persists, return to the same settings page, click “Reset,” and then confirm by clicking “Reset” again in the popup.
3. Install the Latest Windows Update
Microsoft consistently releases updates to remedy existing bugs and issues in the operating system. Failure to install these updates on time can lead to problems with the operating system, particularly with default Windows apps like Windows Security. To eliminate this potential cause, check for available updates and reinstall them.
Right-click on the Start button and open “Settings.” Then, navigate to the “Windows Update” tab on the left. If your system is fully up-to-date, you’ll see a message stating, “You’re up to date.” You can also click the “Check for Updates” button to check for available updates.
Windows will then search for any available updates, download them, and proceed to install them.
In some cases, you may need to restart your device to install updates.
4. Delete the Recently Installed Windows Update
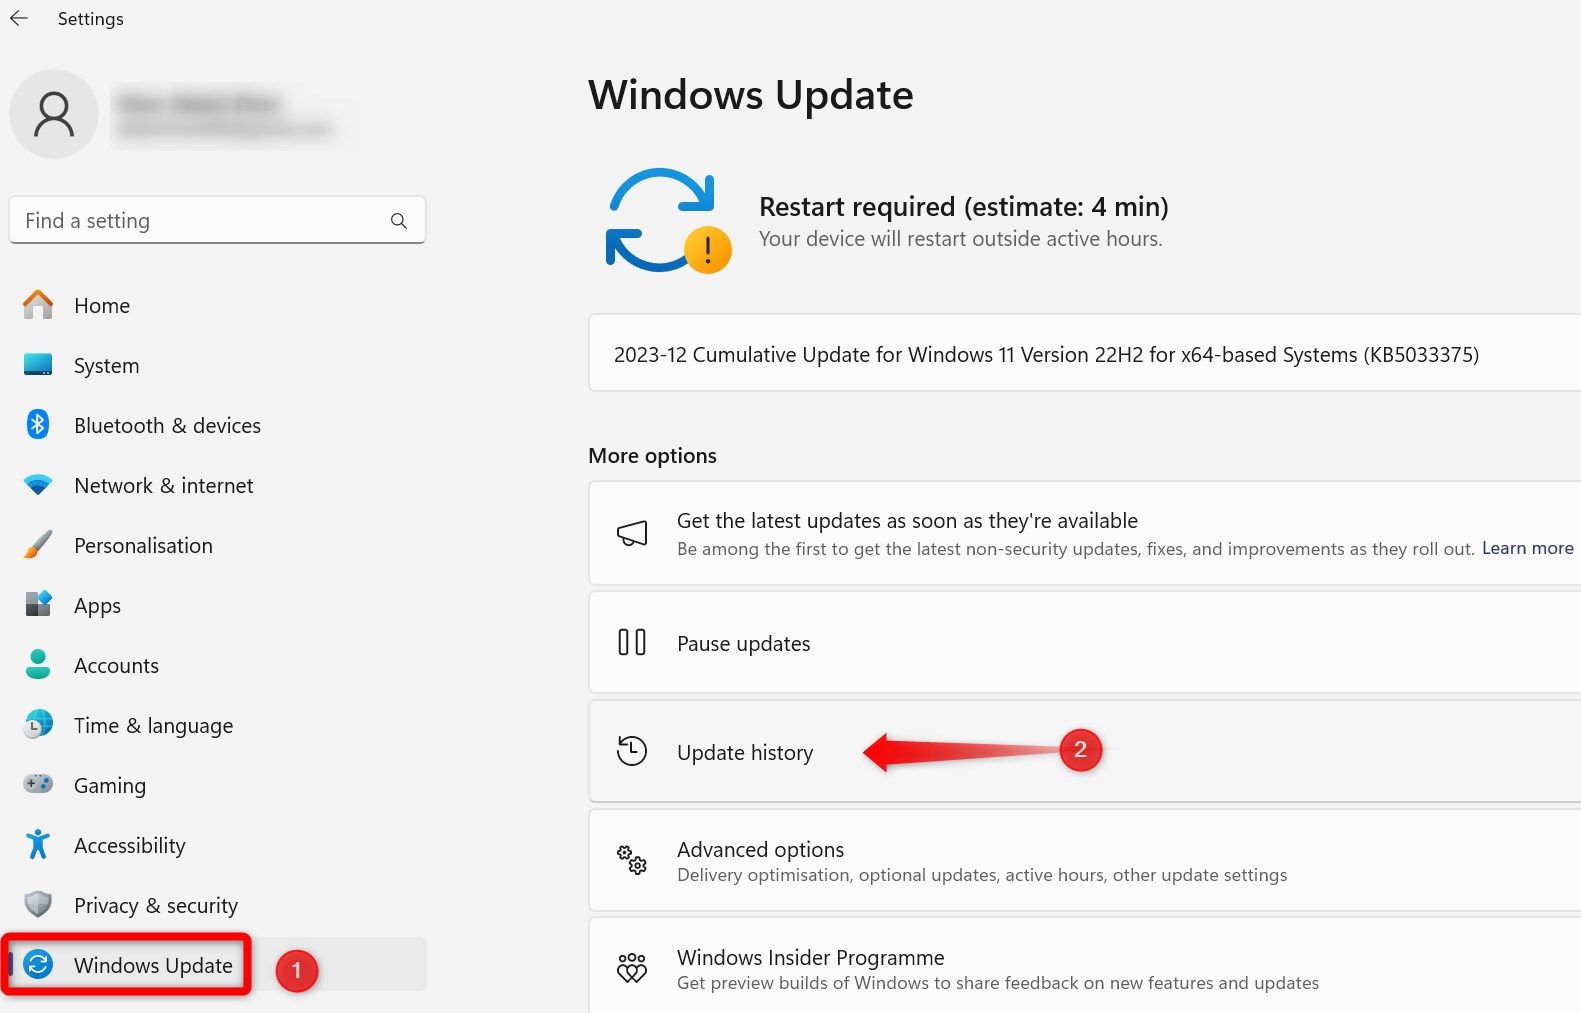
Buggy Windows updates are known to cause issues with default Windows applications. To ensure that a problematic Windows update is not affecting the Windows Security app, find the most recent update first. Open Settings, go to the “Windows Update” tab on the left, and open “Update History” from the right pane.
Here, open the recently installed updates, particularly the “Quality Updates” and “Driver Updates,” and note their version or any other details you find. After that, search for more information about the update online, especially on the Microsoft Community forum.
If you find other users reporting similar issues with the Windows Security app after installing the latest updates, that update could be to blame. Therefore, uninstall the update.
To uninstall the latest update, navigate to the “Windows Update” tab on the left and open “Update History” on the right. Scroll to the bottom of the page and click on “Uninstall Updates.”
Locate the recently installed updates and click “Uninstall” next to the relevant update. Then, follow the on-screen instructions.
5. Ensure Your Device Isn’t Infected
Malware infections can also compromise the operation of Windows Security. To ensure your device isn’t infected, download a reputable antivirus software (if not already installed), install it on your device, and run a malware scan.
If Windows Security is not working due to an infection, the security scan will detect and remove it. If the security scan reveals your system is malware-free, proceed to the next step.
6. Ensure the Security Centre Service Isn’t Disabled
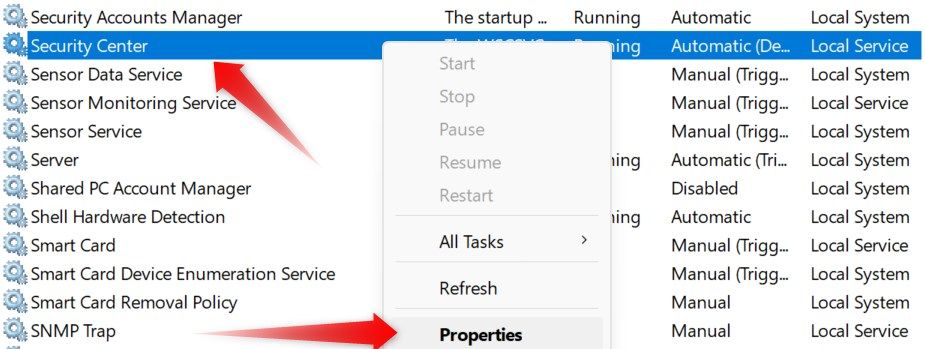
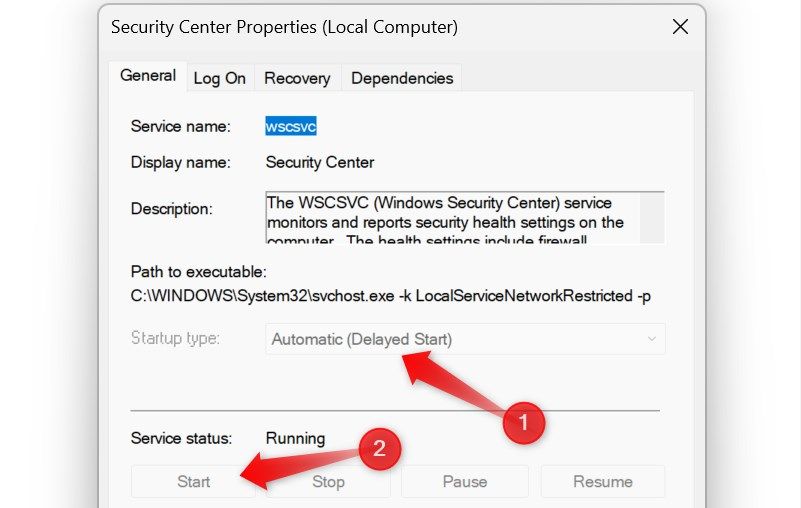
If you encounter an error such as “Windows Security Center service is turned off” when opening the Windows Security app, this service could be disabled. To check, type “Services” in Windows Search and open the “Services” app. In the right pane, locate the “Security Center” service, right-click on it, and open “Properties.”
If the service is disabled, click on the “Start” button and select “Automatic (Delayed Start)” from the dropdown menu next to “Startup Type.”
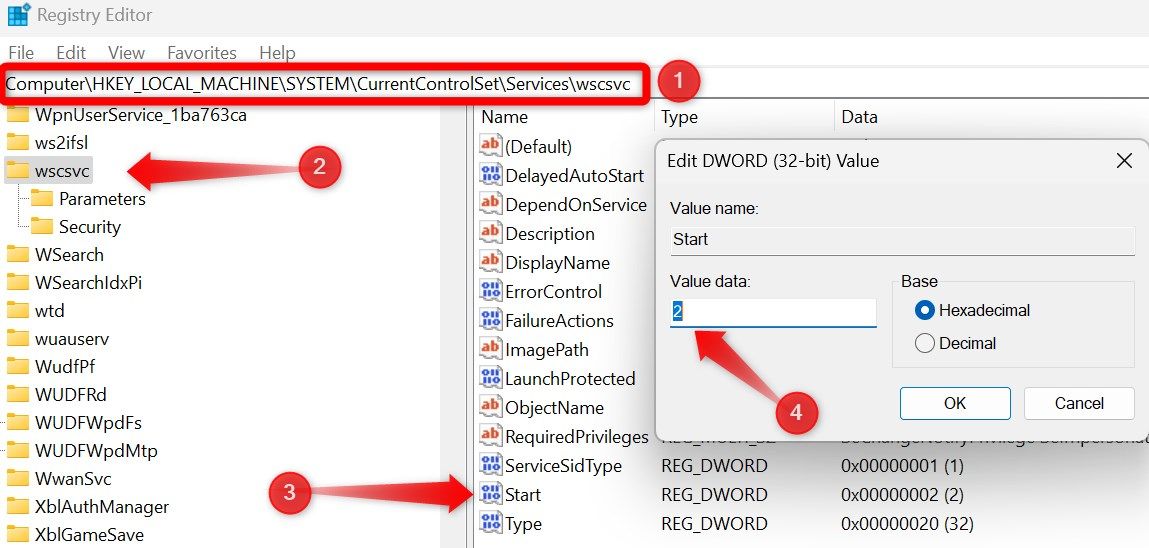
If these options are grayed out, restart this service in Registry Editor. Type “Registry” in Windows Search and open the “Registry Editor.” Then, navigate to Computer > HKEY_LOCAL_MACHINE > SYSTEM > CurrentControlSet > Services > wscsvc. Click on the “Start” key, and if the “Value Data” field is currently set to “4”, change it to “2”.
7. Temporarily Disable or Delete Third-Party Antivirus Software
Using any third-party antivirus software alongside Microsoft Defender can also potentially interfere with the operation of Windows Security. To rule out this possibility, temporarily turn off the third-party security suite and check if disabling it resolves the problem.
If it does, then your antivirus app is likely the cause of the problem. In that case, you can keep it disabled, as Windows Defender is a reliable built-in antivirus solution, and in most cases, there’s no real need for additional third-party software.
If you prefer using a third-party security suite for additional security, consider switching to a different antivirus program that doesn’t interfere with the Windows Security app.
8. Repair the Corrupt System Files
Corruption of system files can also lead to unforeseen issues with the default apps in Windows. To verify that this isn’t the root cause of the problem, run the SFC scan, which identifies corrupt system files and repairs them. To run the SFC scan, type “Command Prompt” in Windows Search, right-click on the “Command Prompt” app, and click “Run as Administrator.”
Then, type the following command and press Enter:
sfc /scannow
The scan will either identify and automatically fix the corrupt system files or provide guidance on repairing them manually. Follow the on-screen instructions carefully throughout the process.
If the SFC scan fails to find and repair the corrupted system files or presents errors during the process, you can run the DISM scan.
If the above troubleshooting steps don’t resolve the issue, perform a clean boot. If that also proves unsuccessful, consider performing a System Restore—keep in mind that it will only work if you have created a restore point before the problem occurred.


