Key Takeaways
To disable Secure Boot on your PC:
1. Restart your PC while holding Shift, or access the “Advanced Startup” menu by typing “Advanced Startup” in Windows Search and then restart your PC from there.
2. Locate the Secure Boot option in your BIOS/UEFI setup menu and disable it. You might have to tweak some other settings in BIOS/UEFI to be able to toggle the Secure Boot option.
3. Save your changes and restart your PC.
Secure Boot is a security feature supported on Windows and some Linux distros. Below you can learn how to disable Secure Boot from the UEFI setup menu, how to locate the Secure Boot toggle, and what Secure Boot is and why it’s important.
What Is Secure Boot Anyway?
Secure Boot is a security feature available on most modern computers –and on most modern motherboards, in the case of desktop PCs– that prevents malware and other malicious software from tampering with the operating system installed on the said computer by executing itself during the boot procedure, before the OS loads. If all’s right and the boot procedure goes as planned, UEFI gives control to the OS after the system boots.
In a nutshell, Secure Boot is a verification mechanism that scans any piece of code that tries to run itself on your PC during the early stages of the boot process for digital signatures confirming the software in question is legit and secure. If a piece of code doesn’t include specific digital signatures, Secure Boot prevents it from executing and potentially tampering with your system.
How to Disable Secure Boot in Windows 10 and Windows 11
The process of disabling Secure Boot is simply to enter your BIOS/UEFI menu, finding the Secure Boot toggle, then saving your settings. Note that the BIOS/UEFI menu can look and be organized very differently depending on your computer. If you have trouble following with your device, check out our hints at the end of the instructions.
Step 1: Enter BIOS/UEFI Setup
To disable Secure Boot, you need to access your PC’s UEFI/BIOS setup menu. The most straightforward way to do that is to restart your PC and then hit the appropriate key during the boot sequence. For example, the BIOS setup key is Del on MSI motherboards (the motherboard brand found in my PC).
However, other motherboard and laptop manufacturers have different BIOS setup keys. Depending on the manufacturer, they’re usually set to F1, F2, F9, F10, F12, or Del. Some manufacturers use unique keys or key combinations; on Microsoft Surface laptops you have to hold the volume up button, and on Lenovo ThinkPad devices you need to first press Enter and then hit the F1 key.
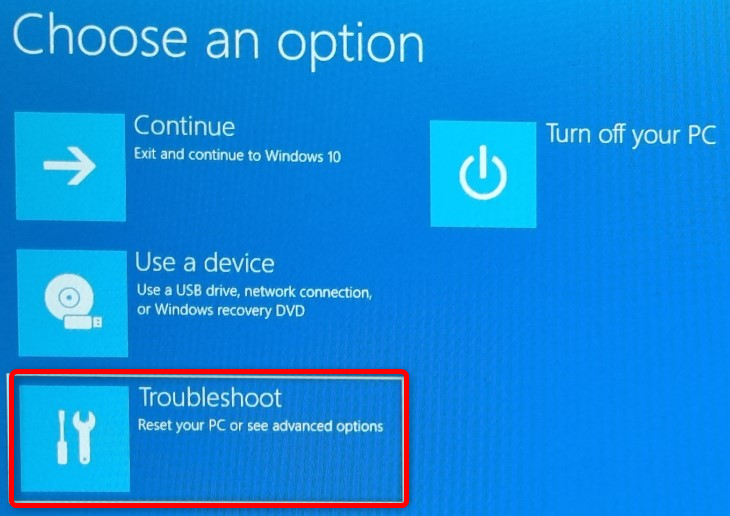
If you don’t want to experiment and restart your PC multiple times before discovering the BIOS/UEFI setup key, simply hold Shift and restart your PC —Start Menu > Power button > Restart. Hold Shift until you’re presented with the “Advanced Startup” menu, like in the screenshot below. Once there, click the “Troubleshoot” button.
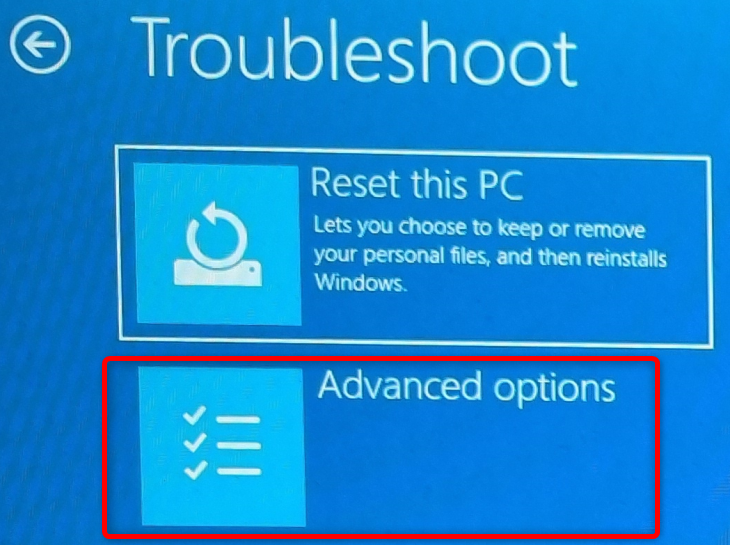
Next, click the “Advanced Options” button.
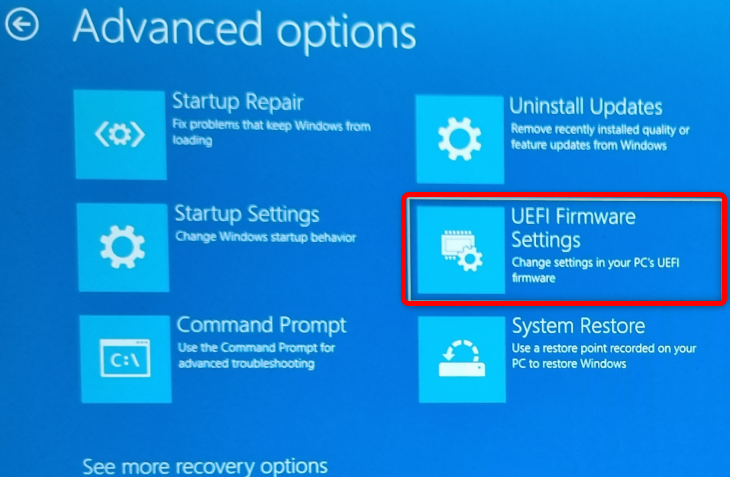
Then click the “UEFI Firmware Settings” button.
Finally, hit the “Restart” button, and you’ll be greeted with the BIOS setup menu once your PC restarts.
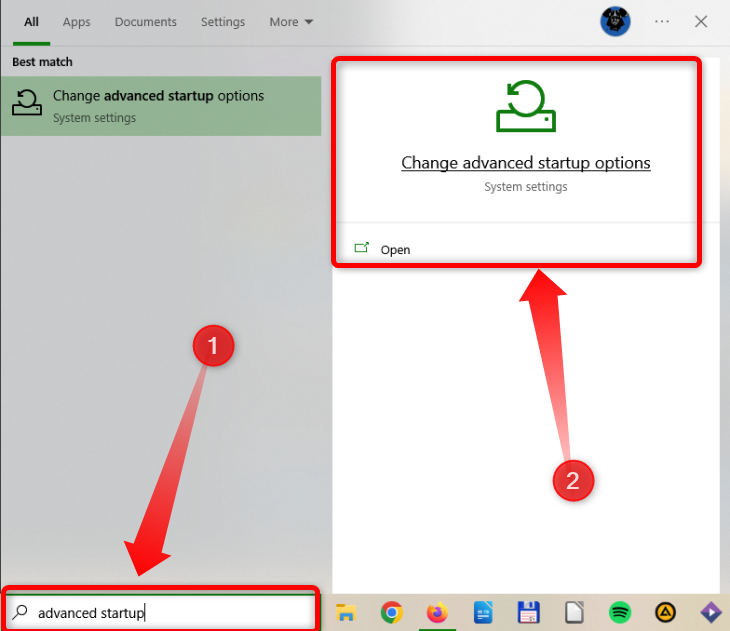
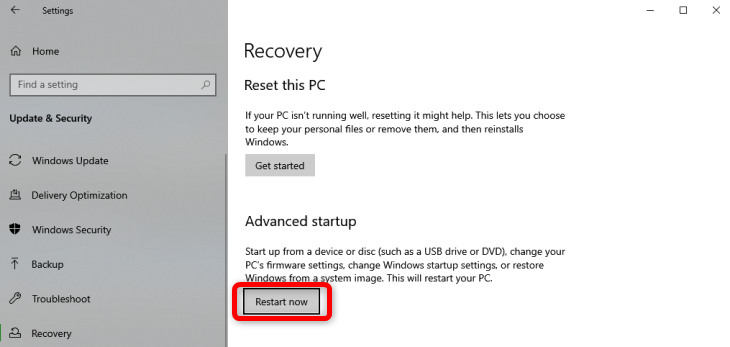
Another way to access the BIOS setup is to open Windows search, type “Advanced Startup,” and then open the “Advanced Startup” menu.
Once there, click the “Restart Now” button. After your PC restarts, you’ll be greeted with the same options as when you restart your PC while holding the Shift button, so follow the steps we listed above.
Note that you can also access the BIOS/UEFI setup on most PCs by holding the F2 key and pressing the power button while the device is powered off. Just keep holding the F2 key after your device turns on until you enter the BIOS setup.
Step 2: Disable Secure Boot in BIOS/UEFI
Once you enter the BIOS/UEFI setup menu, you need to find the Secure Boot option. On MSI motherboards and laptops, click the “Settings” button and then click the “Advanced” tab.
Once there, click the “Windows OS Configuration” tab.
Next, click the “Secure Boot” tab.
Once you’re inside the “Secure Boot” option menu, you’ll see whether Secure Boot is enabled or disabled on your machine. If it’s enabled, and you want to disable it, click the button and select the “Disable” option.
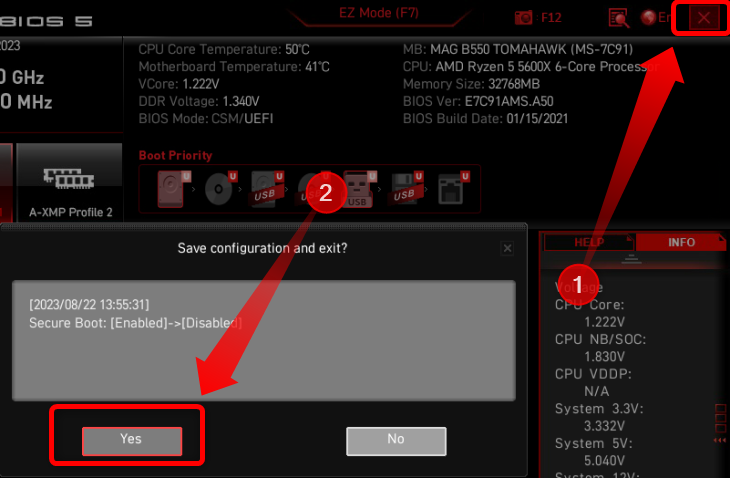
Once you’re done, exit the BIOS setup and make sure to save the changes you’ve made —in the case of MSI motherboards and laptops, just hit the “X” button in the upper right corner and save the changes when prompted.
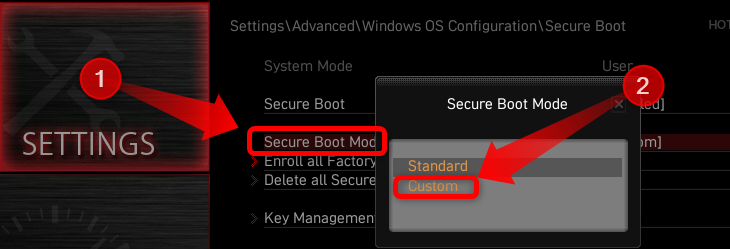
If you cannot enable Secure Boot on an MSI motherboard, you’ll most likely be greeted with the following notification when trying to change the setting: “System in Setup Mode! Secure Boot can be enabled when System in User Mode. Repeat operation after enrolling Platform Key(PK).”
If that happens, change the Secure Boot mode option from “Standard” to “Custom.”
Then, switch back to “Standard,” and click “Yes” when prompted to “Install Factory Defaults.”
Next, select “No” when asked whether to exit without saving.
Now you should be able to enable or disable Secure Boot without issues.
What to Do if You Can’t Find Secure Boot
Remember that these settings differ on different laptops and motherboards. For example, on ASUS and Gigabyte motherboards and laptops, Lenovo PCs, and most other motherboards and laptops, you can locate the Secure Boot toggle in the “Security” tab of the BIOS setup menu.
On Acer laptops, the toggle is either located in the “Security” or “Boot” menus. On most Dell devices, the option is found in the “Boot” or “Boot Sequence” tabs. On HP devices, you can find the Secure Boot toggle in the “Boot Options” menu in the “System Configuration” tab or the “Boot Options” tab.
Note that, as is the case with MSI motherboards and laptops, there’s a chance you’ll have to tweak some other settings in order to be able to toggle Secure Boot or make the option appear in the first place. On some systems, you need to enable the BIOS advanced mode by pressing the F7 key; on others, you’re required to create a BIOS administrator password, restore default BIOS settings, load default platform keys, etc. If you encounter issues, just Google “how to enable/disable Secure Boot” on your motherboard, PC, or laptop brand. For example, if you own a Razer laptop, Google “How to disable Secure Boot on Razer laptops.”
How to Check If Secure Boot Is Enabled
On Windows 10 and 11, open Windows Search, type “System Information,” open the System Information app, and look for a row titled “Secure Boot State.” If it’s on, you have Secure Boot enabled; if the “Secure Boot State” reads off, you have it disabled. For a more in-depth guide as well as other ways to check if Secure Boot is enabled on your PC, read our guide on how to check if Secure Boot is enabled on your PC.
Should You Disable Secure Boot?
If you’re a regular user, disabling Secure Boot doesn’t offer much of a benefit. The feature doesn’t affect your PC’s performance, but it does increase overall security and prevents malware from messing up your system. In other words, there’s no harm in keeping Secure Boot enabled in most cases.
If you plan on dual booting a modern Windows OS —think Windows 10 or Windows 11-– along with either some Linux distro or an older Windows OS, you might have to disable Secure Boot since Secure Boot can block the second OS from booting. Some older pieces of hardware also don’t work well with Secure Boot, so if you encounter any issues, you might have to disable Secure Boot.
Note that you can install Windows 11 only on machines with support for Secure Boot. This means that you don’t have to have Secure Boot enabled to install and run Windows 11, but your system has to support the option.
It’s also worth noting that some multiplayer games that come with kernel-level anti-cheat software, such as Valorant, won’t run unless you’ve Secure Boot enabled. So if you want to play those games, you have to enable Secure Boot.

