If your Windows 10 computer has started feeling slow or unresponsive, cache buildup might be the reason. Cache files are temporary data created by Windows and installed apps to help things load faster. However, when these files accumulate, they can cause lag, storage issues, or unusual system behavior.
This guide explains every effective way to clear cache files in Windows 10, why each method is useful, and when to apply them.
What Are Cache Files in Windows 10?
Cache files store temporary data that allows your apps, browser, and system to load information quickly.
Examples include:
-
Browser images and scripts
-
Windows thumbnail previews
-
App installation leftovers
-
DNS records
-
Temporary system files
Over time, these files pile up and may slow down your computer. Clearing them helps Windows rebuild fresh cache and improve performance.
This guide walks you through all the major types of cache in Windows 10 and how to safely clear each one.
1. Clear Temporary System Files Using Disk Cleanup
Windows automatically stores temporary files, thumbnails, error reports, and other data that can quickly accumulate. Disk Cleanup is the built-in tool designed to remove them safely.
Steps:
-
Click the Start button and type Disk Cleanup.
-
Open the tool and choose the drive you want to clean (usually C:).
-
When the scan is complete, you’ll see a list of cleanup options.
-
Check boxes such as:
-
Temporary files
-
Recycle Bin
-
Delivery Optimization files
-
Thumbnail cache
-
System error memory dump files
-
- Click OK, then confirm by selecting Delete Files.
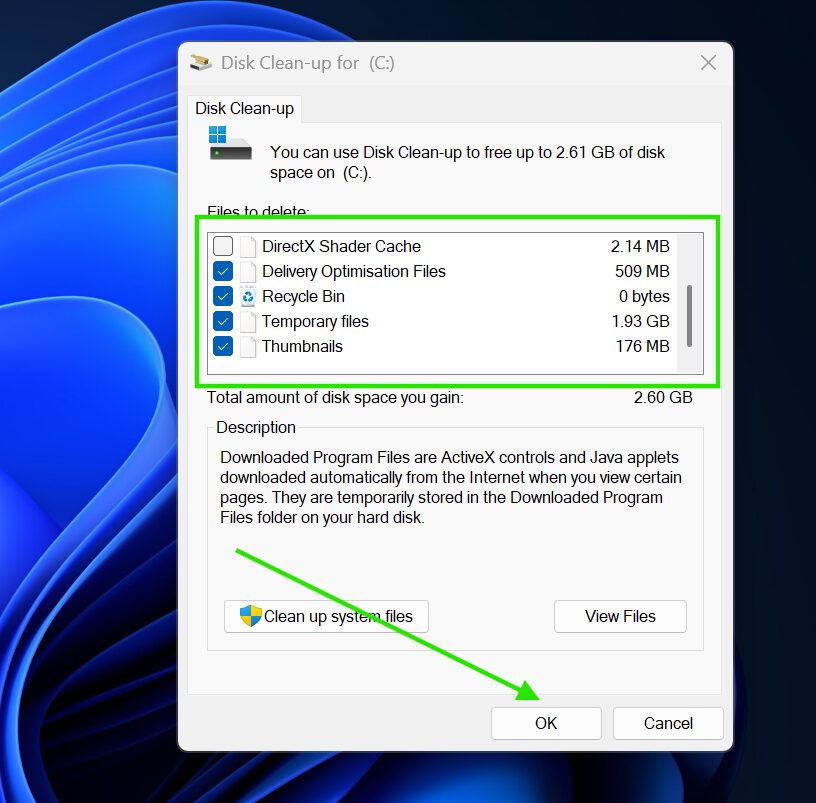
This process may take a few minutes depending on how much data is stored.
2. Clear Windows Store Cache
If apps from the Microsoft Store behave strangely or fail to update, the Store cache might be corrupted. Windows has a special command to clean it instantly.
Steps:
-
Press Windows Key + R to open Run.
-
Type wsreset.exe and hit Enter.
-
A blank Command Prompt window will appear and close automatically.
-
The Microsoft Store will open once the cache has been reset.
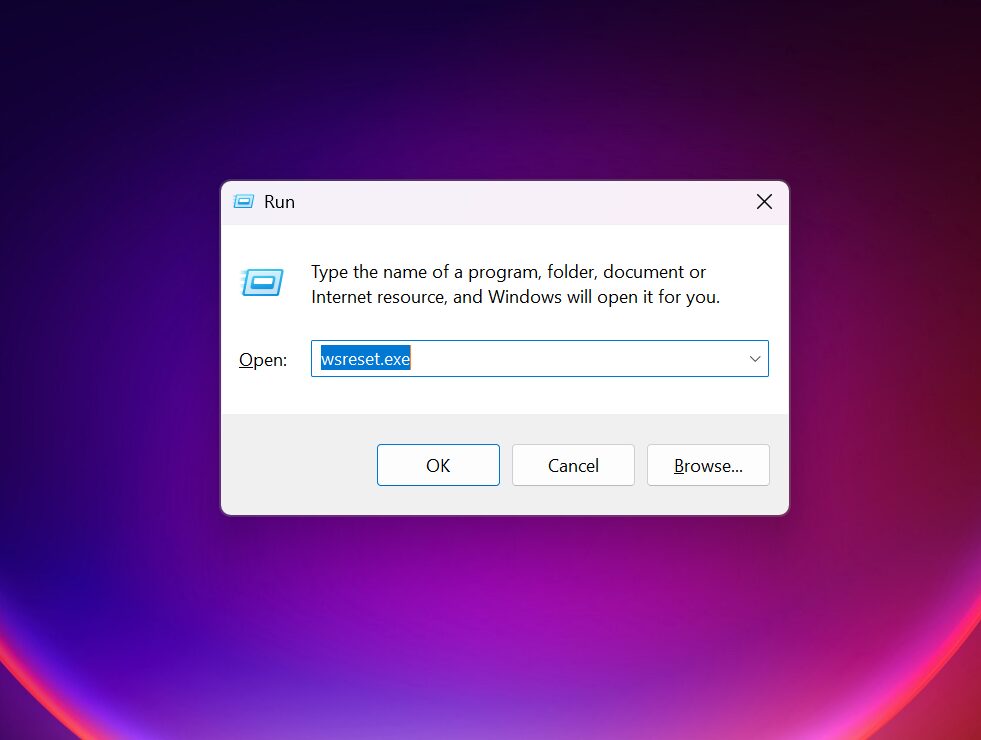
This won’t delete your installed apps or settings — only the cache.
3. Clear Location Cache
Windows keeps a small history of your device’s location data for apps that need it. If you prefer privacy or troubleshooting location services, clearing it is helpful.
Steps:
-
Open Settings.
-
Go to Privacy → Location.
-
Scroll until you see Location history.
-
Click the Clear button.
You can also turn off location access completely if you want stricter privacy control.
4. Clear DNS Cache
DNS cache stores IP address lookups so websites load faster. When the cache becomes outdated, you might experience browser errors or pages refusing to load, flushing the DNS forces Windows to fetch fresh records.
Steps:
-
Right-click the Start menu and select Command Prompt (Admin) or Windows PowerShell (Admin).
-
Type the command:
-
Press Enter.
-
You should see a message confirming the resolver cache has been cleared.
This method is especially useful after changing DNS servers.
5. Clear Cache in Your Web Browser
Every major browser stores images, scripts, and site data to speed up browsing. Over time, this cache becomes huge and can cause outdated page displays or loading issues.
Shortcut Method (Most Browsers):
Press Ctrl + Shift + Delete.
Google Chrome / Edge / Opera / Brave
-
Open the Clear browsing data window (using the shortcut above).
-
Select Cached images and files.
-
Choose All time as the time range for a full reset.
-
Click Clear data.
Firefox
-
Press the shortcut or go to Options → Privacy & Security.
-
Scroll to Cookies and Site Data.
-
Click Clear Data → select only “Cached Web Content.”
-
Confirm.
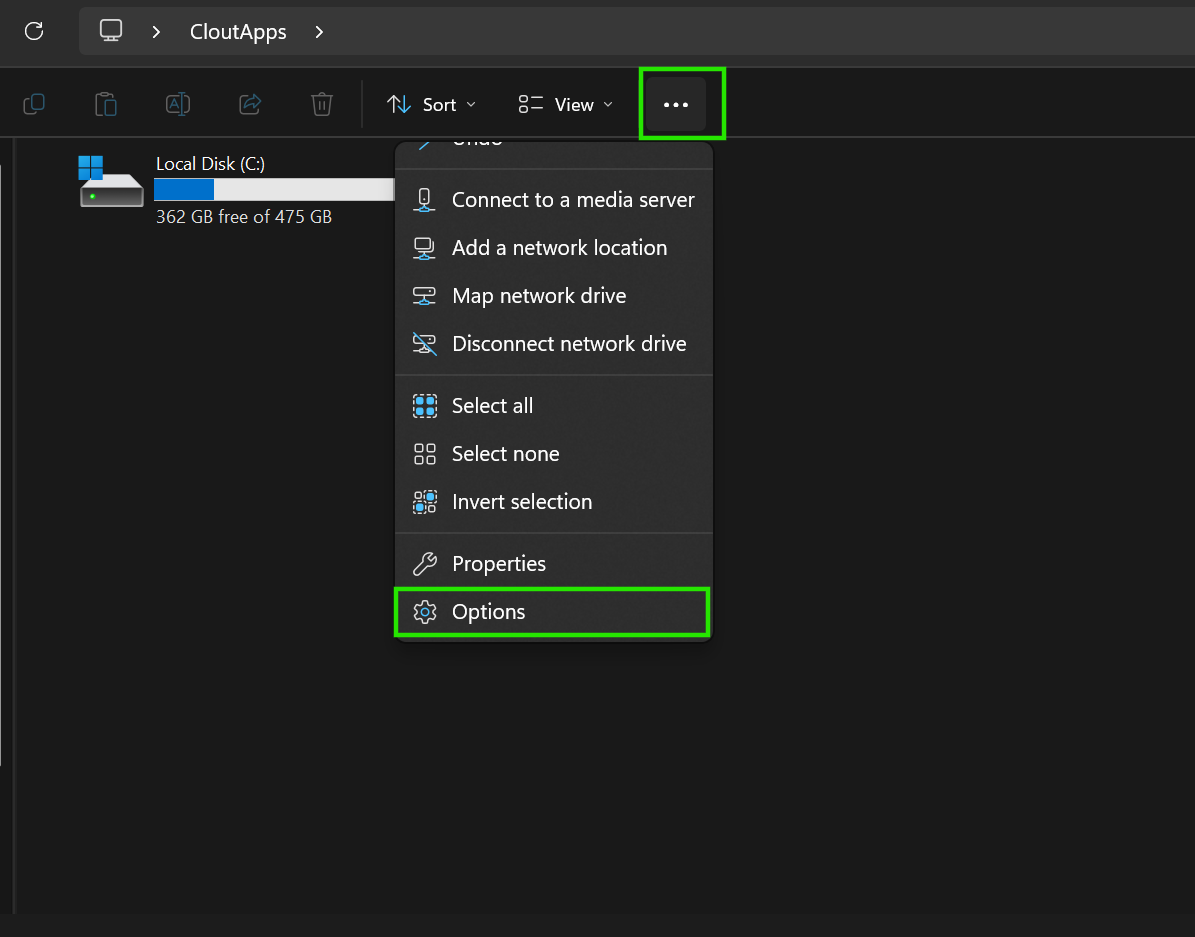
6. Clear File Explorer History
File Explorer remembers recent searches and paths, which can be cleaned for privacy or troubleshooting.
Steps:
-
Open File Explorer.
-
Click View → Options.
-
Under the General tab, find the Privacy section.
-
Click Clear.
7. Clear Temporary Files Using Windows Settings (Alternative Method)
Windows 10 includes a modern version of storage cleaning inside the Settings app.
Steps:
-
Go to Settings.
-
Click System → Storage.
-
Select Temporary files.
-
Let Windows scan for junk files.
-
Select the types you want to remove.
-
Click Remove files.
This is also where you can turn on Storage Sense to automatically clean files at intervals.
Why Clearing Cache Is Helpful
- Frees up valuable disk space
- Fixes app crashes and Store update issues
- Improves browser speed and page loading
- Helps with networking problems
- Enhances overall system performance
- Protects privacy when needed
How Often Should You Clear Cache?
-
Light use: Every 2-3 months
-
Heavy browsing/gaming: Monthly
-
If you’re troubleshooting: Anytime an issue appears
-
Low-storage PCs: Every few weeks
Cache files help Windows run smoothly, but excessive use can become a problem. By clearing your cache periodically using the methods in this guide, you’ll keep your PC cleaner, faster, and more stable – without installing any third-party tools.