You can back up your text messages (and iMessages) with iMessage Exporter, a free tool for the Mac. Whether you want to preserve your family message history for sentimental reasons, or need to keep conversation records for business, iMessage Exporter will get the job done.
You might already back up your messages in iCloud, but Apple charges an arm and a leg for space. You can save space (and money) by making a local backup and clearing out your cloud storage.
Keep reading or watch our video to see how.
How to back up your text messages
Backing up your devices, photos and files is always a good idea — but there are not a lot of tools for backing up texts. However, all of this is possible using an open source tool.
iMessage Exporter will create a local backup with your full conversation history that you can search and read through. It saves it in a rich file format that looks a lot like a regular iMessage thread. You can choose to include all attachments and pictures for maximum backup, or store it in plain text for maximum efficiency.
If you back up your messages to a Mac, then you can comfortably delete your old messages from your phone, saving space.
Table of contents: How to back up your text messages
- Download iMessage Exporter
- Approve iMessage Exporter in Security Settings
- Back up messages using the Terminal
- Clear out your old messages from iCloud
- Delete your messages backup
Download iMessage Exporter

Screenshot: D. Griffin Jones/Cult of Mac
iMessage Exporter is a small, command-line tool that you run from your Mac’s Terminal. That means it’s slightly more complicated than simply downloading an app. However, I will walk you through the process of using it. You just need a Mac.
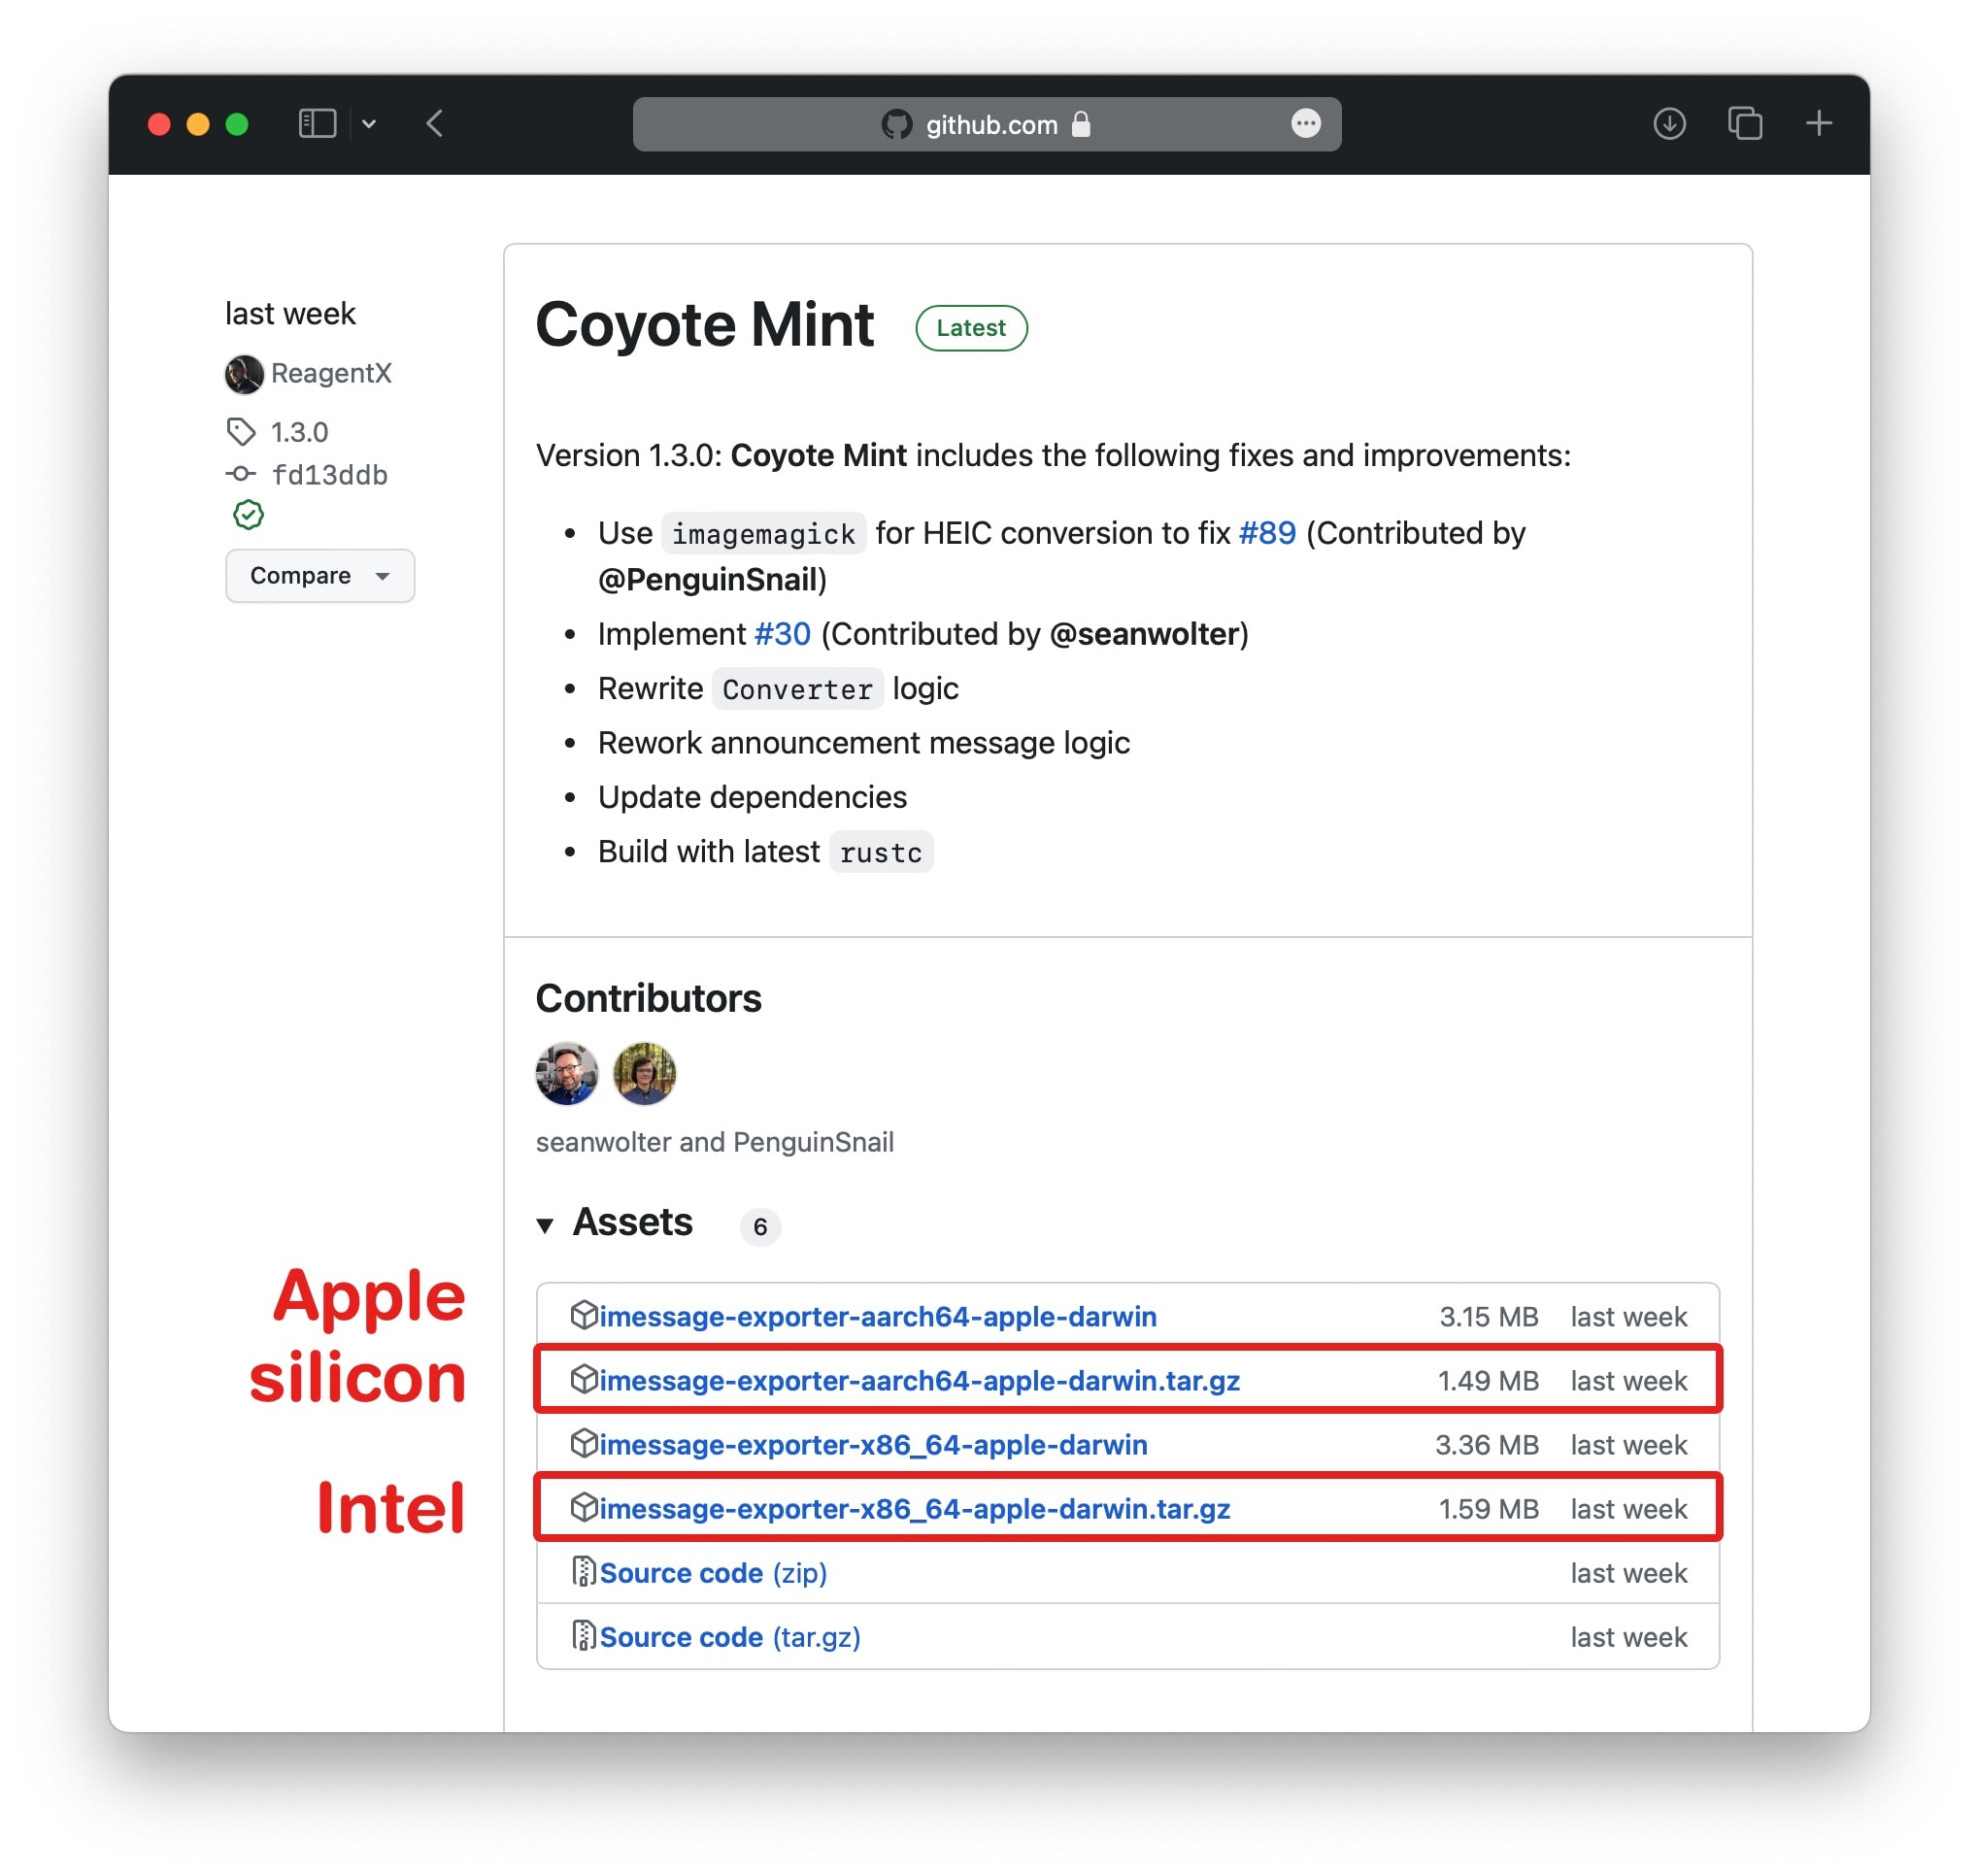
First, go to GitHub’s Releases page to download iMessage Exporter.
If you use a newer Mac with an Apple silicon chip, click imessage-exporter-aarch64-apple-darwin.tar.gz. If you own an older Intel Mac, click imessage-exporter-x86_64-apple-darwin.tar.gz. (If you’re not sure, click > About This Mac to double-check what kind of processor is inside your machine.)
Approve iMessage Exporter in Security Settings
Next, open your Downloads folder and double-click on the .tar file to unzip it. You should see a black icon that says imessage-exporter. Double-click on this to run iMessage Exporter for the first time.
You’ll probably get a pop-up message saying you can’t run it. Click OK.

Screenshot: D. Griffin Jones/Cult of Mac
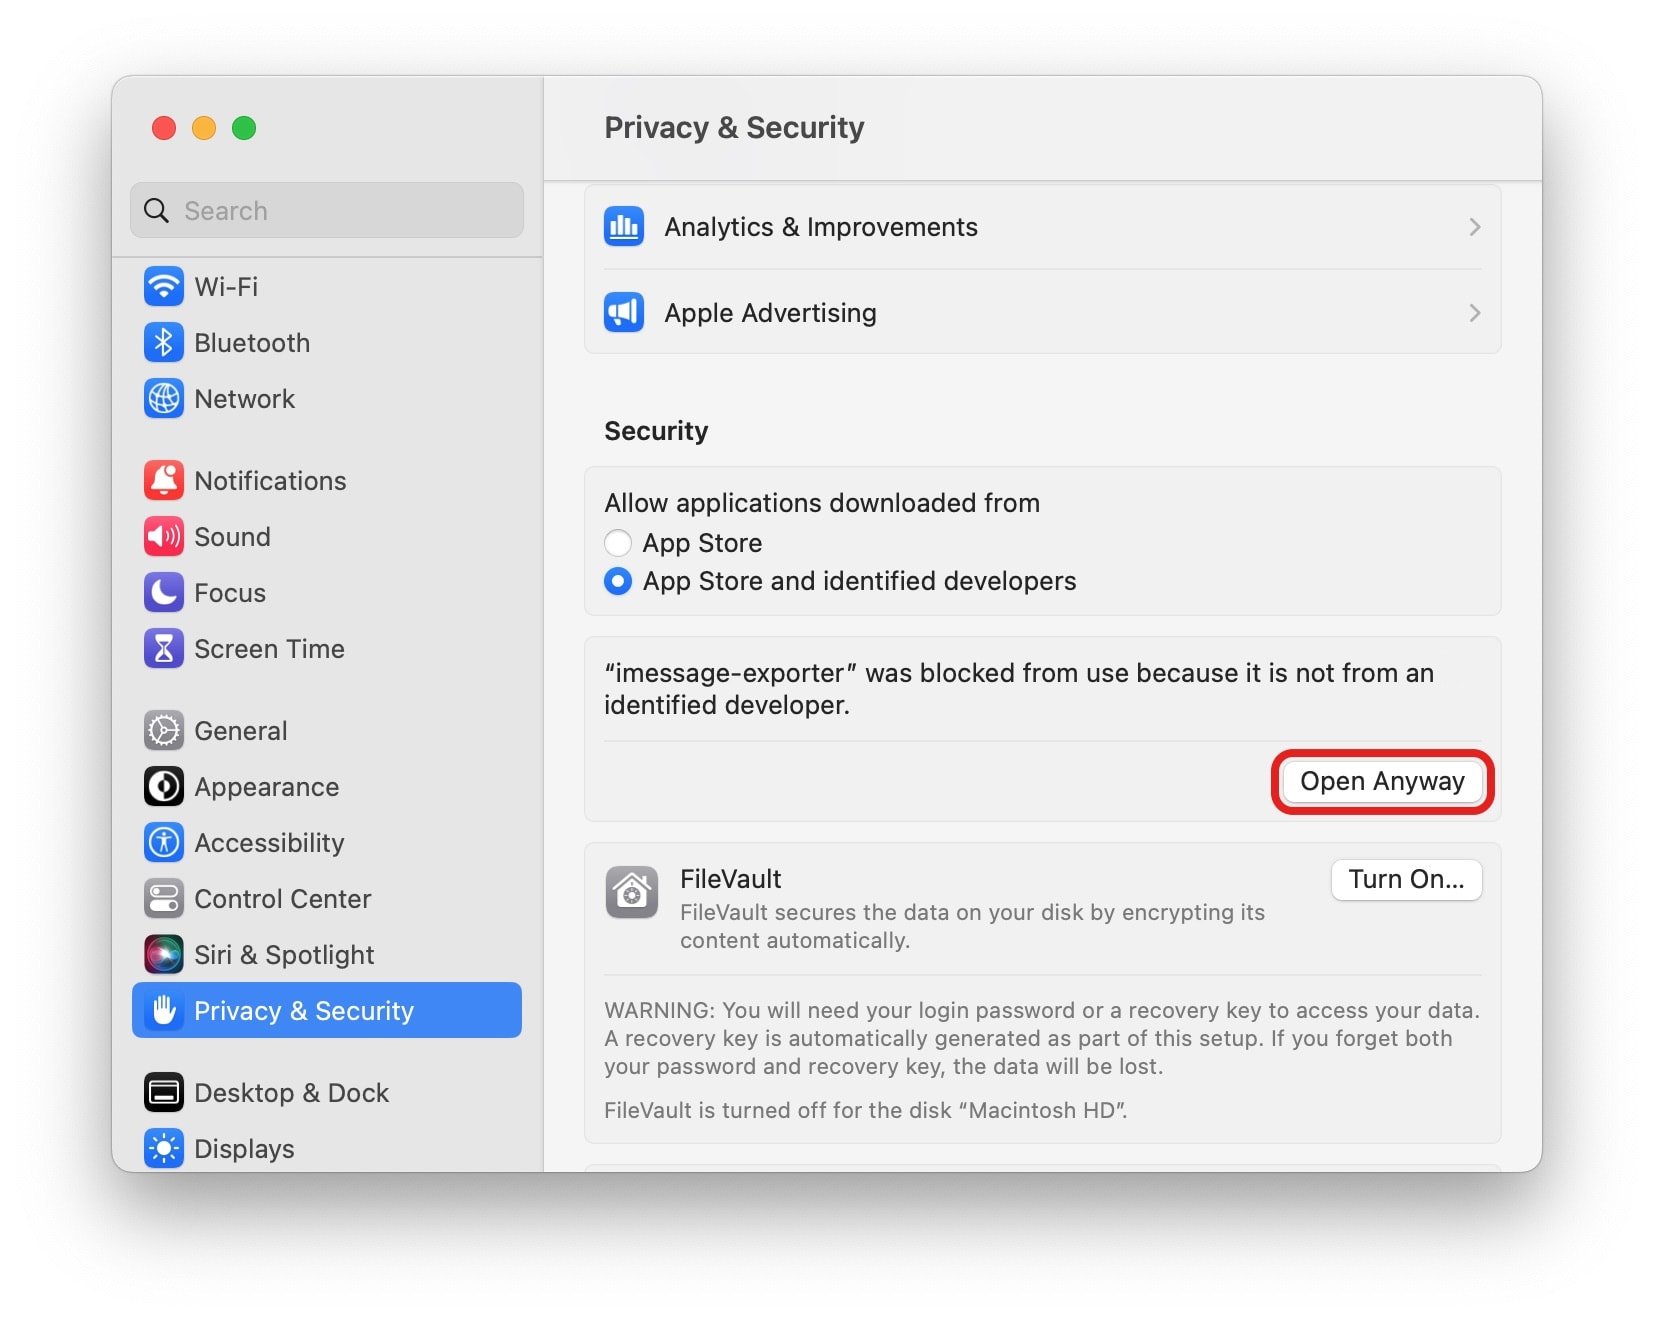
Next, open System Settings (aka System Preferences on older versions of macOS) and go to Privacy & Security. Scroll down below the big list and you’ll see a message that says imessage-exporter “was blocked because it is not from an identified developer.”
Click Open Anyway, then click Open on the dialog box.
Make sure you also go back to System Settings, scroll back up to Full Disk Access and enable iMessage Exporter for Terminal.
Back up messages using the Terminal

Screenshot: D. Griffin Jones/Cult of Mac
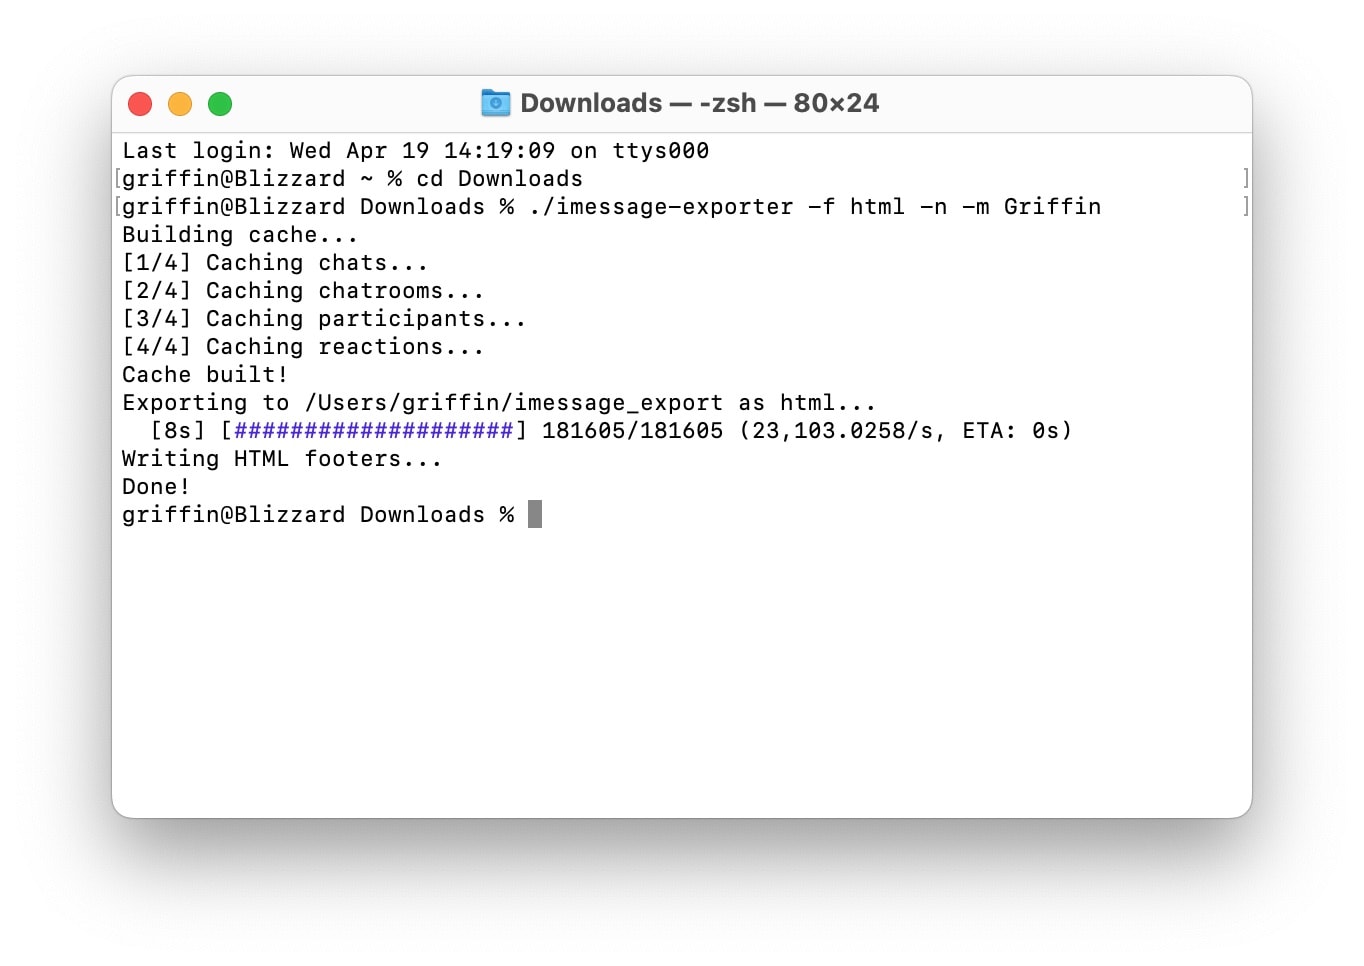
Now you’re ready to get started and actually back up your messages. Click on the Terminal window that opened when you ran the tool. You can leave it open as a reference.
Open a new Terminal window by hitting Command-N (⌘N), then type in cd Downloads. (“cd” stands for “change directory.”) This should point the Terminal to the same folder where you downloaded imessage-exporter.
To make a backup of your iMessages, just type in ./imessage-exporter -f html -m YourFirstName with your own name in place of “YourFirstName.” (“YourFirstName” replaces your phone number in the export with your own name, making the export easier to read.)
You have several options for tweaking exactly how your iMessage are backed up:
- If you want to include pictures and videos, this will significantly increase the size of the file you generate, but it’ll be a more complete backup. To do that, run the same command as above but add
-c cloneto the end. - If you want a plain text backup instead of a formatted HTML file, replace
htmlwithtxt - If you want to save the backup directly to a different location instead of your Home folder, add
-p /folderpath/
Unless you specify a different location, the backup will go in your Home folder. Click the Finder icon and hit Shift-Command-H (⇧⌘H) to jump there.
Clear out your old messages from iCloud
After you make your local iMessage archive, you might want to free up some iCloud space. To do that, open Messages. In the menu bar, go to Messages > Settings (on older versions of macOS, it’s called Preferences). Just change Keep Messages from Forever to One Year.
From an iPhone, go to Settings > Apps > Messages and scroll down to find the same setting.
Delete your messages backup
If you mess up and you want to run iMessage Exporter again with different settings, or if you don’t think you need the backup, it’s easy to delete the backup file you created.
By default, iMessage Exporter puts it in your Home folder. Click on the Finder and hit Shift-Command-H (⇧⌘H) to bring it up. Just drag the “imessage_export” folder to the Trash and empty the trash.
Pretty good, but with limits
The tool is handy, but it has a few limitations. First, using the Mac Terminal is challenging for people who aren’t fluent in command-line interfaces. (It really wouldn’t take much work to whip up a small interface in SwiftUI, if somebody felt up to the challenge.)
It’s understandable, but nonetheless annoying, that iMessage Exporter can’t pull in contact names. Nonetheless, this tool offers you a quick and easy way to back up those messages of yore so you can save them for eternity without paying Apple for storage.
We originally published this article on how to back up messages on April 26, 2023. We updated it with new information.


