Over the years, I’ve tried quite a number of data recovery applications. Some of them worked, some partially worked, and others looked promising but failed when it really mattered. In most cases, the tools followed the same pattern: launch the app, force you straight into a storage scan, overwhelm you with options, and then leave you guessing whether the recovered file would even open.
So when I tried Advanced File Recovery, I wasn’t expecting anything radically different at first. But from the moment I launched the application, the experience felt more deliberate and user-focused. Instead of rushing me into scanning my entire drive, it gave me control – where to start, what to scan, and how to approach recovery. That difference may sound small, but when you’ve used several recovery tools before, you quickly realize how much smoother and less stressful the process becomes when the software is designed this way.
What stood out most was not just that it worked – because many recovery tools do – but how it worked. The interface, the organization, the speed, and the little details in how recovered files are handled made the experience feel more refined and practical for real-world use. That’s what makes this tool different from many others I’ve tested.
Launching the Application
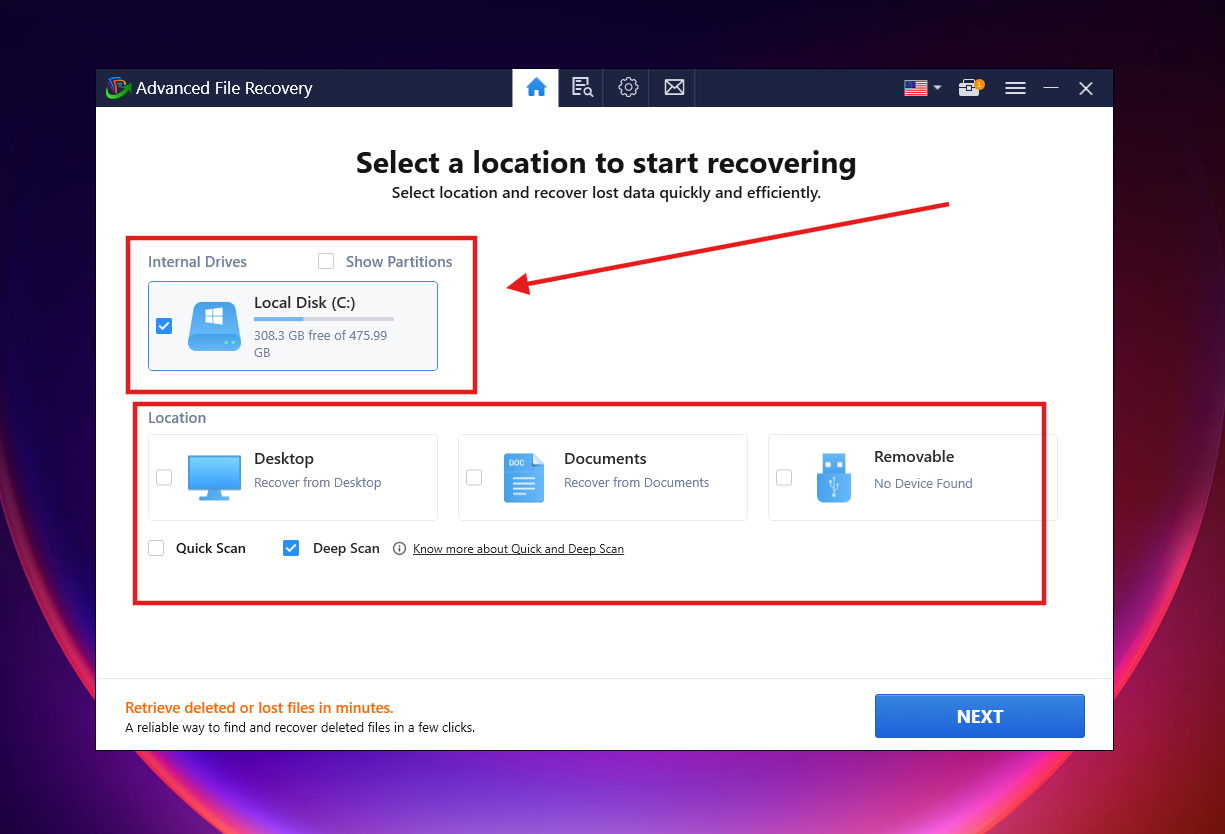
When I launched the application, the home interface immediately stood out. It’s simple, user-friendly, and clearly designed for people who just want to recover their files without stress. Right from the first screen, it gives you options to select where you want to start your recovery from, instead of forcing you straight into a storage directory like many other recovery tools do.
That small design choice already sets a good tone. It feels intentional and guided.
Selecting Storage & File Types
After choosing the storage device I wanted to recover from, the app gave me another useful option: selecting the file types to recover – images, videos, documents, ZIP files, and more. This is a genuinely cool feature because it saves time and avoids unnecessary scanning.
You can also select multiple file types at once, which makes it flexible depending on what you lost.
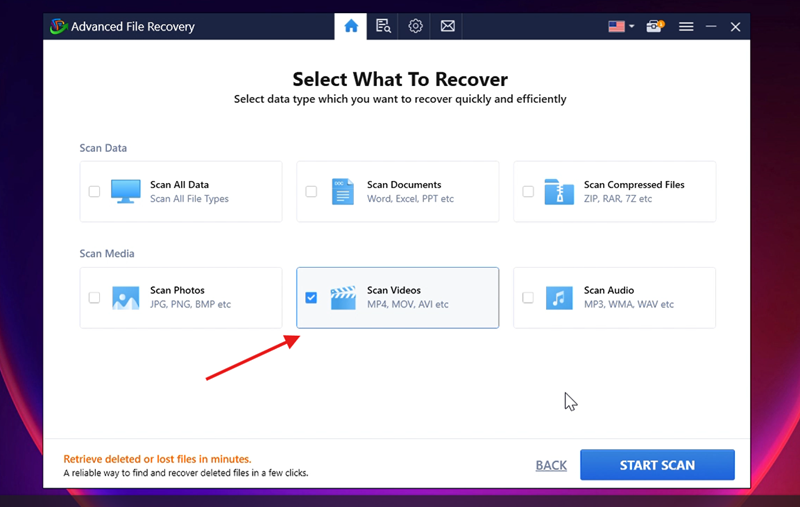
In my case, I decided to select video files only, because I wanted to see if I could recover some deleted videos.
Scanning Experience
Once scanning started, I noticed one limitation:
while scanning was in progress, I couldn’t move into other parts of the interface. I tried navigating around, but the app doesn’t allow that – you have to wait until scanning is completed.
That said, the scan itself was quite efficient.
-
Total files scanned: 2,012,996
-
Video files detected: 118
-
Scan duration: about 5 minutes
Considering the volume of files scanned, that timing feels reasonable.
Scan Results & File Organization
After scanning was completed, this is where Advanced File Recovery really impressed me.
The recovered files were well organized:
-
Files were grouped based on their original locations
-
Video formats were neatly arranged by file type
-
No confusion about where a file belongs or which format is which
Everything was clearly structured, so you’re not left wondering “Where did this come from?” or “Which one is the right file?”
This level of organization makes recovery much less overwhelming.
Preview Before Recovery
Another strong feature is the file preview option. Before recovering anything, you can preview the scanned files to confirm:
-
It’s the correct file
-
The file is not corrupted
This is important, especially for large video files where you don’t want to waste time restoring something broken.
Recovery Speed & File Integrity
I selected one of the video files and clicked Recover. The app asked me to choose a recovery location, which is good practice to avoid overwriting data.
The recovery itself was extremely fast – honestly, it felt like it took under two seconds.
To be sure, I played the recovered video immediately, and it played perfectly. No corruption, no glitches. That’s always the real test with recovery tools.
Settings, Language & Smart Recovery Handling
From the Settings page, you can:
-
Set default file types and formats to scan
-
Apply default filters
-
Customize how scans behave
The application also supports six languages:
-
English
-
Spanish
-
German
-
French
-
Italian
-
Japanese
When you select a new language and click Apply, the app closes and relaunches in the chosen language.
However, I noticed something important:
when switching languages, my recovery history was cleared. So if you plan to use the app in a different language, it’s best to select that language before starting your recovery process.
One thing I really liked, though, is how the app handles interrupted scans.
If scanning stops for any reason and you relaunch the application, it asks whether you want to:
-
Continue the previous scan, or
-
Start a new one
That means your last scanning session is saved – a thoughtful touch that prevents wasted time.
Support Interface
Finally, there’s a Support interface inside the app itself, where you can easily find their contact details such as email and website. This saves you from having to leave the application just to get help.
Pros
-
Very clean, beginner-friendly interface
-
Lets you choose storage before scanning
-
File-type selection saves scanning time
-
Excellent file organization after scan
-
Preview before recovery helps avoid errors
-
Very fast recovery speed
-
Recovered files retain integrity
-
Scan sessions can be resumed
-
Multiple language support
-
Built-in support section
Cons
-
You can’t navigate other sections while scanning
-
Switching languages clears recovery history
-
Free version focuses on scanning (recovery requires upgrade, depending on license)
Final Verdict
Advanced File Recovery feels like a tool designed for real users, not just technicians. It doesn’t overwhelm you, it explains itself through the interface, and most importantly – it does what it promises.
If you’ve deleted important files and want a recovery tool that is fast, organized, and easy to understand, this is a solid option worth trying. Just make sure you set your preferences (like language) early, and let scans finish without interruption.
If you’re unsure, start with a scan, preview your files, and decide from there. That alone tells you whether the tool is right for your recovery needs – without pressure.
I will update this post with the video link soon, til then, enjoy it.