
With the rapid rise of video content, bloggers and marketers are constantly looking for ways to repurpose written content into engaging videos. Video not only boosts engagement but also improves SEO, drives traffic, and increases your content’s visibility across platforms like YouTube, TikTok, and Instagram.
Enter PictoryAI – a powerful AI video creation tool that allows you to turn long-form blog posts into short, dynamic videos in minutes. Whether you’re a content creator, digital marketer, or business owner, this tool can help you automate video creation, saving time and effort while expanding your content’s reach.
In this article, we’ll walk you through how to use Pictory to turn blog posts into YouTube videos, step-by-step.
What You’ll Need
Before diving into the guide, make sure you have the following:
-
A PictoryAI account (Free trial available)
-
A published blog post (or the raw text)
-
A YouTube account for uploading your final video
-
Basic video editing preferences (branding, voiceover, etc.)
Optional but helpful:
-
A microphone or voiceover software (if recording narration)
-
A brand kit (logo, colors, fonts for consistency)
-
A script version of your blog post (if you want to customize narration)
Step-by-Step Guide: Turn Blog Posts into Videos with Pictory
1. Sign Up or Log In to PictoryAI
Head over to PictoryAI.com and create an account. You’ll get access to a free trial, which allows you to test out the blog-to-video feature without payment.
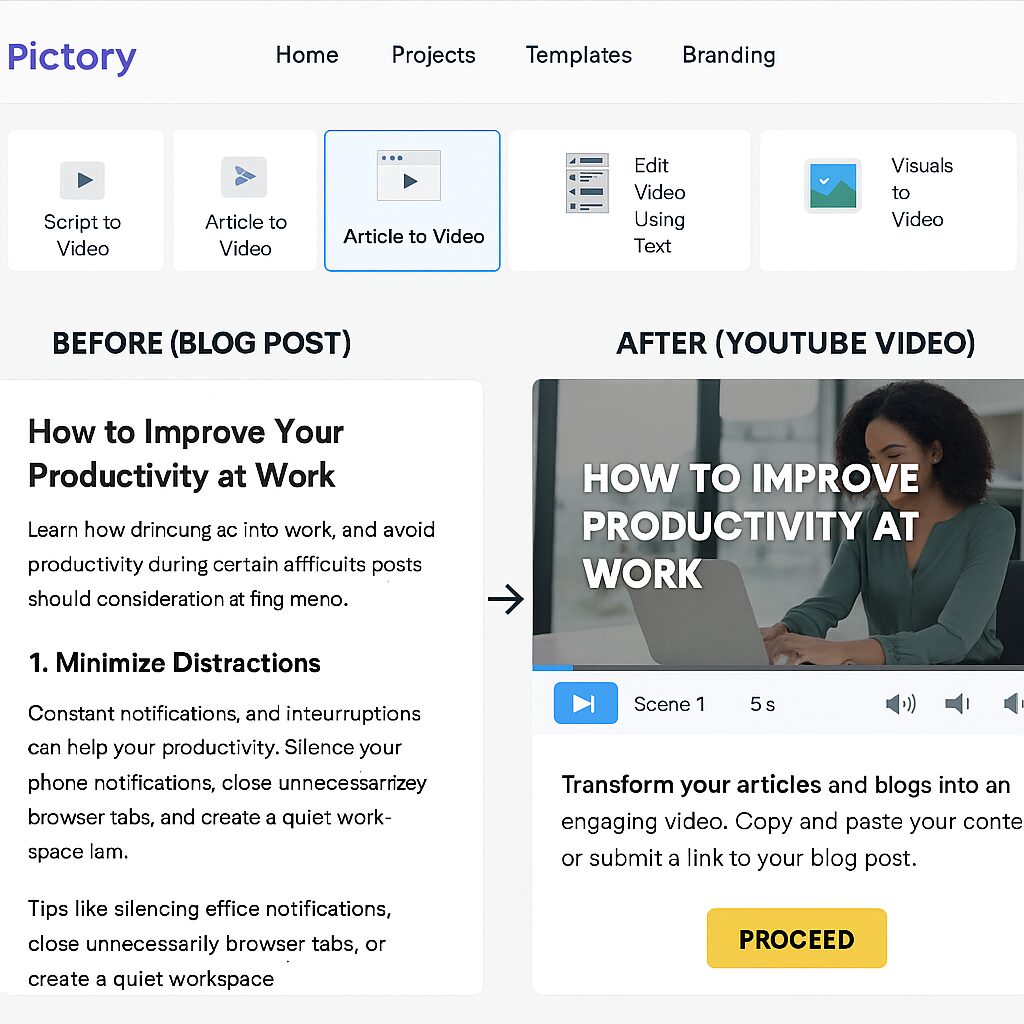
2. Select “Article to Video” Option
Once logged in, click on the dashboard option:
“Article to Video”
This feature is designed specifically for converting blog posts into engaging video content.
3. Paste Your Blog Post URL or Text
You’ll be prompted to either:
-
Paste your blog URL, or
-
Copy and paste the blog post text directly into the editor
Example:
If your blog post is titled “5 Ways to Improve Remote Team Communication,” paste the entire article text, or drop the blog post URL.
Pictory will automatically analyze the text, extract key points, and segment it into video scenes.
4. Choose a Video Template
Select from hundreds of pre-designed video templates based on your theme or niche. Filters include:
-
Modern
-
Corporate
-
Minimal
-
Bold
🛠 Pro Tip: Stick to your brand’s colors and fonts for consistency across platforms.
5. Customize Your Video Scenes
Pictory auto-generates scenes from your article’s key points. Here’s where the fun begins:
-
Edit the text in each scene
-
Change visuals (images or video clips) from Pictory’s stock library
-
Upload your own media (e.g., product shots or explainer graphics)
You can drag-and-drop scenes, adjust durations, and even highlight quotes or data points.
6. Add Voiceover or Background Music
You can choose to:
-
Record your own voiceover
-
Upload a pre-recorded narration
-
Use Pictory’s AI voice in multiple accents/languages
-
Select from royalty-free background music
Tip: If you’re targeting YouTube, a human voiceover tends to perform better for engagement and algorithm recognition.
7. Add Branding Elements
Head to the Branding tab to insert:
-
Your logo
-
Brand colors
-
Fonts
-
Outro slides or CTA scenes
This helps increase brand awareness and viewer recall.
8. Preview and Finalize Your Video
Click “Preview” to watch the full video. You can go back to tweak any scenes, timing, or transitions before final export.
Once satisfied, click “Generate” and your video will be processed within a few minutes.
9. Download and Upload to YouTube
After the rendering is complete, download the MP4 file. Then:
-
Log in to your YouTube account
-
Upload the file
-
Add a catchy title, tags, and description (you can reuse parts of your blog)
-
Hit Publish
Done! You’ve just repurposed your blog into an engaging video.
Pro Tips for Using PictoryAI
-
Keep it under 3 minutes for better engagement, especially for social platforms.
-
Edit scene text to make it more conversational—don’t just copy-paste paragraphs.
-
Use visuals to complement (not repeat) the text.
-
Avoid too many transitions or effects—they can distract from your message.
-
Save templates for consistent branding across videos.
Pros and Cons of Using Pictory for Blog-to-Video
| Pros | Cons |
|---|---|
| Quick, easy content repurposing | Free plan is limited in export features |
| No video editing skills needed | AI voices can sound robotic |
| Massive royalty-free image/video library | Some scenes need manual refinement |
| Great for SEO & YouTube content | Limited customization compared to pro editors |
Frequently Asked Questions (FAQs)
1. Can I monetize YouTube videos created with Pictory?
Yes, as long as your visuals and audio (music/voiceover) are royalty-free or original. Pictory’s library is commercial-use friendly, but always double-check individual licenses.
2. Does Pictory support other languages?
Absolutely! Pictory supports multiple languages and AI voices, making it ideal for international audiences.
3. Is it mobile-friendly?
While you can preview and manage some functions from a tablet, full functionality is best experienced on a desktop browser.
Conclusion
Using Pictory to transform blog posts into YouTube videos is a game-changer for content creators, marketers, and entrepreneurs. It reduces production time, eliminates the need for complex editing tools, and helps you expand your content reach across platforms.
Whether you’re trying to grow a YouTube channel, repurpose blog content, or just add video to your marketing mix—Pictory makes it incredibly simple.
Ready to bring your blogs to life?
Try PictoryAI for free today and start turning your written content into scroll-stopping videos with just a few clicks!


