Skip the hassle of manually sending your family all the vacation photos — enable a shared iCloud Photo library instead. Everyone in your family automatically gets all the family photos as if the images were in their own camera roll — in full quality.
Your iPhone will identify faces in photos (securely and privately), and any pictures of people who are in the family will be added to the shared library. If all of your phones are in the same place while you’re taking a lot of pictures, even if you aren’t in them (like at an aquarium or a museum), those pictures will be added automatically, too. As you’re shooting in the camera, you can easily toggle between the shared library for everyone and the private photo library on your own devices.
Starting a Shared Photo Library with your family is the best way to organize family photos. Continue reading to see how to turn it on.
Enable Shared iCloud Photo Library
Table of Contents:
- Set up and invite people to your shared iCloud Photo Library
- Add or remove photos from the shared library
- Switch camera modes
- Remove people from a shared iCloud Photo Library
- Delete your shared library
- Summary
Set up Shared iCloud Photo Library
Screenshot: D. Griffin Jones/Cult of Mac
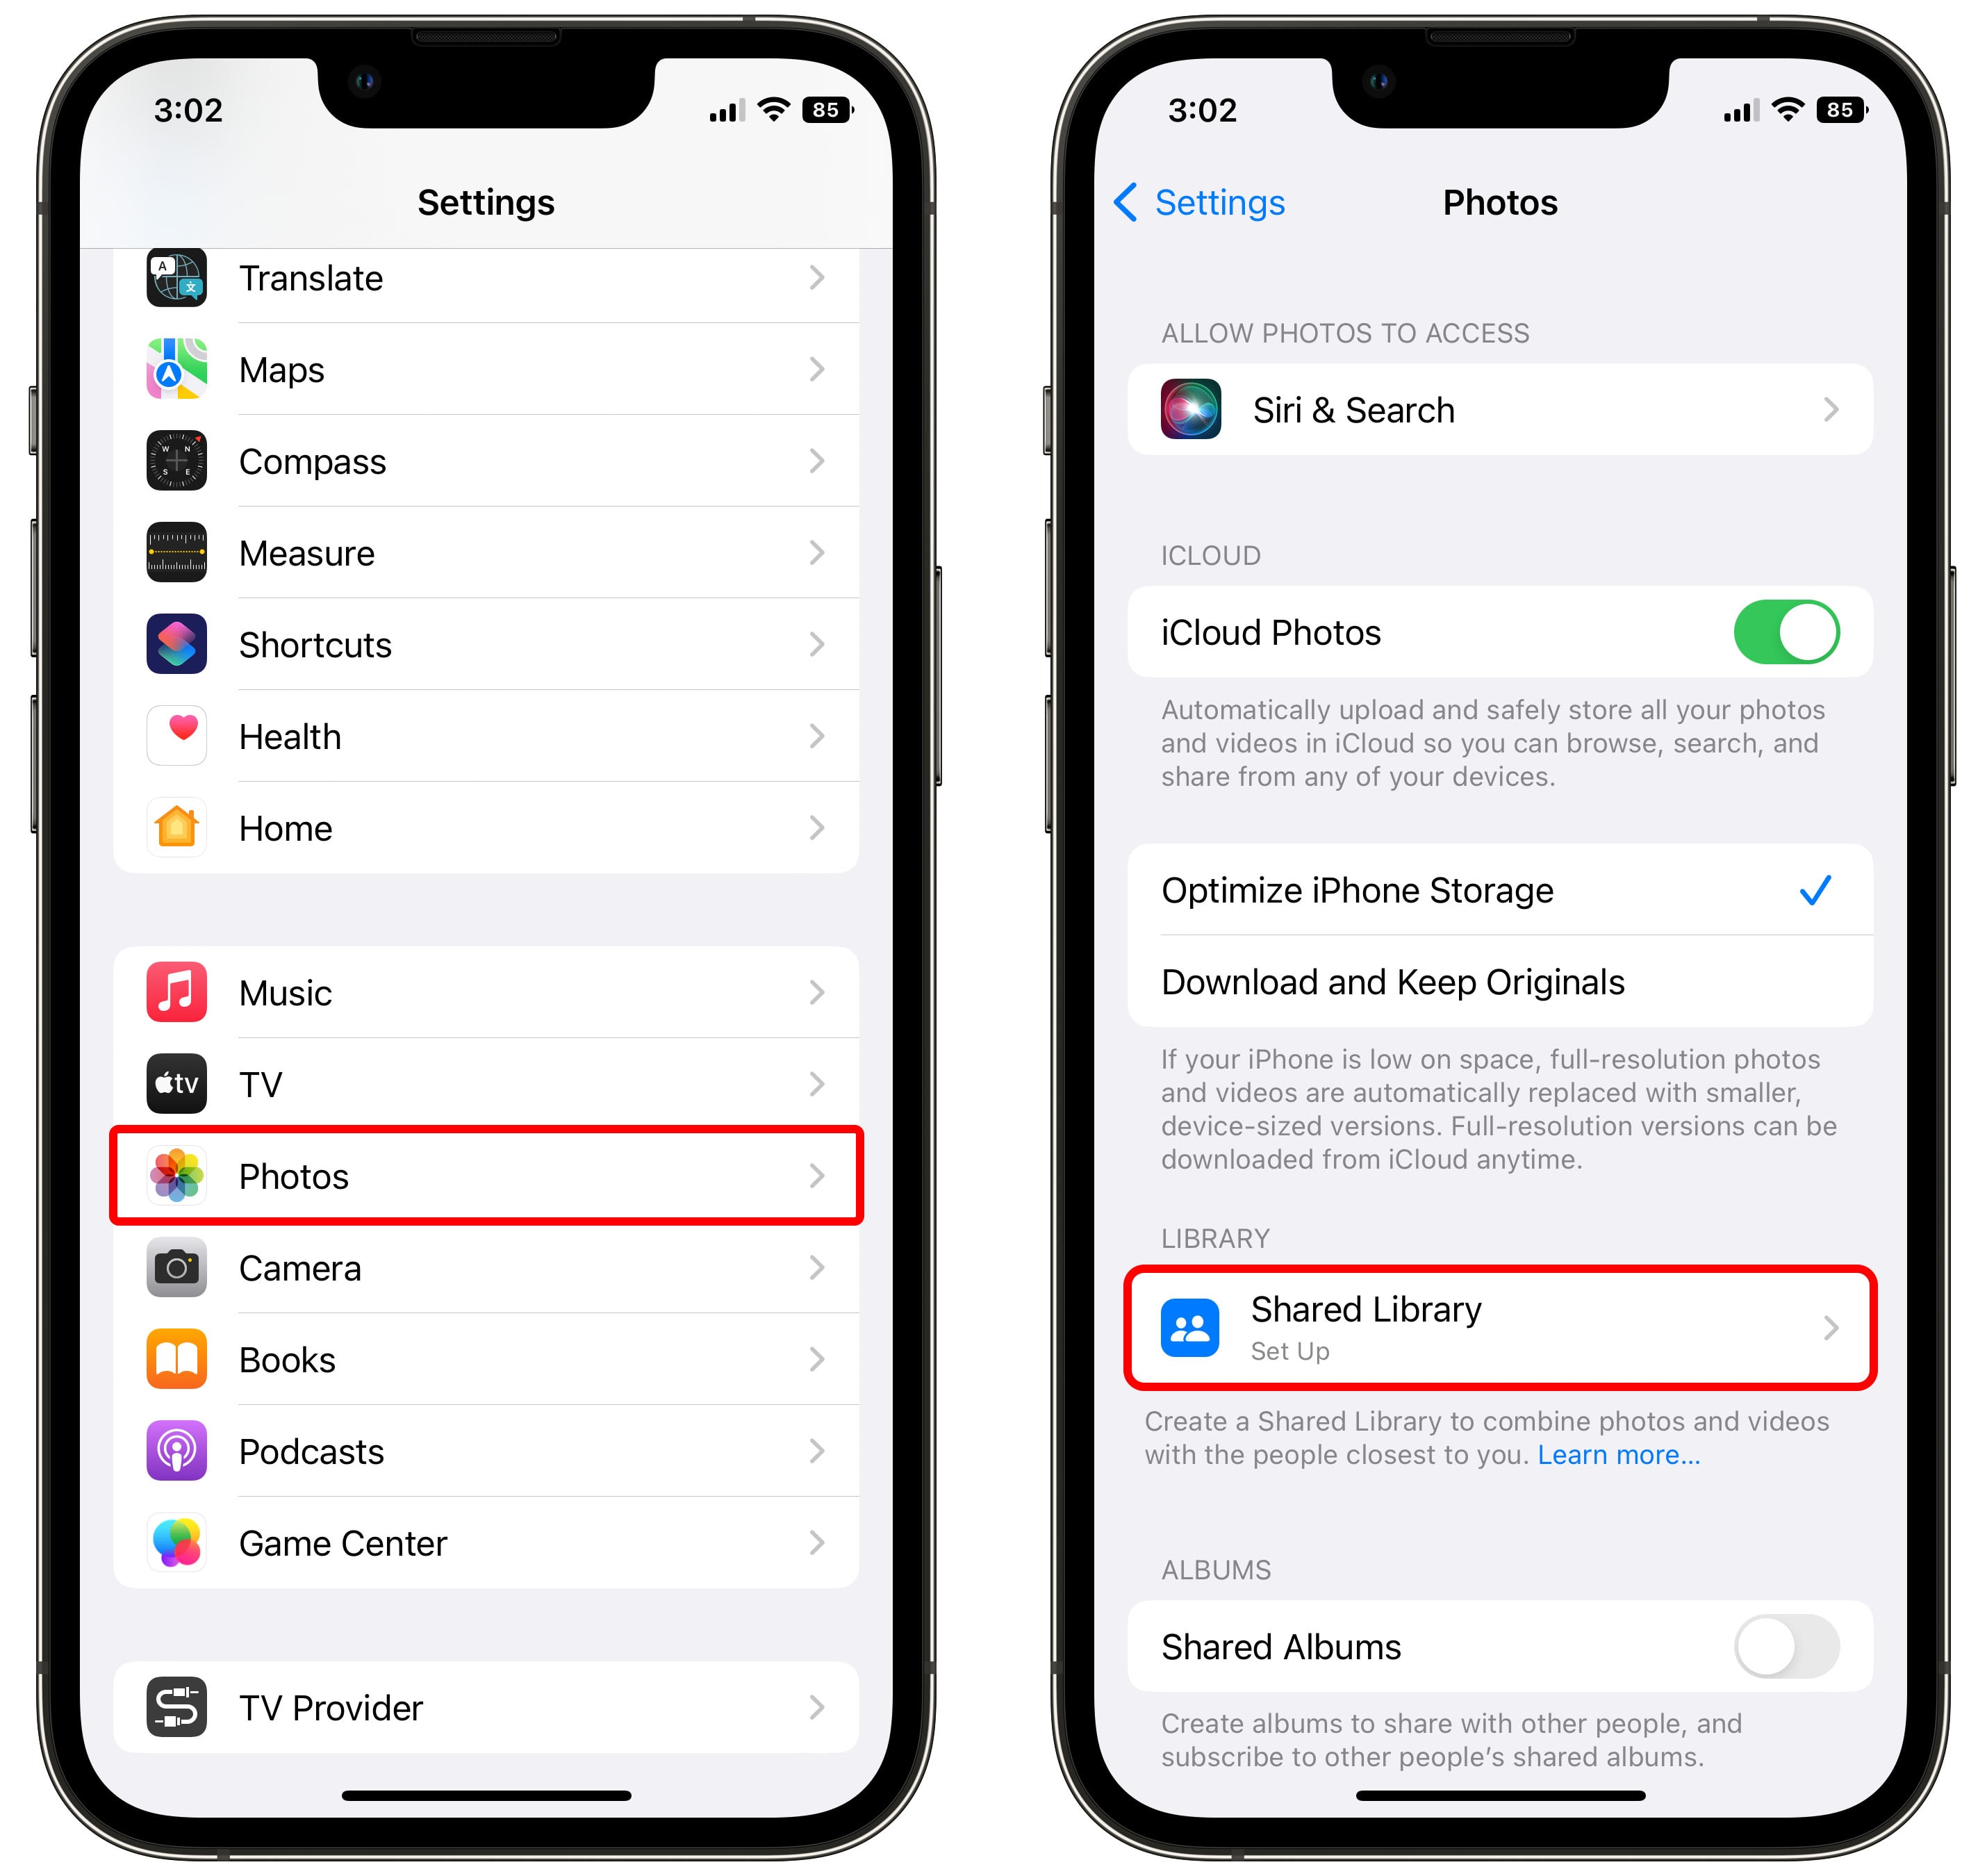
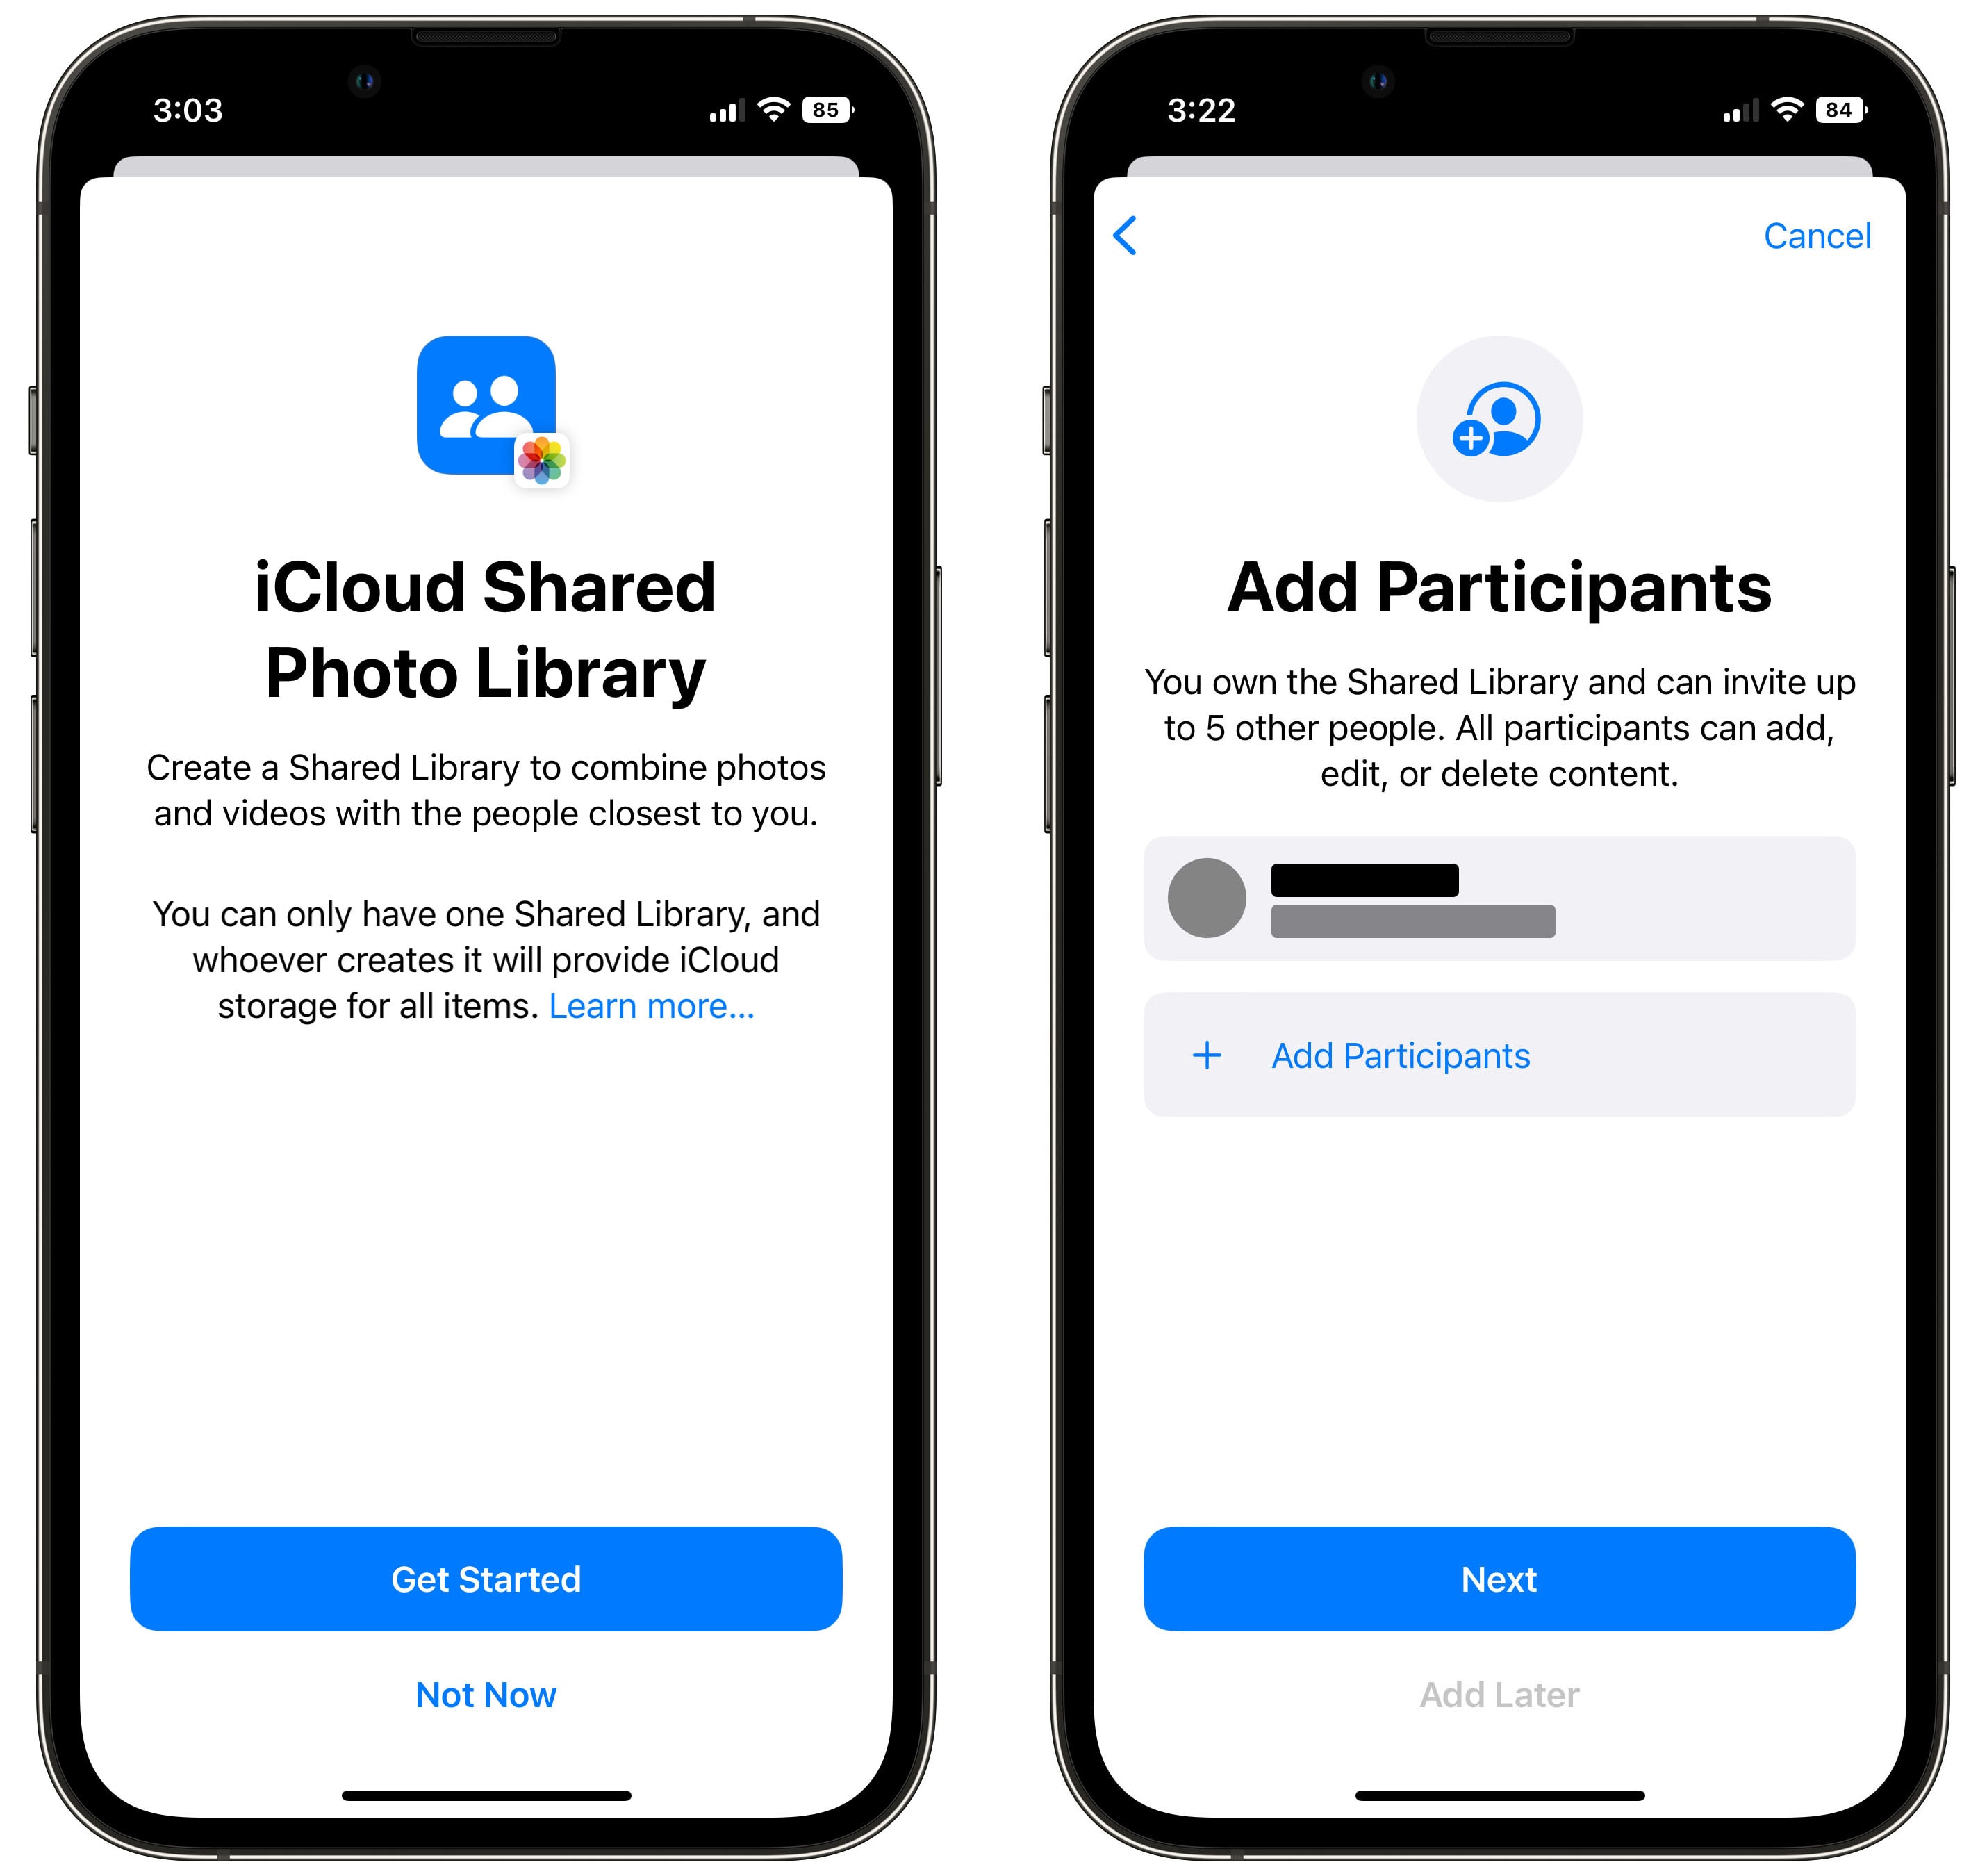
To turn it on, go to Settings > Photos > Shared Library. You can only have one Shared Library, but you can share it with up to five people. Tap Get Started to continue.
Screenshot: D. Griffin Jones/Cult of Mac
Everyone you invite will be able to add, edit or delete shared photos. Tap Add Participants to search for contacts to add to your photo library. I recommend adding them by their Apple ID, or an email address, rather than their phone number, if possible.
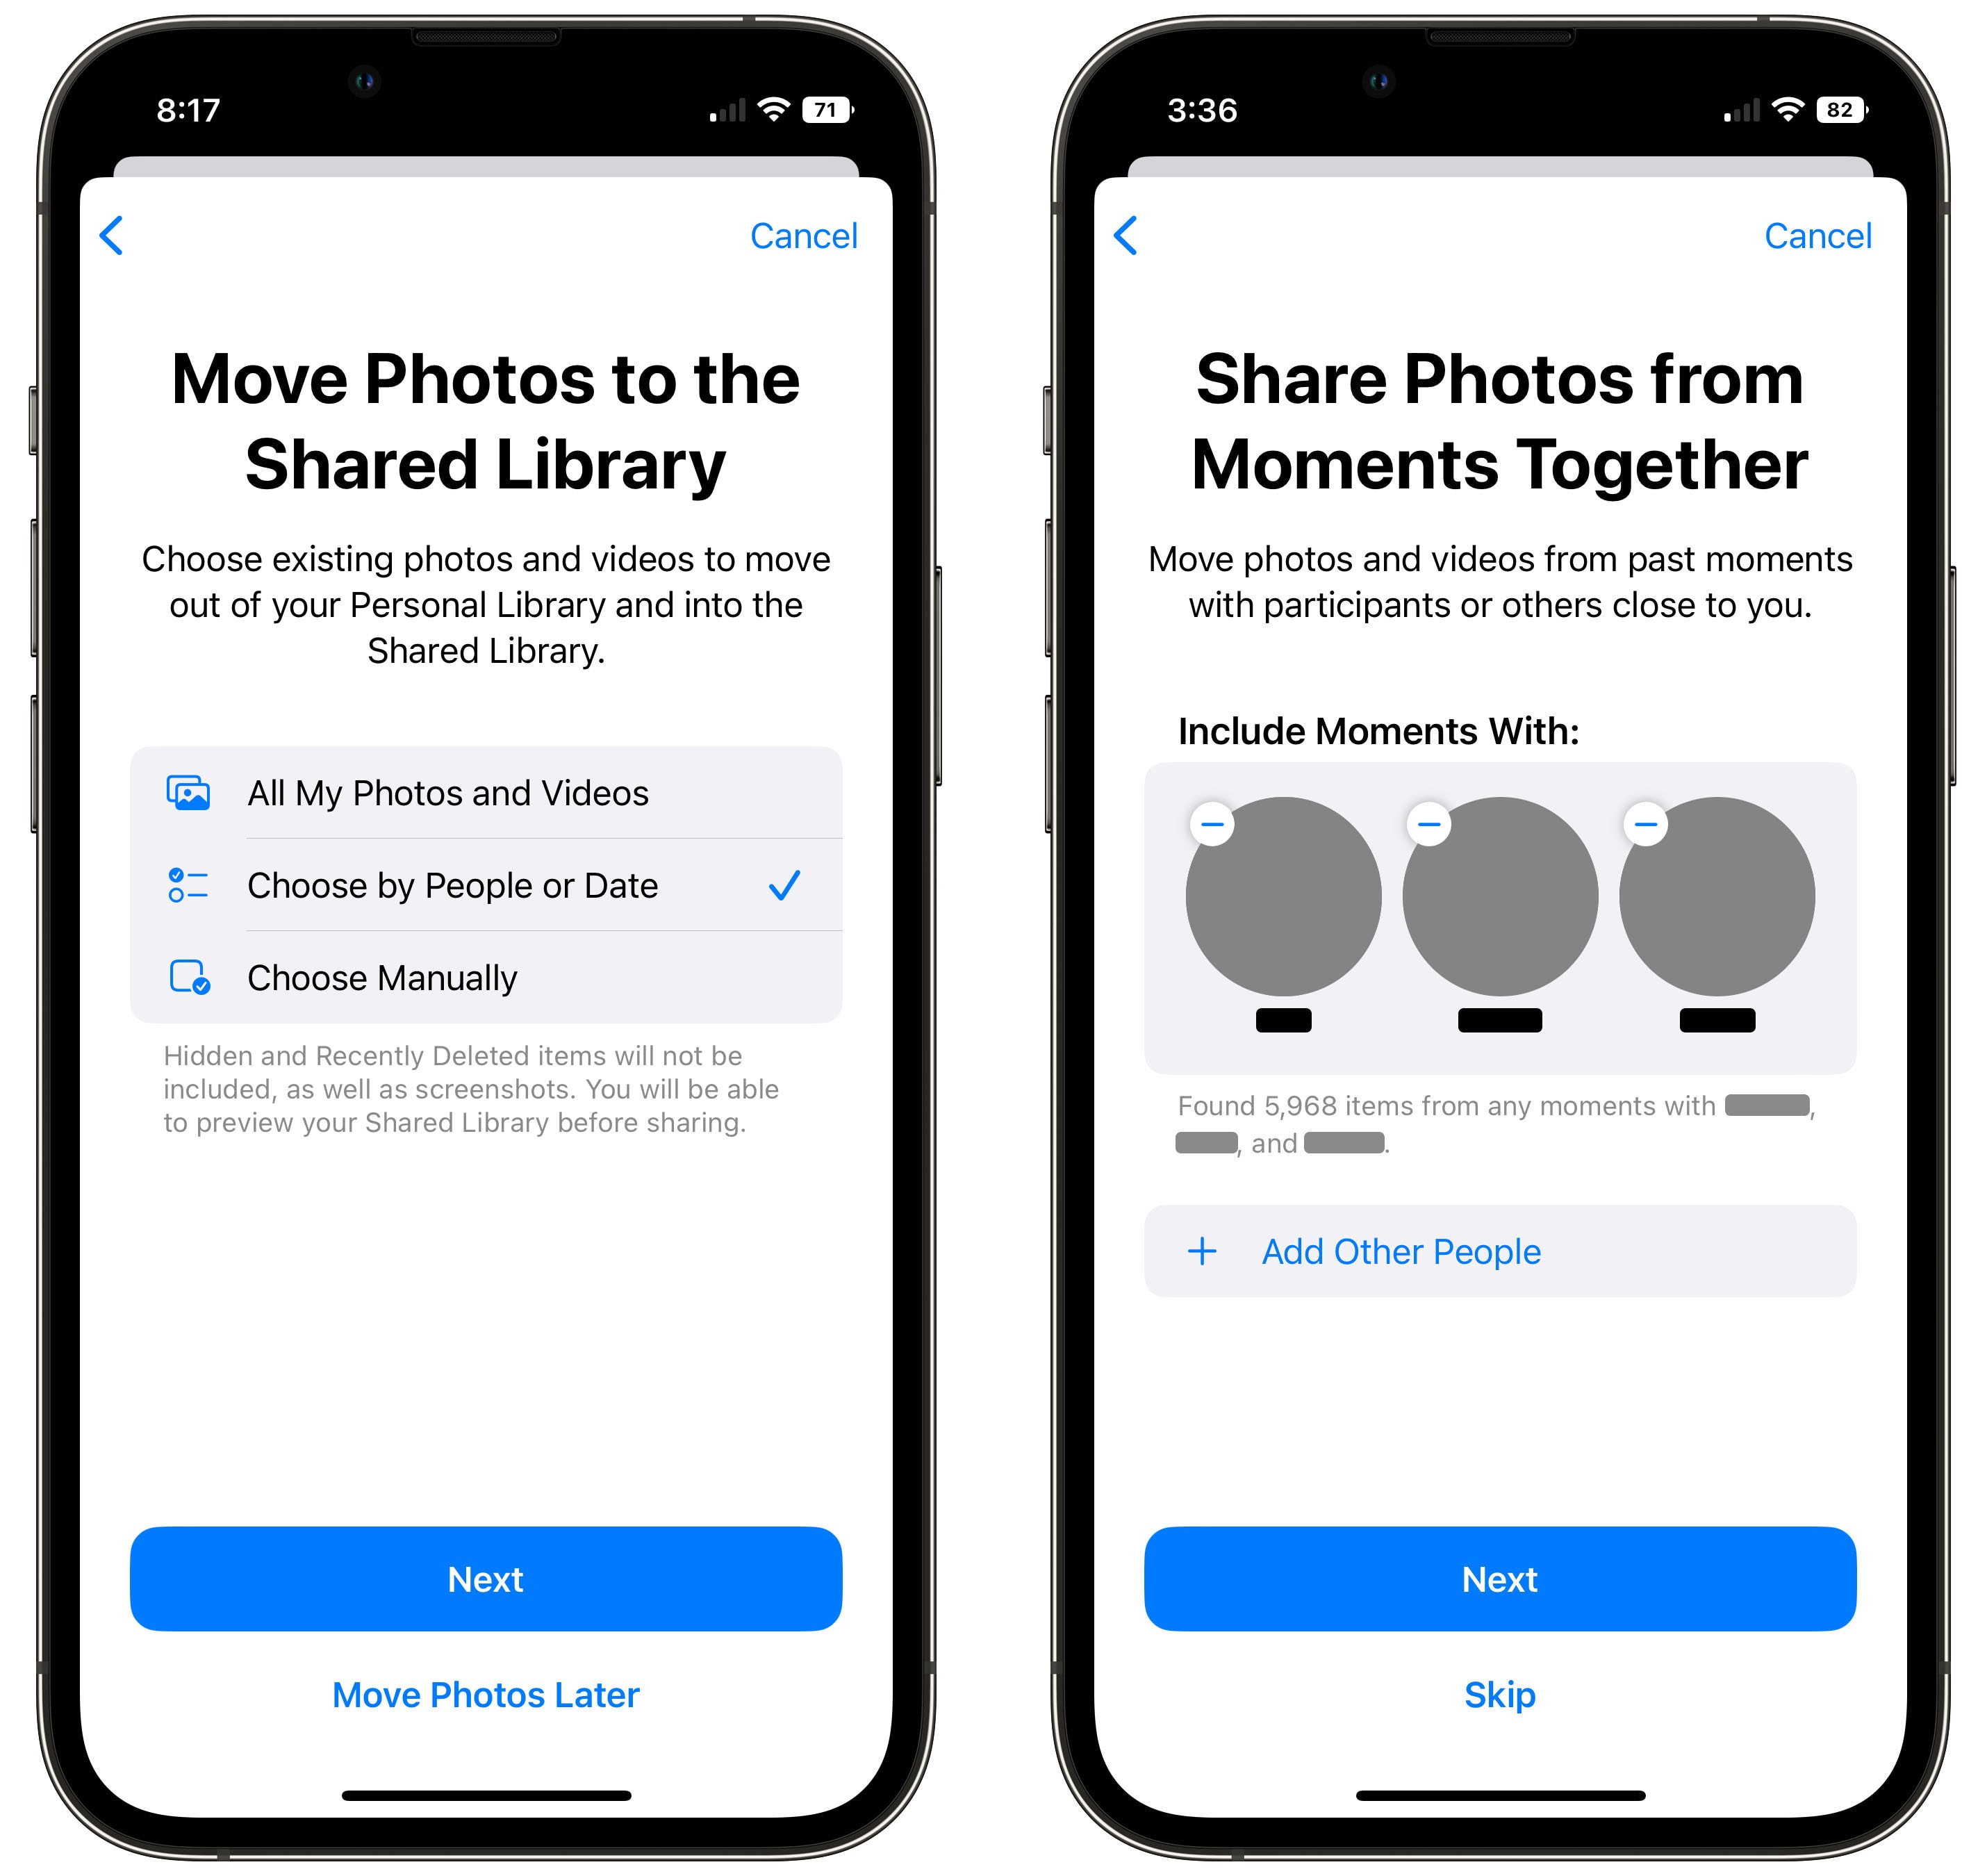
Next, you can pick which photos to add to the shared library. You have four options:
- The first option is to simply share all pictures and videos — your entire library. (Except for the photos from your Hidden album.)
- You can share pictures of specific people, like pictures of your significant other and/or your mutual friends; or you can choose a date and share all photos after that time. If you have a large history of photos that your close friends or family might not care to have in the shared library, you can choose a more selective approach.
- You also can use an entirely manual selection. You’ll be prompted to pick specific photos to add.
- You can skip adding any photos right now. You can always add photos to the Shared Library later.
Personally, I went with Choose by People. My photo library spans all the way back to 1999, and my wife isn’t interested in having all of those photos before we met. I selected to share pictures of her, everyone in her family and our mutual friends.
Tap Next when you have chosen the images, or tap Move Photos Later.
If you chose to share photos of specific people, tap Add Other People to pick some of your mutual friends and family. You may be asked to identify whether some photos in your library are of the people you selected or not. Tap Skip if you don’t want to share pictures this way.
You also can pick a specific date after which to share all photos. Pick a date from the calendar and tap Next or just tap Skip instead. I picked our wedding date. Sure, there are some pictures after that she may not want, but as you’ll see in the next step, you can manually fine-tune the results.
Double check the library before sharing
Screenshot: D. Griffin Jones/Cult of Mac
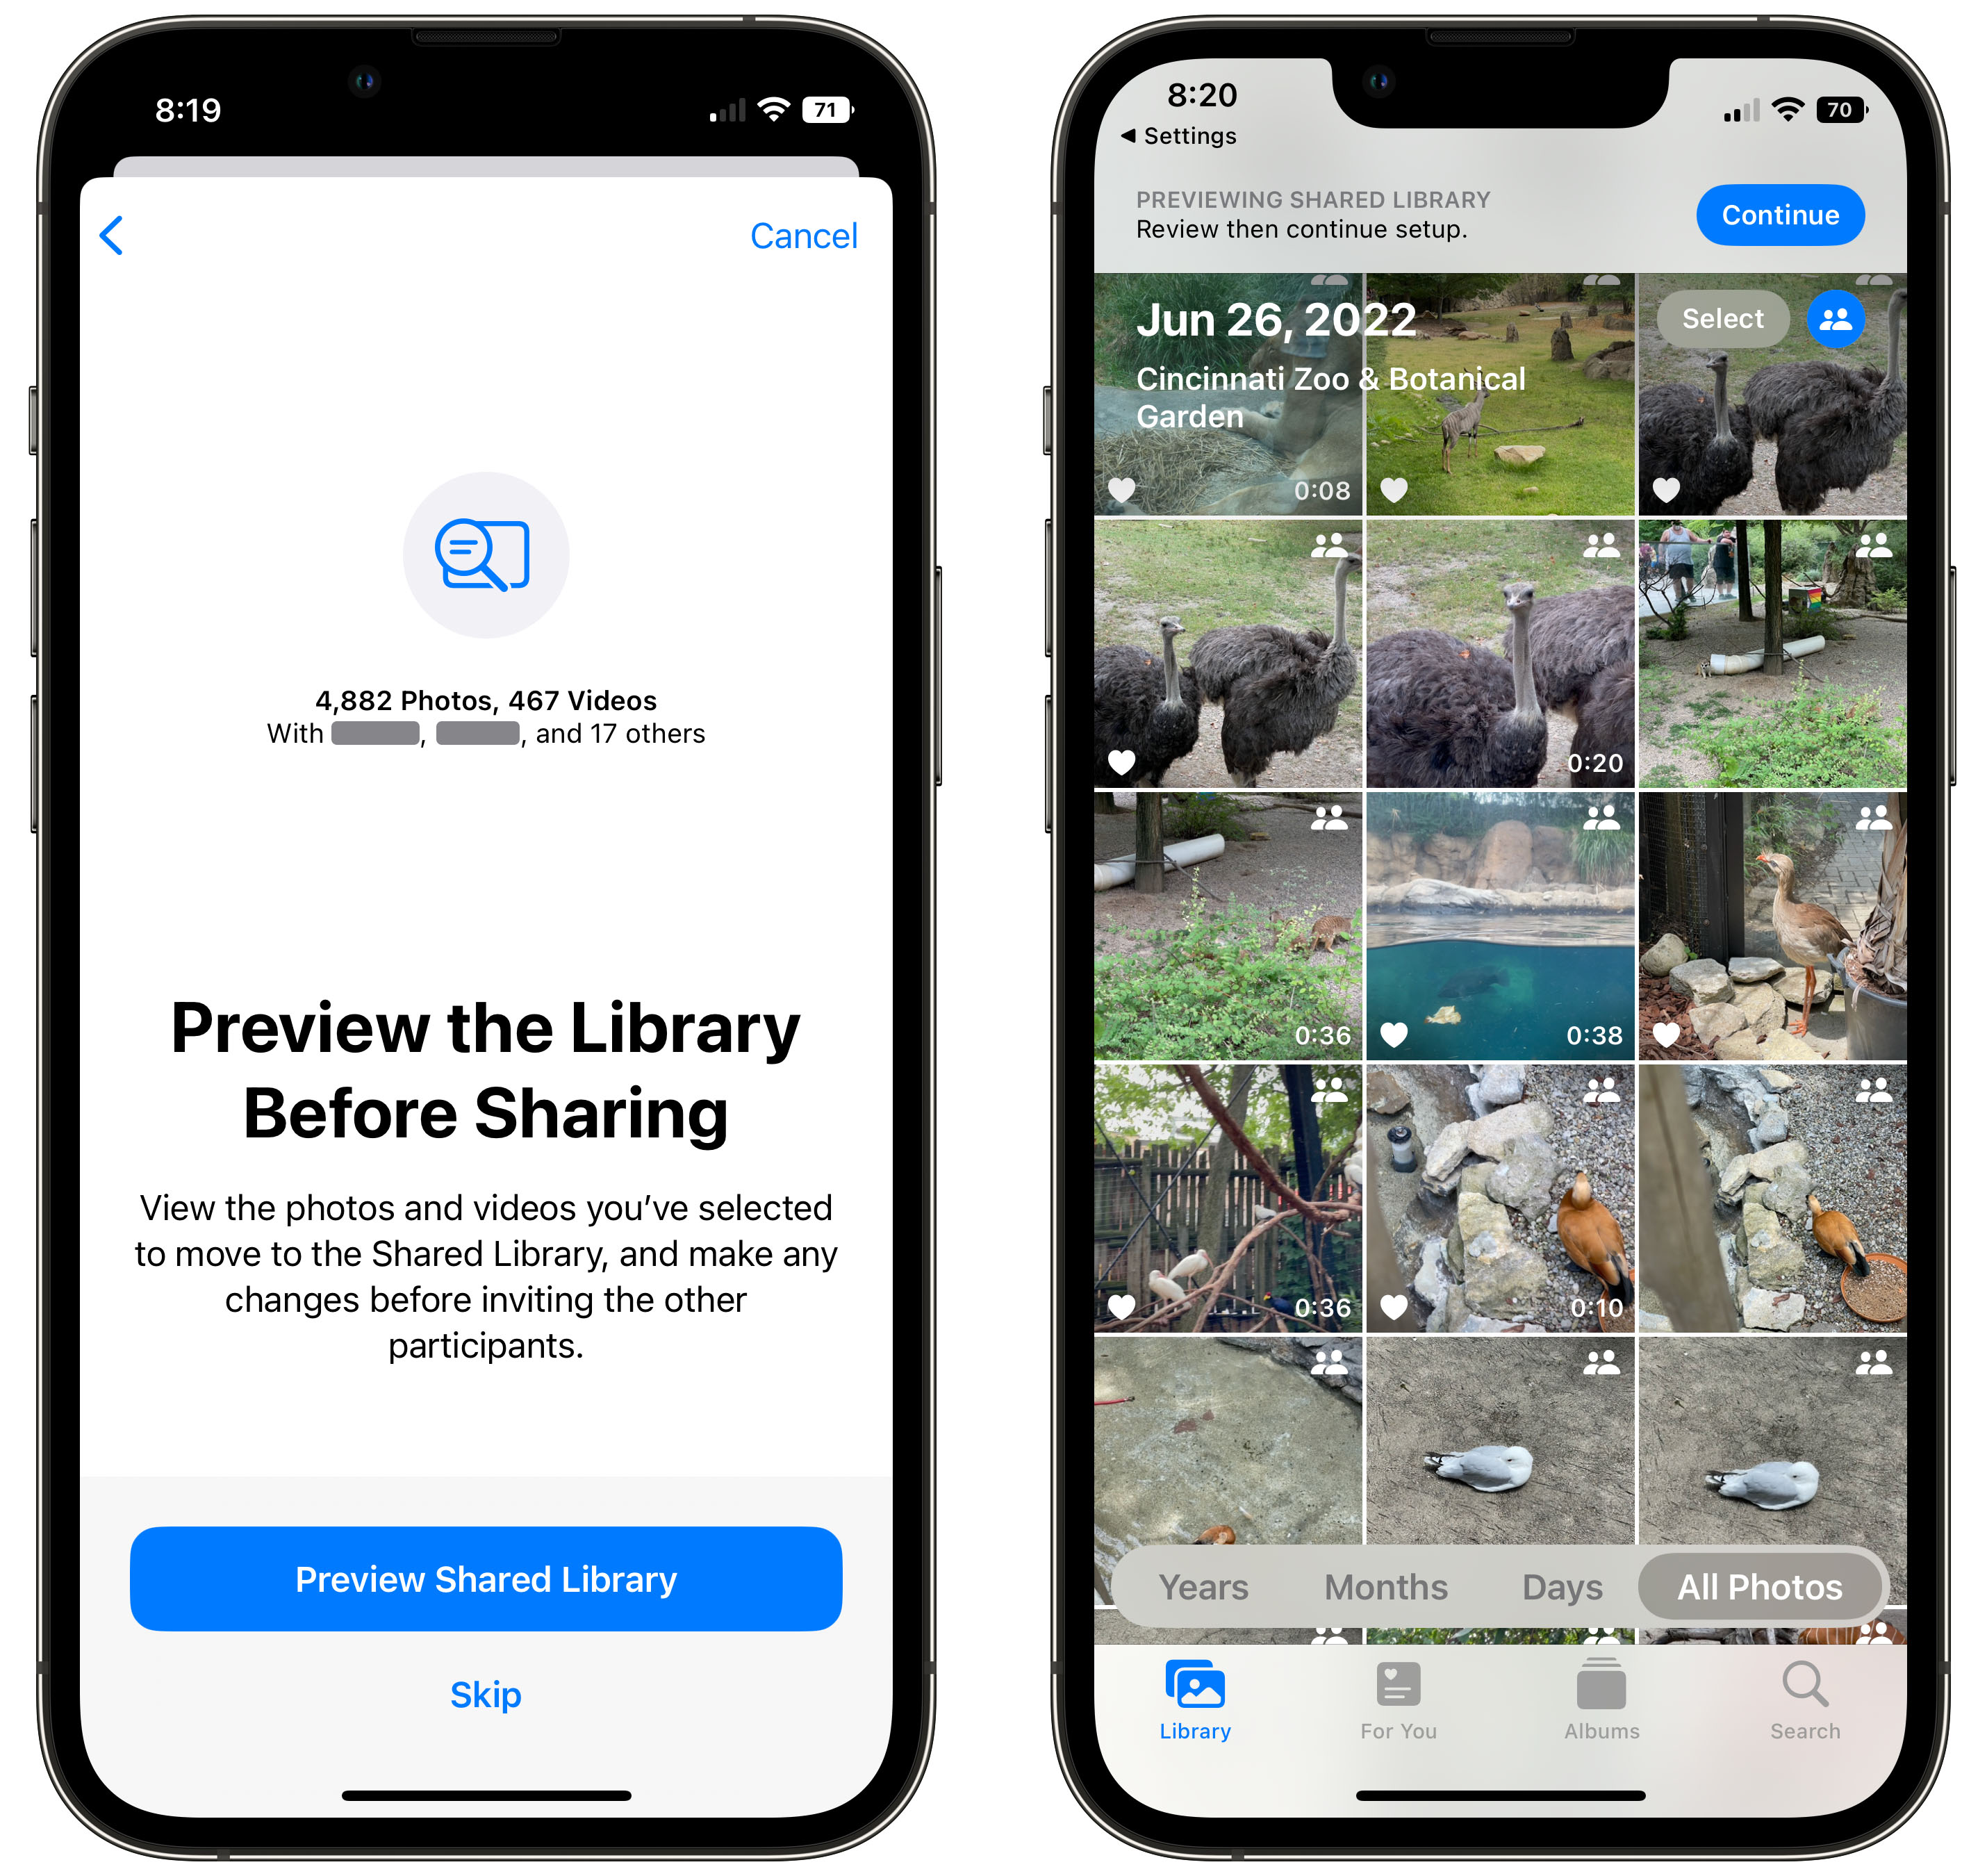
Next, you can tap Preview Shared Library to double-check the pictures you’ve selected. If you see pictures in here you don’t want shared, tap Select, tap and drag to select a range of photos, and tap Move to Personal Library.
You also can add photos to the shared library if they aren’t shown. Tap the icon in the top right to switch to your personal library, tap Select, tap and drag to select some photos and tap Move to Shared Library.
I took a lot of time at this step sharing and unsharing pictures. Tap Continue when you’re done.
You’re now ready to invite someone to your shared library. You can send your invitations through Messages or pick another way with the Share menu.
Next, you’ll be asked whether you want your camera to intelligently share photos or not. If your phone detects your family’s phones nearby, pictures you take in the camera will automatically be uploaded to the shared library. Either way, you’ll be able to tap a button in the camera to switch modes, but I strongly recommend tapping Share Automatically.
Accepting an invitation
When someone receives an invitation, they’ll be prompted with the same dialog where they can pick which pictures they want to contribute to the shared library. If they don’t want to add any, they can tap Move Photos Later.
Add or remove photos from your Shared Photo Library
Screenshot: D. Griffin Jones/Cult of Mac
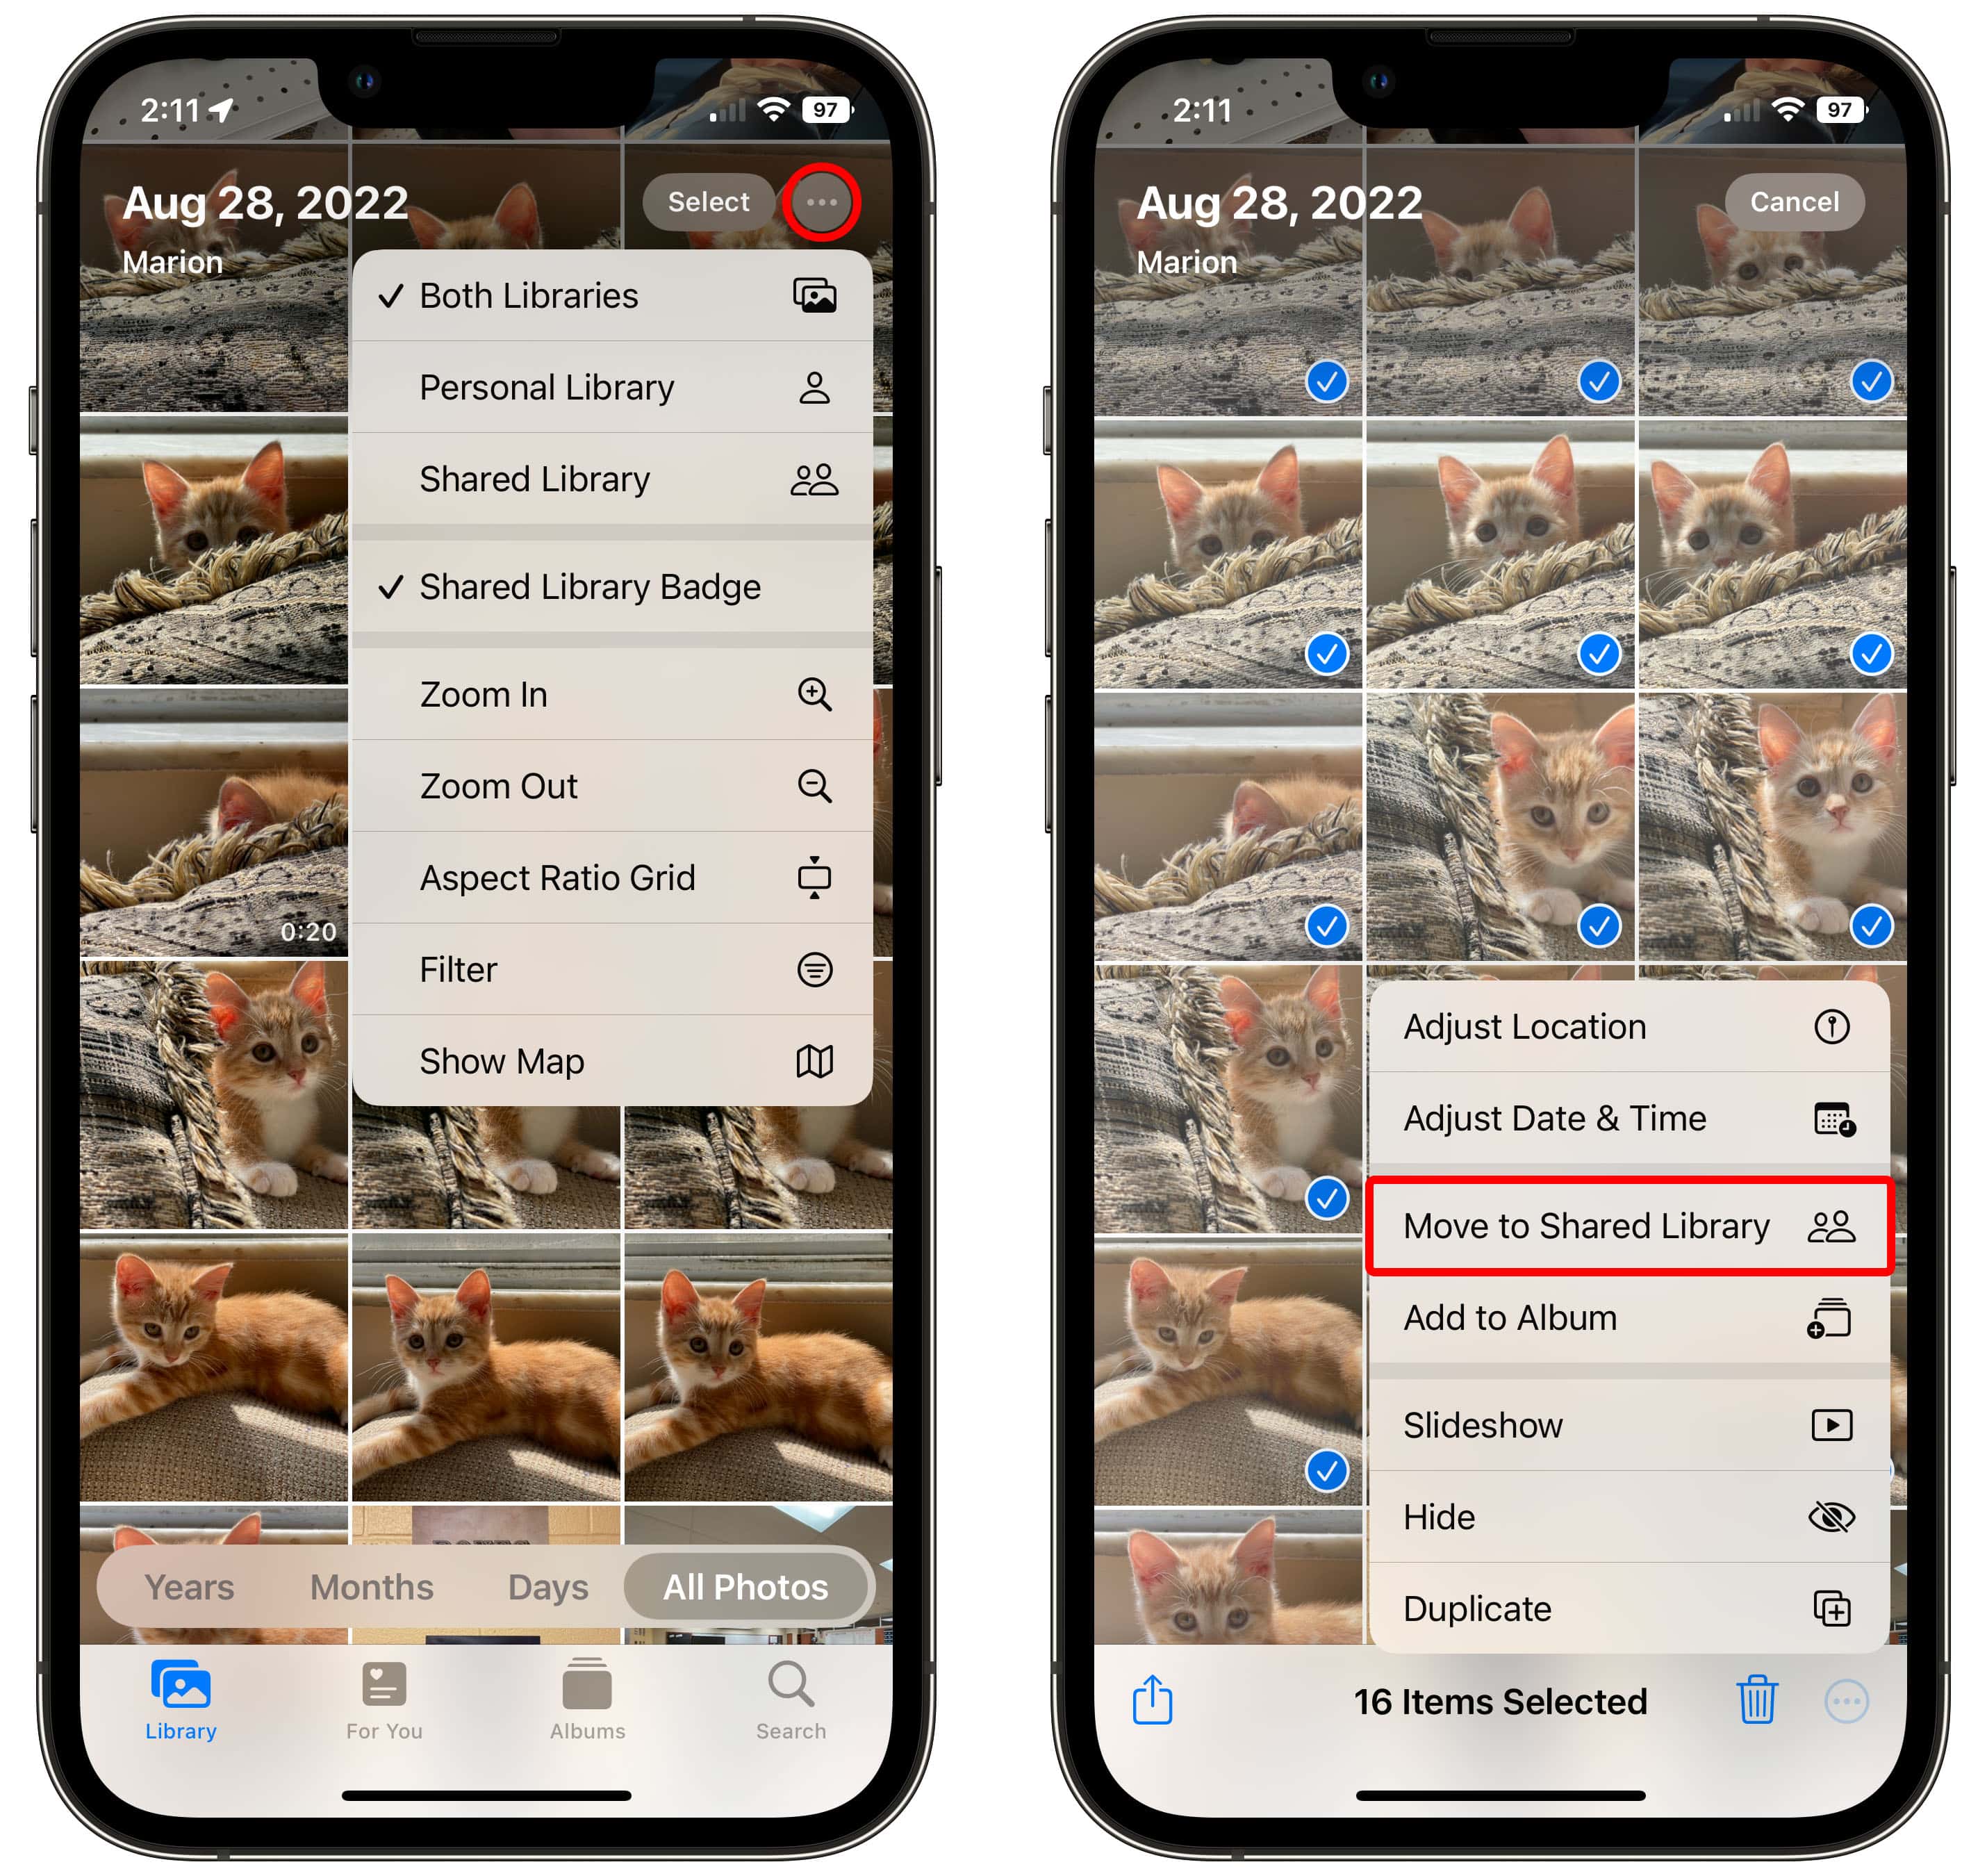
Which photos are in your personal library and which are in the shared library? By default, shared photos will have a little icon of two people in the corner. Tap the icon in the top left and you can filter whether you’re looking at both sets of photos (Both Libraries), filter by shared pictures (Shared Library) or filter by your personal pictures that are not shared (Personal Library).
To share (or unshare) a picture, tap Select, tap or drag your finger across a set of pictures, tap the three dots button and select either Move to Shared Library or Move to Personal Library. If you’re moving just one picture, you can tap and hold it and find the same option in the pop-up menu.
Switch between libraries from the camera
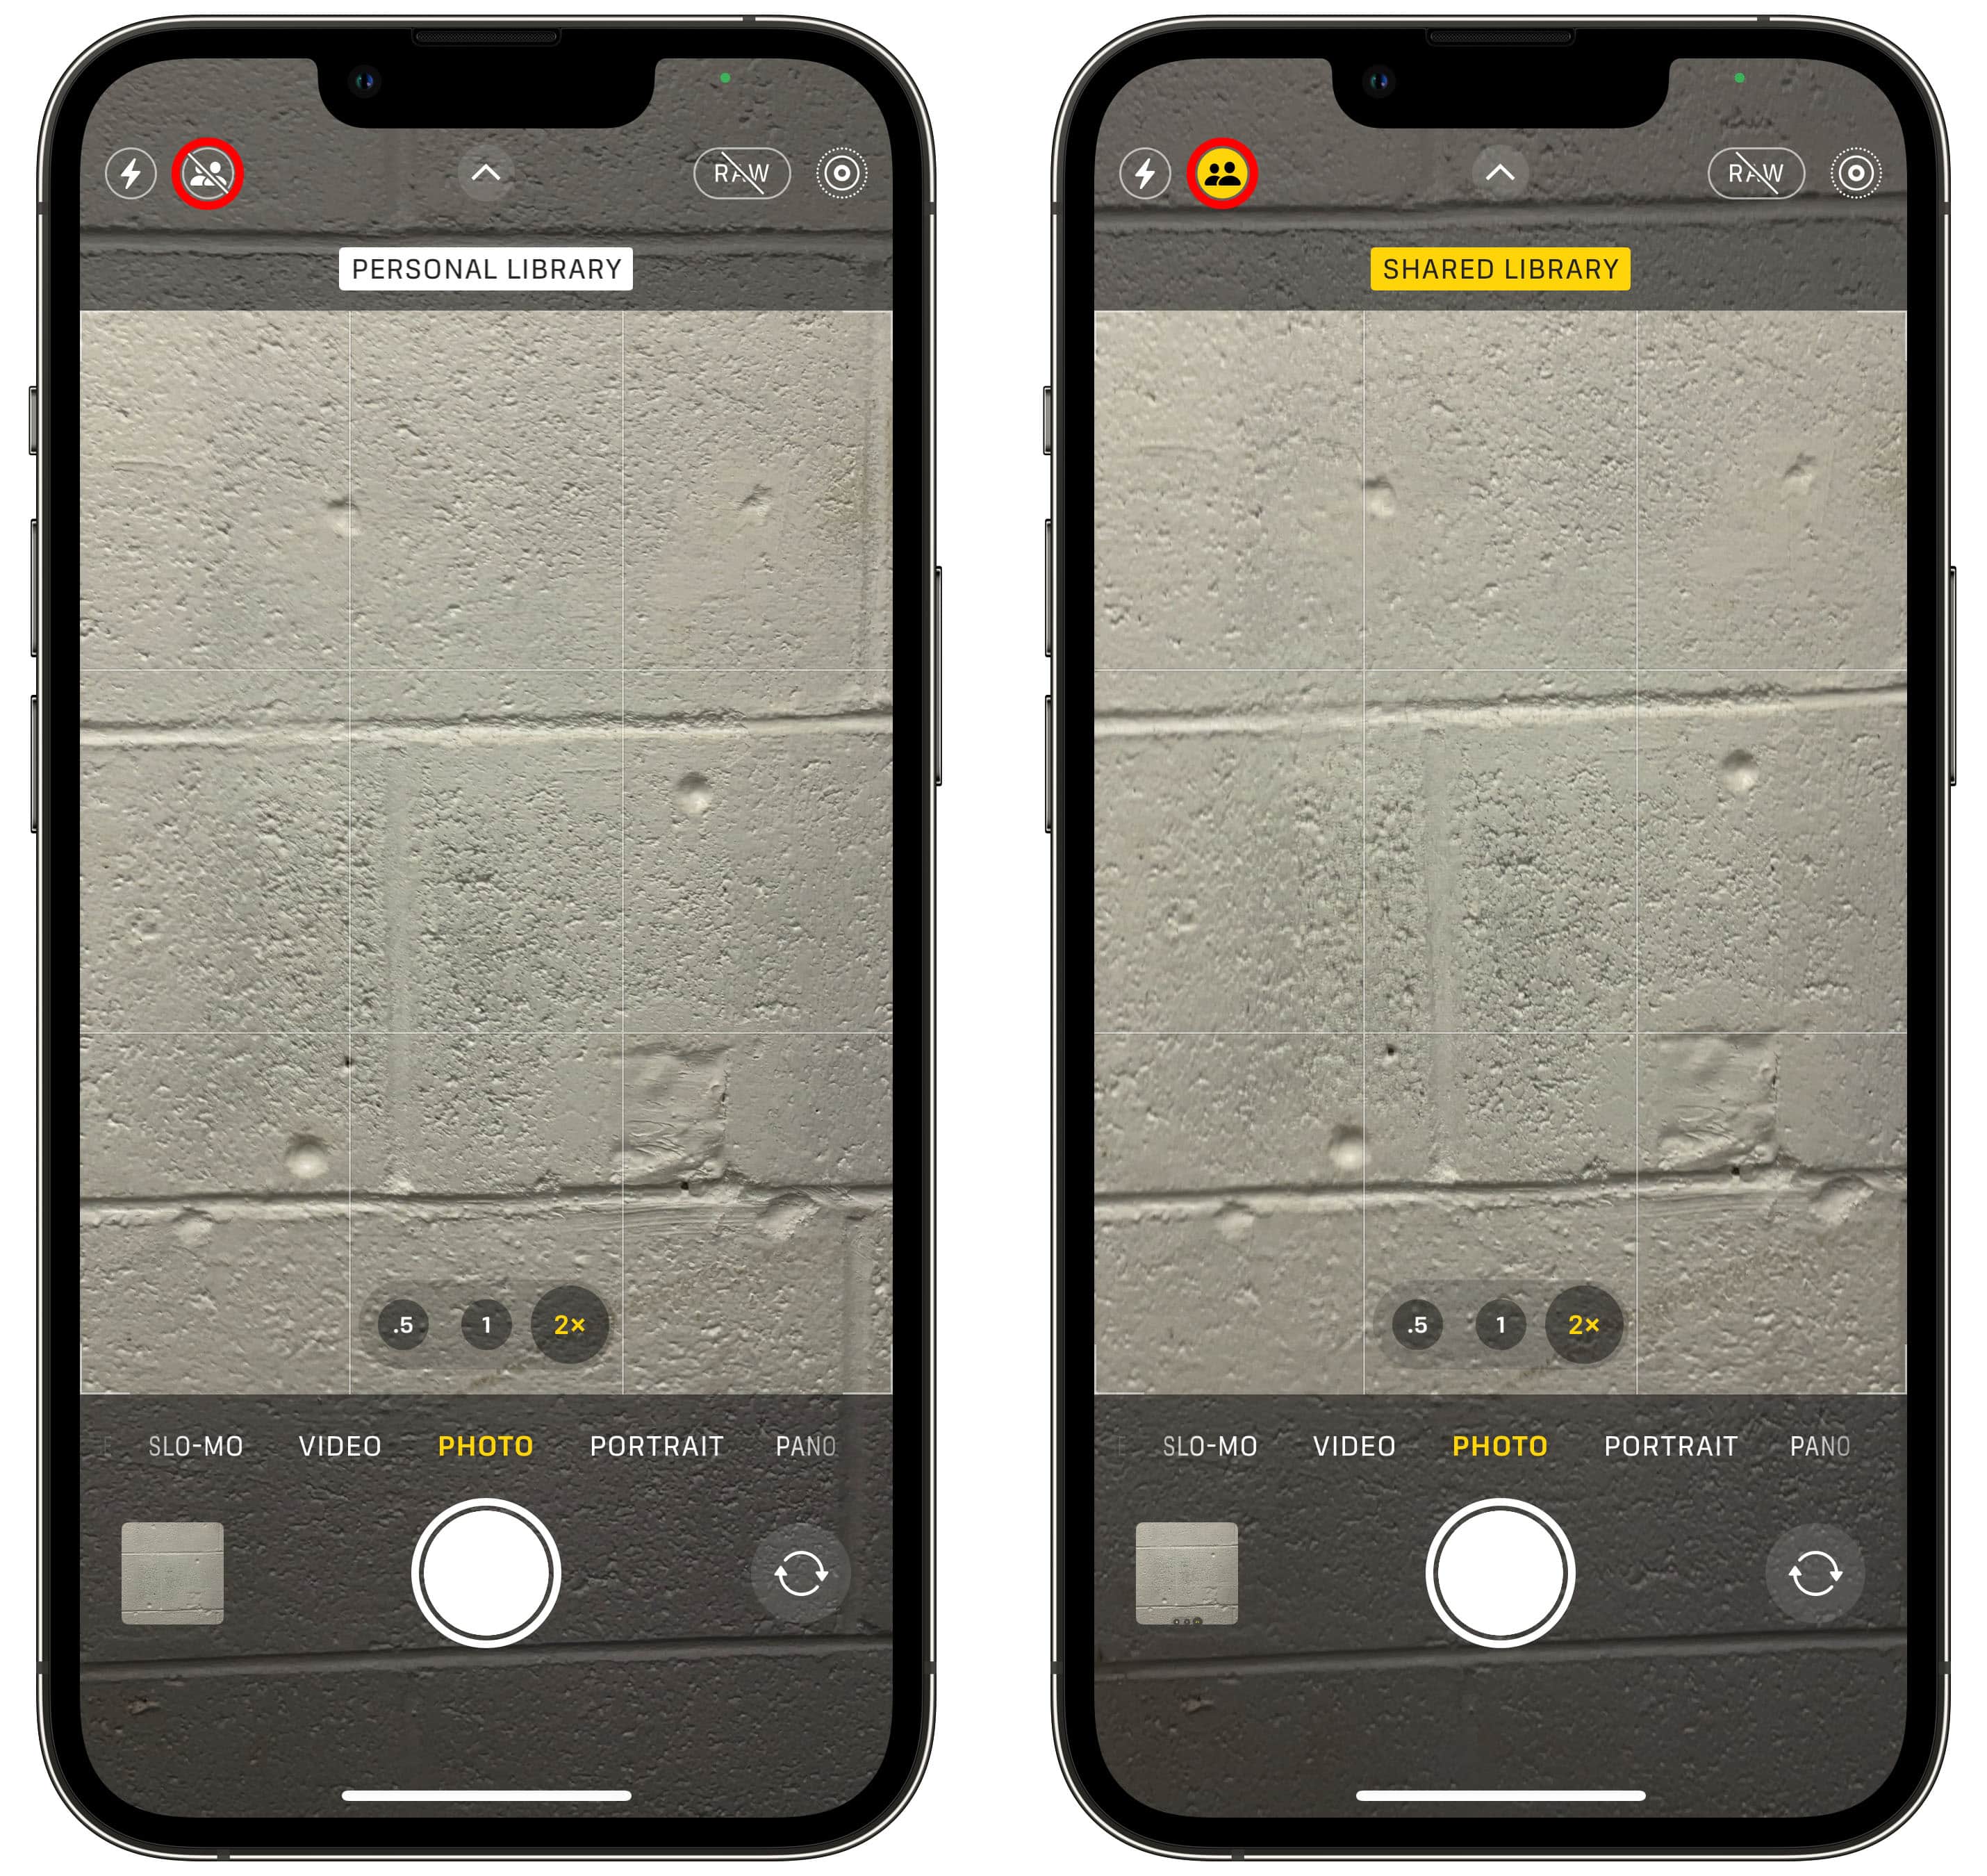
Your phone will intelligently decide whether to send pictures to the Shared Library or your Personal Library every time you open the camera. According to Apple, “When other shared library members are nearby,” the feature will turn on automatically. And after the fact, you will “get smart suggestions for adding photos to the shared library in For You.”
Screenshot: D. Griffin Jones/Cult of Mac
To switch by hand, you can always tap the person icon at the top of the camera. When it’s bright yellow, your photos will go to the Shared Photo Library.
For example, if I’m out with friends, my wife might want to see the group photos I take — even if she couldn’t make it. But she definitely doesn’t need or want my many glamour shots of Mac keyboards in her library.
Remove people from your Shared Photo Library
Screenshot: D. Griffin Jones/Cult of Mac
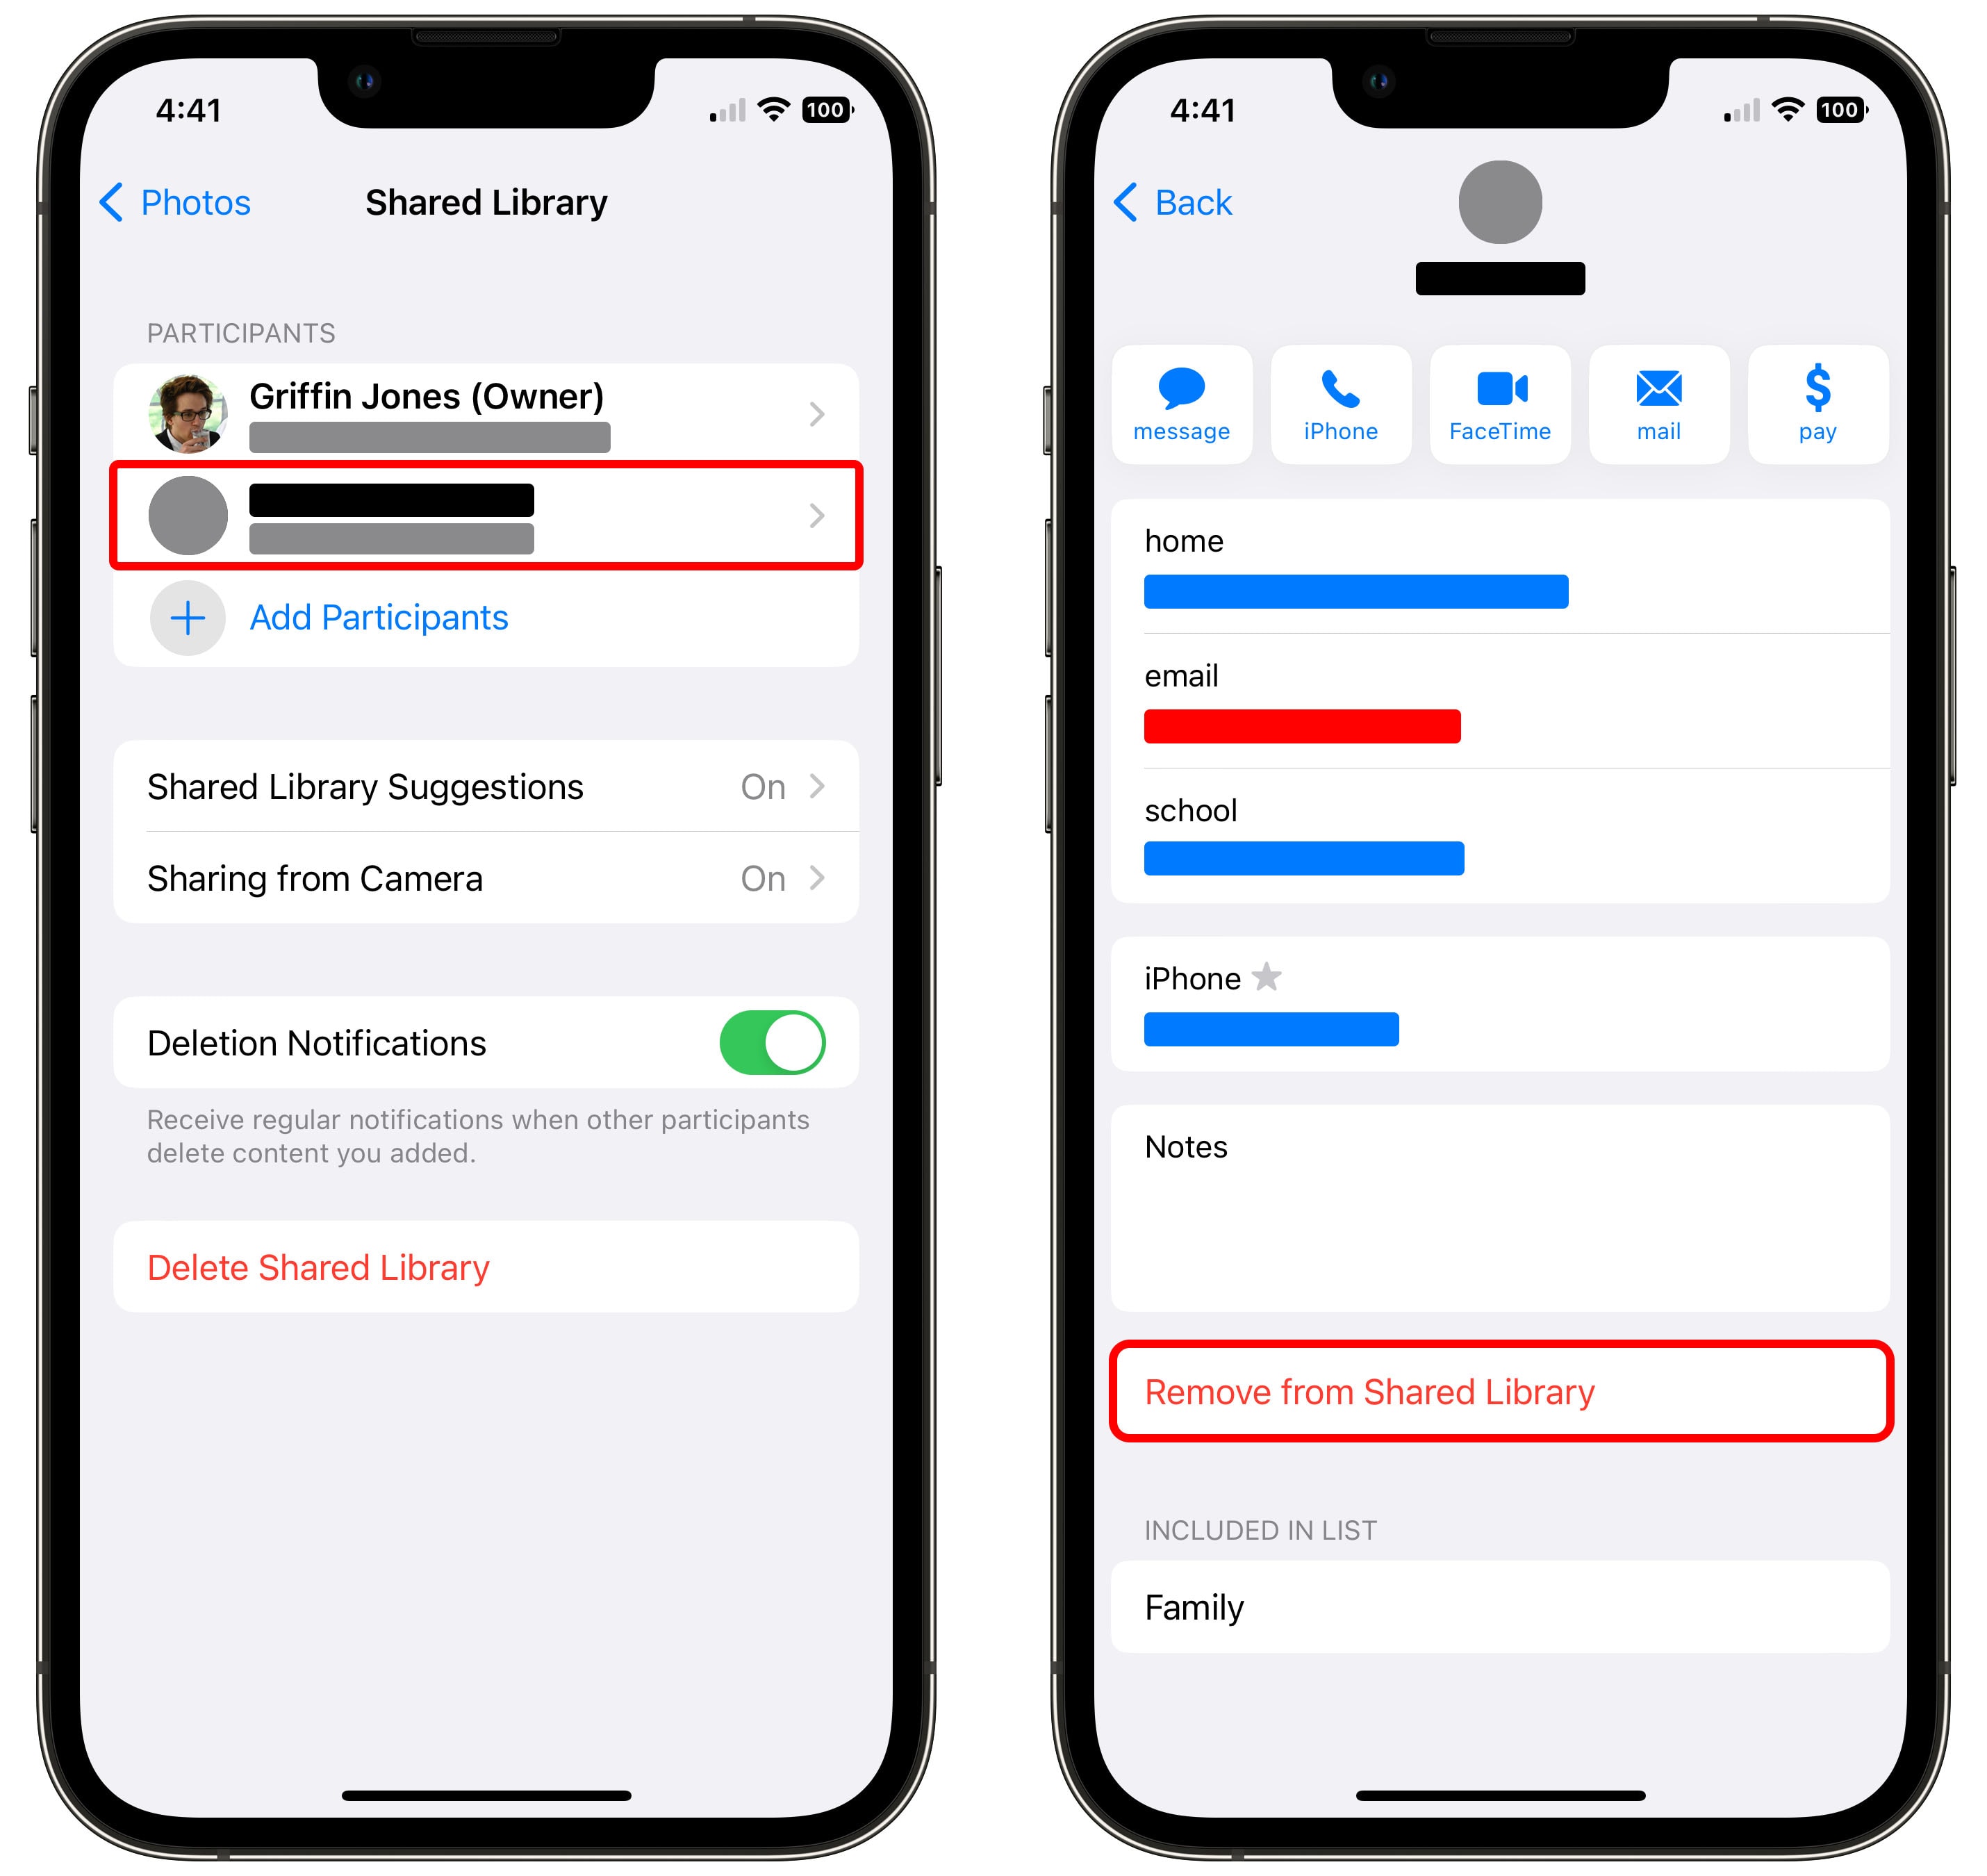
To remove someone from your Shared Photo Library, go back to Settings > Photos > Shared Library, tap on their name and tap Remove from Shared Library. Confirm you want to remove them by tapping Remove from Shared Library again.
Delete your Shared Library
Screenshot: D. Griffin Jones/Cult of Mac
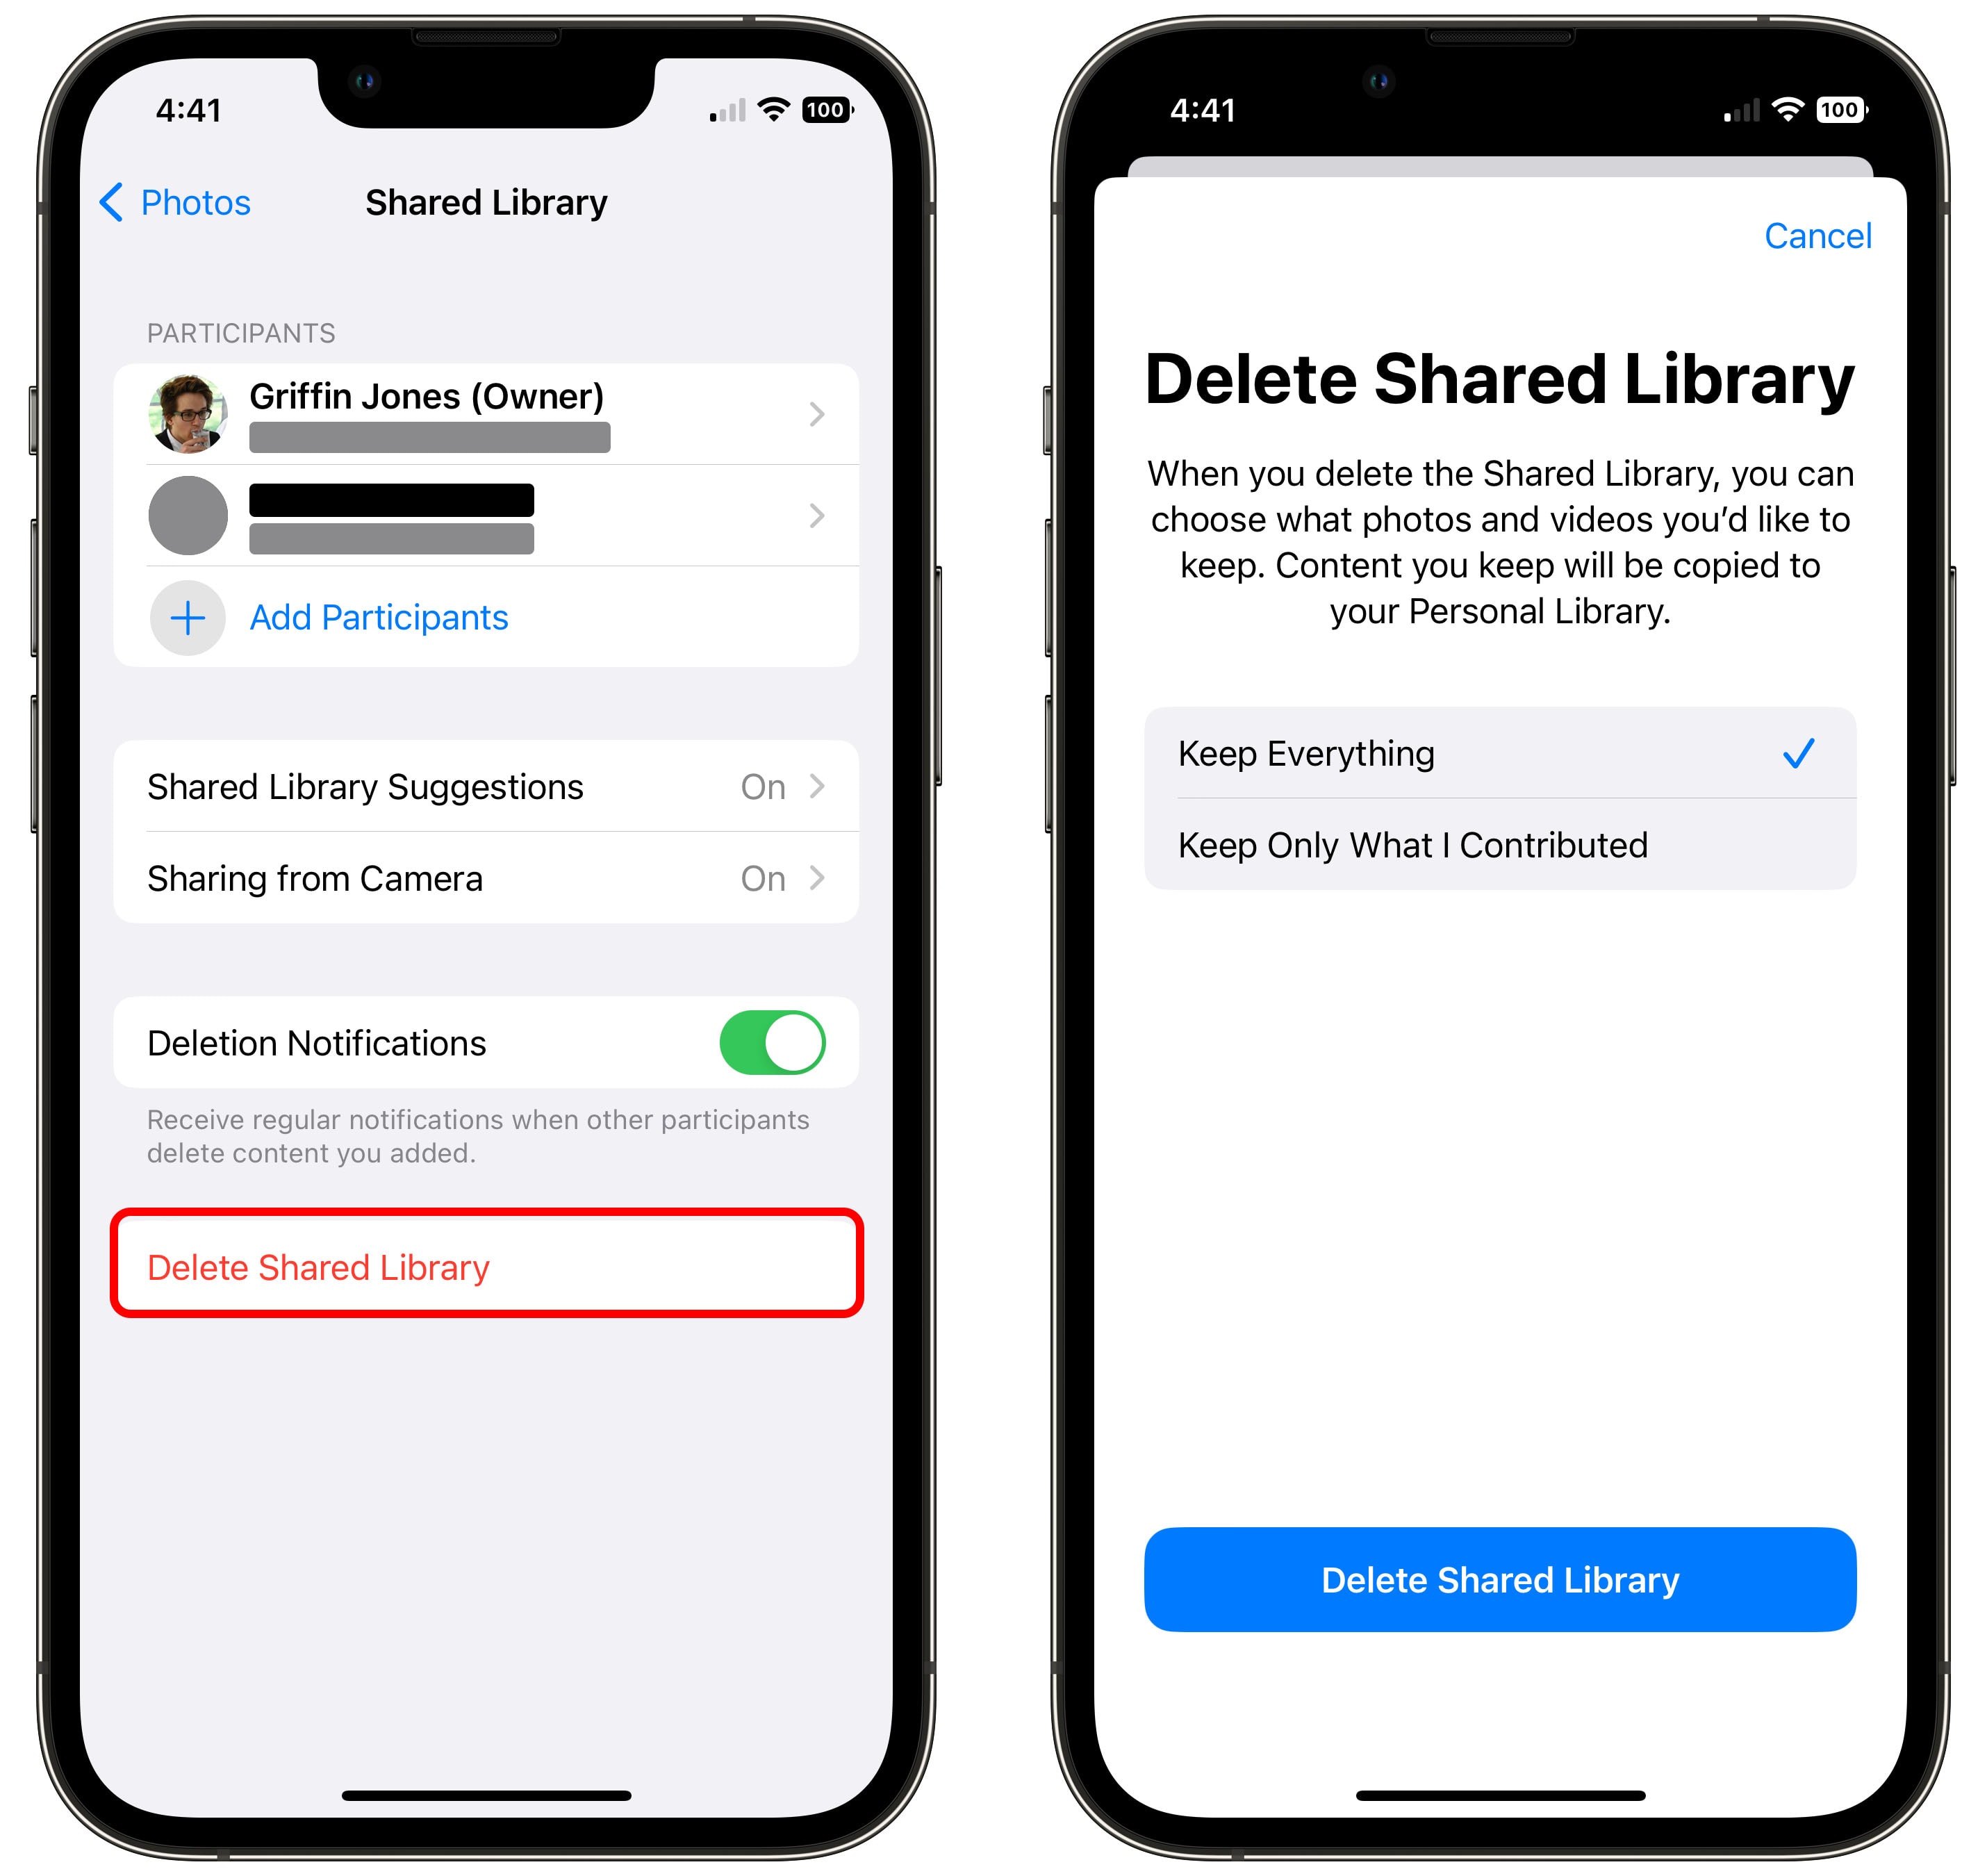
To delete your shared library, navigate back to Settings > Photos > Shared Library and tap Delete Shared Library.
If other people in the Shared Library contributed photos, you can choose to either copy them all to your personal library (Keep Everything) or only keep the photos you took yourself (Keep Only What I Contributed). Select one and tap Delete Shared Library again to confirm, or tap Cancel to take no action.
Deleting the Shared Library will take a few minutes.
More Photos features
Shared iCloud Photo Library is one of many great features in Apple Photos. Make sure you learn these new tricks, too:

