
It’s very important to set up the Medical ID on your iPhone so it’s ready in case you find yourself in an emergency situation. First responders can check your iPhone to get critical information about any allergies or preexisting conditions that could make a huge difference in their ability to help you.
It might be unpleasant to think about, but providing this vital information could prove lifesaving if an accident leaves you unconscious.
If you haven’t yet done so you’ll be happy to know it only takes a couple of minutes to update your medical records in the Health app on your iPhone. Here’s how to do it.
Set up your Medical ID on iPhone
Like Crash Detection and other safety features built into iPhones and Apple Watches, Medical ID is designed to help out disaster strikes. You never know when you might wind up needing emergency medical help. Accidents happen, and it’s better to be ready when they do. So don’t put this off!
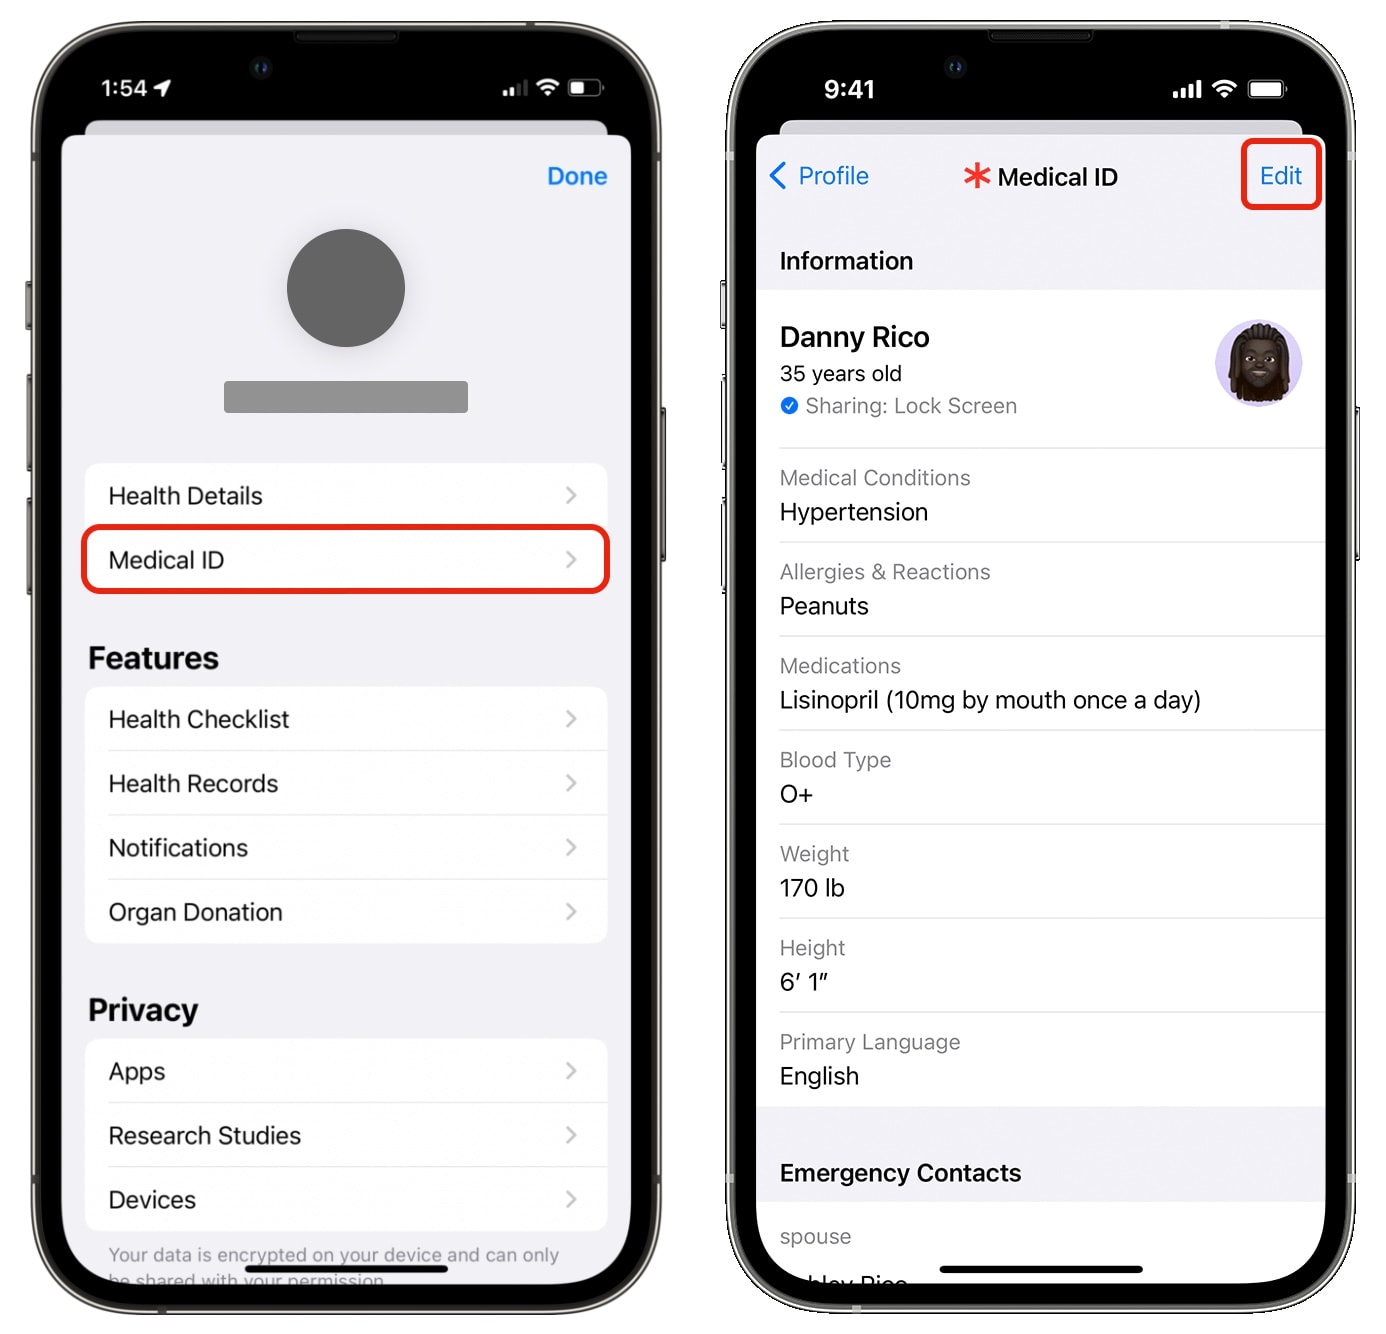
To get started setting up your Medical ID, open the Health app on your iPhone.
Screenshot: D. Griffin Jones/Cult of Mac
Tap on your icon in the top-right corner and tap Medical ID. Then tap Edit in the upper right to add some information.
The Health app will pull in some information your iPhone already knows about you from your Apple ID and contact card. But you can customize it all. You can add:
- Your name
- Birthday
- Medical conditions
- Medical notes
- Allergies and reactions
- Medications
- Blood type
- Organ donor status
- Weight
- Height
- Primary language
You also can add emergency contacts, so first responders can notify your loved ones after an accident. Tap add emergency contact to pick someone from your list. (You might have to specify a phone number if you have multiple saved.) Then, specify how you know your emergency contact by picking a title. These people will automatically be notified if you ever activate Emergency SOS on your iPhone.
You will see two more options at the very bottom. Show When Locked is important to keep enabled — this is what will allow first responders to see your ID. Share During Emergency Call will automatically share your ID while you’re placing a call to emergency services (911 in the United States).
How to access your Medical ID on iPhone and Apple Watch
Screenshot: D. Griffin Jones/Cult of Mac
It’s very important for everyone to set up their Medical ID on their iPhone. And it’s equally important for every first responder to know how to access that information.
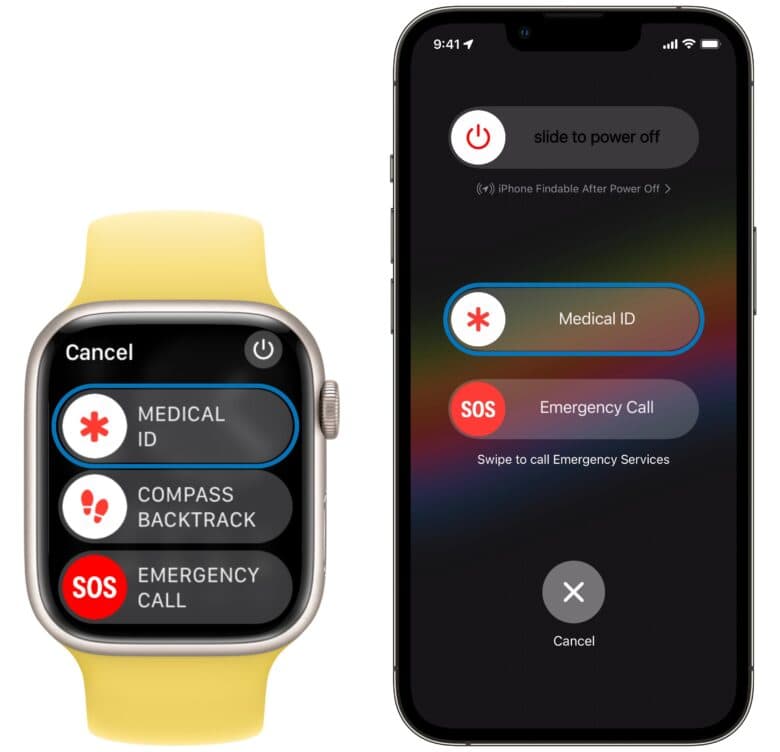
To access the Medical ID, hold down the power button and either volume button for a few seconds. (On an older iPhone with a Home Button, you just need to hold the power button.) You’ll feel a short vibration and see three options: slide to power off, Medical ID and Emergency Call. Swipe right on Medical ID to see the critical health information and emergency contacts.
You can bring this up on the Apple Watch, too, by pressing and holding the side button.
Don’t worry — your device will remain locked
You don’t need to worry about anyone getting into your phone while you’re out for the count — holding the power and volume buttons down will lock your iPhone out of Face ID (or Touch ID) and require the passcode.
Incidentally, this move can come in handy at other times. If you ever find yourself in a situation where you want to protect your phone (at a police stop, in a Transportation Security Administration line, at a protest, etc.) you can lock down your iPhone discreetly. Just hold the power and volume buttons in your pocket or in your purse until you feel that vibration. Then you’ll know your iPhone is locked.
Keep your iPhone health info updated
One final note: Once you get all your health information entered, you should make sure you update the info if and when your situation changes. Even as a spry, healthy person generally absent of any health problems, I check in and update my Medical ID regularly to make sure it remains accurate.

