I have four top tips for Mastodon users after spending a few months on the hot new social media platform. There’s a healthy community of Apple writers, developers, creators and fans — even Phil Schiller — who have all jumped ship from Twitter.
I’ve previously written a detailed guide to getting started. I’ll start with some brief advice on picking an instance and move on to the pro tips I’ve picked up.
Top 4 tips for Mastodon
You can also see how these all work in this video:
No. 1: The best Mastodon apps
Free:
- Ice Cubes is free and open-source for iPhone, iPad and Macs with Apple silicon. It supports all the basic features of push notifications, browsing timelines of other instances, quote posts and more.
- Mammoth by Shihab Mehboob is resurrected from another Twitter client, Aviary 2. This app is by far the most fully featured of any I’ve tested. Shihab is the fastest indie developer I’ve met — I got a new build on TestFlight, like, every day.
- The official Mastodon client is cross-platform on iPhone, iPad and Android. Designed by Sam Henri Gold, it has a very similar look and feel to the website, so it’s easy to pick up and use.
Paid:
- Mona (iPhone/iPad) (Mac) is my favorite client right now. Not only is there a Mac app that works on Intel, but the timeline sync between devices is lightning fast and dead reliable. It’s in open beta right now through TestFlight; pricing for the App Store version is yet to be announced.
- Ivory by Tapbots is built from the wreckage of Tweetbot, the popular Twitter client. It’s highly polished and well-ironed.
No. 2: Don’t worry about your instance
The biggest difference between Twitter and Mastodon is that there’s no singular Mastodon. It’s not one company with one owner; there are lots of independently run instances (or servers) you can join from.
Picking a Mastodon instance is no more complicated than picking an email service. There are plenty of free ones, and you can still follow anyone from anywhere.
Following people from other instances adds one extra step — but I have some tips for that if you keep reading. Nonetheless, if you’re on mastodon.social, you’ll have the easiest time following other people on mastodon.social.
If you want to get on mastodon.social, the most popular instance, use our invitation link here.
No. 3: An easier way to follow people
When you click on a link to someone’s profile, it’ll open in Safari. If they’re on a different instance, you can’t just click Follow — you need to look up their profile from your own instance.
That sounds annoying and complicated, but luckily, there are two easy solutions that brush it under the rug:

Screenshot: D. Griffin Jones/Cult of Mac
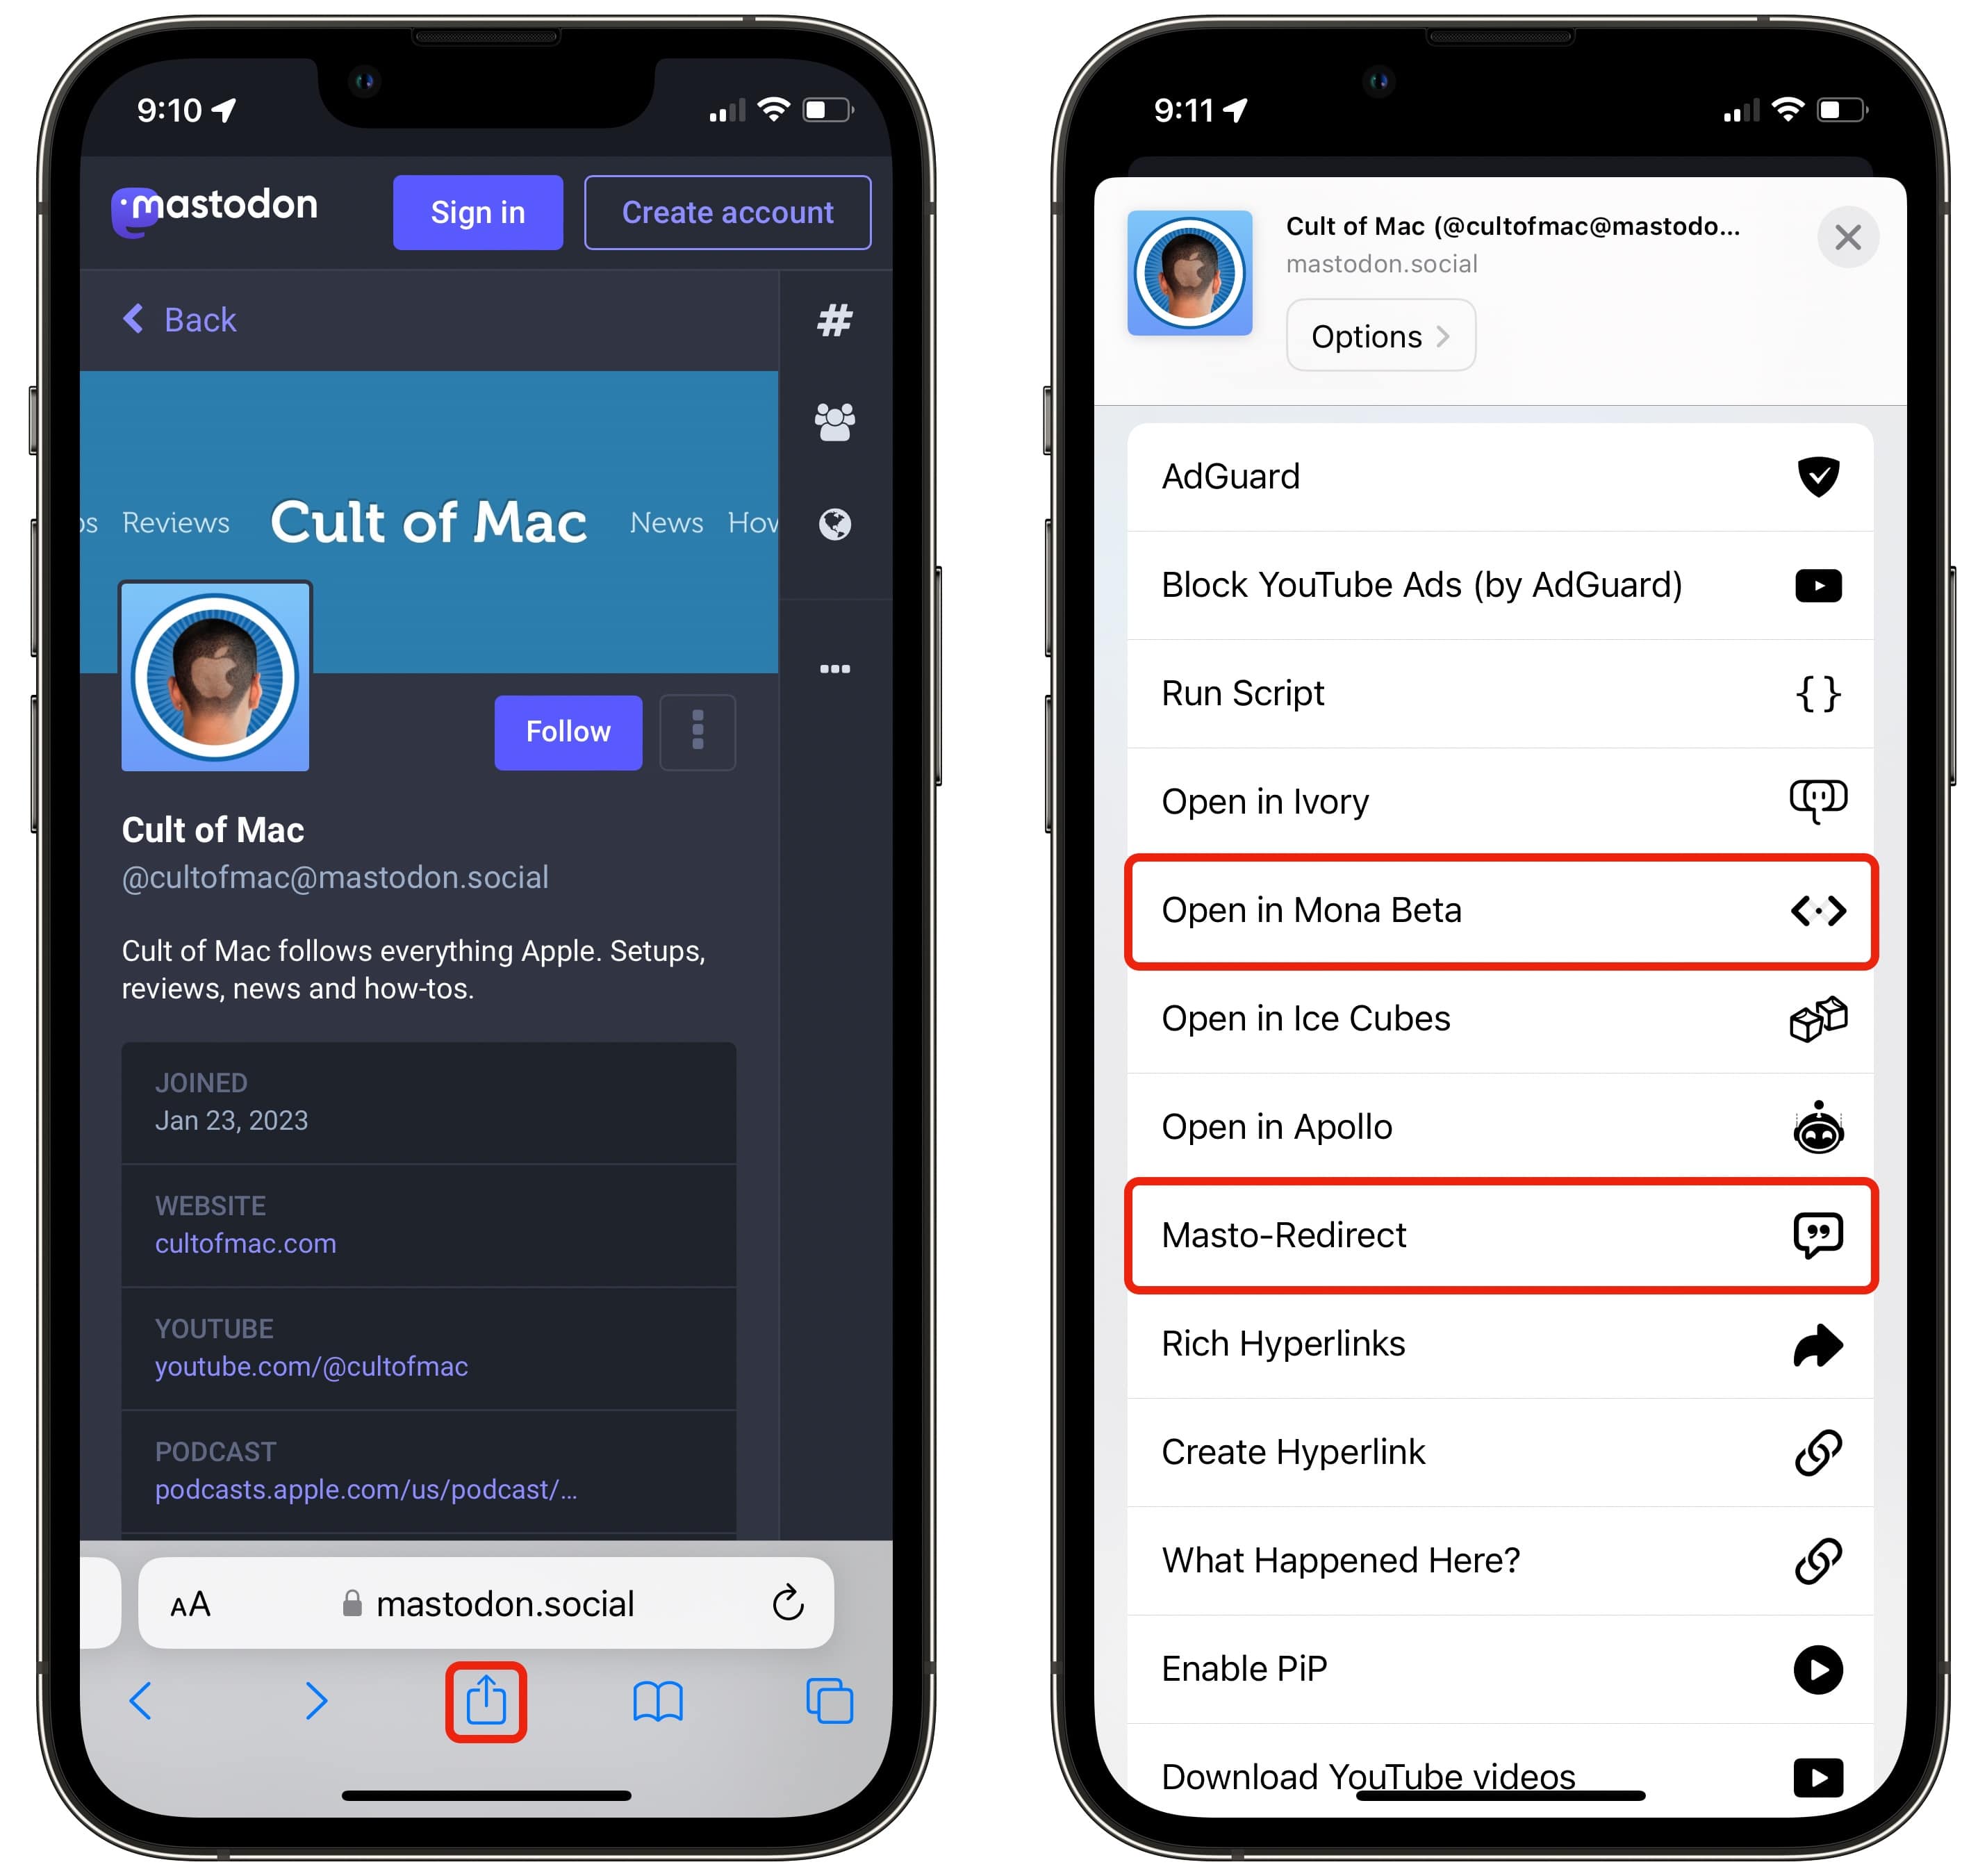
- Most third-party apps add an extension to the Share sheet. When you’re on someone’s profile, just tap the Share button and tap Open in Ivory or Open in Ice Cubes or whichever Mastodon app you’re using.
- If you don’t want to be thrown into an app, Masto-Redirect by Federico Viticci is a Shortcut you can install. Tap the Share sheet, tap Masto-Redirect, it’ll fix the URL for you and open the profile in a new Safari tab.
If you want it to redirect individual posts (not just profile pages), Viticci has some more detailed instructions you can follow to set that up, but profile pages should work almost out of the box.
Both of these are so convenient and effective, you can almost forget this annoying limitation of Mastodon exists at all.
No. 4: Set up two-factor authentication
Unlike that other place that’s charging people money for the privilege of account security, setting up two-factor authentication using iCloud Keychain is very simple (and free!). It’s the best kind of security: not only is it highly effective, but it syncs across all your devices and fills in codes automatically, so it’s not any harder to use.
In the web browser, go to Settings > Account > Two-factor auth (this is hidden in the menu on mobile). The URL is at mastodon.social/settings/two_factor_authentication_methods — replace mastodon.social if you have a different account.
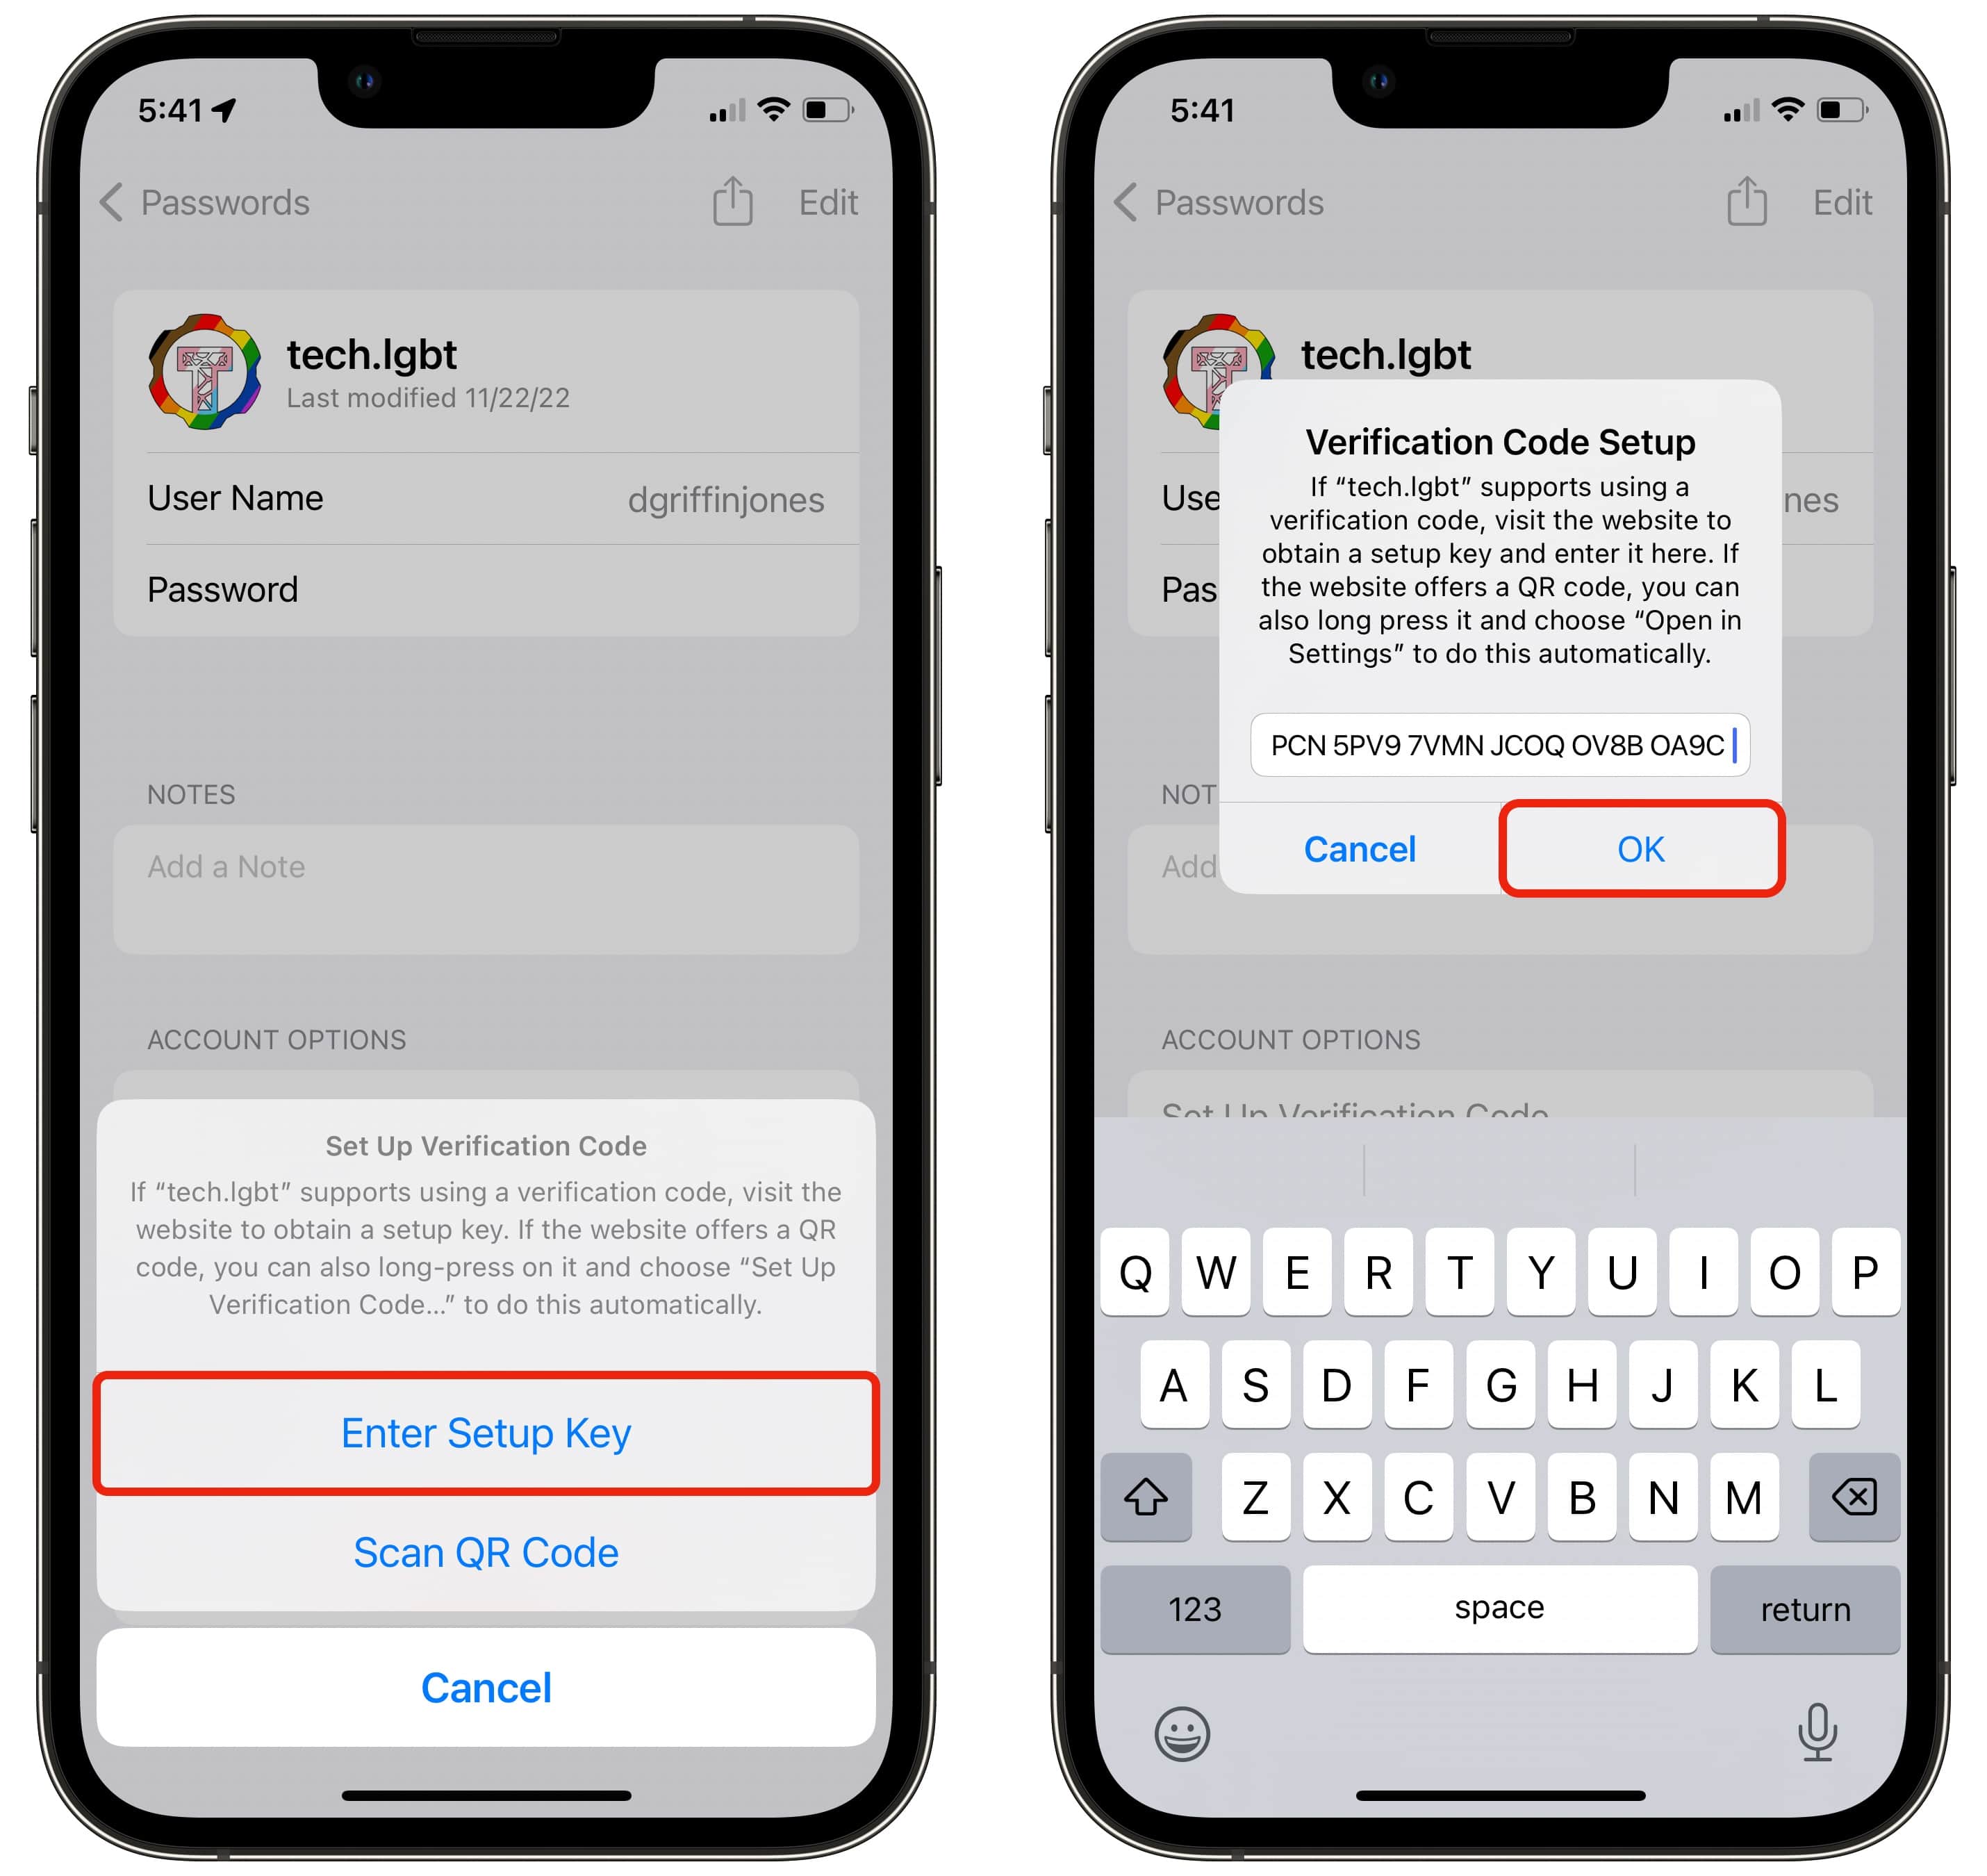
Tap Set Up to get started. You’ll see a QR code and a string of text. On your phone, go to Settings > Passwords and tap the saved password for your Mastodon account.

Screenshot: D. Griffin Jones/Cult of Mac
Tap Set Up Verification Code. You can either Scan QR Code if you have it open on a different device or Enter Setup Key by copying and pasting that string of text.
Either way, you’ll then see a six digit code. Copy and paste this back into Safari and tap Enable. You should get an email if it’s been set up correctly.
One more thing: Follow Cult of Mac
We post all of our news, reviews, how-tos and top tips on Mastodon. Follow Cult of Mac here.
Here are some of the Cult of Mac writers:
Some of our friends:


