Key Takeaways
- The “Steam Service Error” occurs when Steam’s service client is facing an issue, preventing it from running as expected.
- To resolve the error, you can try reinstalling Steam’s service, running Steam as an administrator, setting the Steam service client to launch automatically, repairing Steam’s service client, adding Steam to your firewall’s whitelist, updating your Windows version, or removing and reinstalling Steam on your PC.
- Following these steps should help fix the “Steam Service Error” and allow you to access and use Steam on your Windows computer. Happy gaming!
Trying to access Steam only to be greeted with a “Steam Service Error” message? Your Steam client may be experiencing issues, or your Windows 11 or 10 PC may have a problem. We’ll show you various ways to fix this issue on your computer. Let’s get started.
What Is the Steam Service Error, and Why Am I Seeing It?
The reason you’re seeing a “Steam Service Error” is that Steam’s service client is facing an issue. This client helps Steam update or install games, enable anti-cheat detection in some games, and assist with other system-level tasks. When this service client doesn’t run as expected, Steam displays the Steam service error message.
Some reasons Steam’s service client doesn’t work as intended are that the app isn’t running with full permission, the service client itself is faulty, you have an outdated Windows version, and more.
How to Resolve a Steam Service Error
To fix a “Steam Service Error” on your PC, you’ll likely have to follow multiple methods as the error can originate from many sources. Here’s what you should do to get rid of your issue with Steam.
Reinstall Steam Service
When you get the “Steam Service Error” message, the message box has an option saying “Install Service.” Click this option to reinstall Steam’s client service, which will likely resolve your issue.
Run Steam as Admin
Another quick fix to try to resolve your error is to run Steam as an administrator. When you do this, the app gets full permission to run on your machine, fixing any issues caused by a lack of permission.
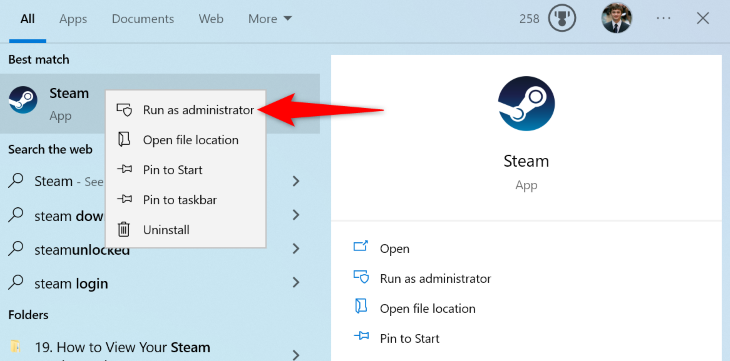
To do that, find Steam on your desktop or in your “Start” menu. Right-click the app and choose “Run as Administrator.”
In the “User Account Control” prompt, select “Yes.”
Steam is now running with admin privileges.
Set Steam Service Client to Launch Automatically
Steam automatically loads the service client when it needs it, but when you experience issues with the client, set Windows to automatically launch the service client when your PC turns on.
To do that, open “Run” by pressing Windows+R. Type the following in the box and press Enter:
services.msc
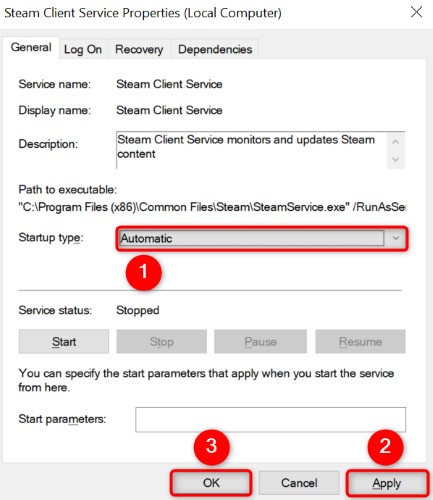
Right-click the service named “Steam Client Service” and choose “Properties.” Select the “Startup Type” drop-down menu and choose “Automatic.”
Then, click “Apply” followed by “OK.”
Restart your Windows 11 or Windows 10 PC and launch Steam.
Repair Steam’s Service Client
If Steam’s service client itself has an issue, use a built-in repair option to repair the utility. This should resolve your “Steam Service Error” problem.
To do that, open “Start,” find “Command Prompt”, and select “Run as Administrator.” In the “User Account Control” prompt, choose “Yes.”
In Command Prompt, type the following command and press Enter:
“C:\Program Files (x86)\Steam\bin\SteamService.exe” /repair
Wait for the command to repair the Steam service client. When that’s done, close Command Prompt and launch Steam.
Add Steam to Your Firewall’s Whitelist
Steam needs access to the internet to function. If your PC’s firewall blocks the app’s internet access, that may be why you’re getting a “Steam Service Error.” In this case, add the app to your firewall’s safelist, so your firewall never blocks your app’s network connections.
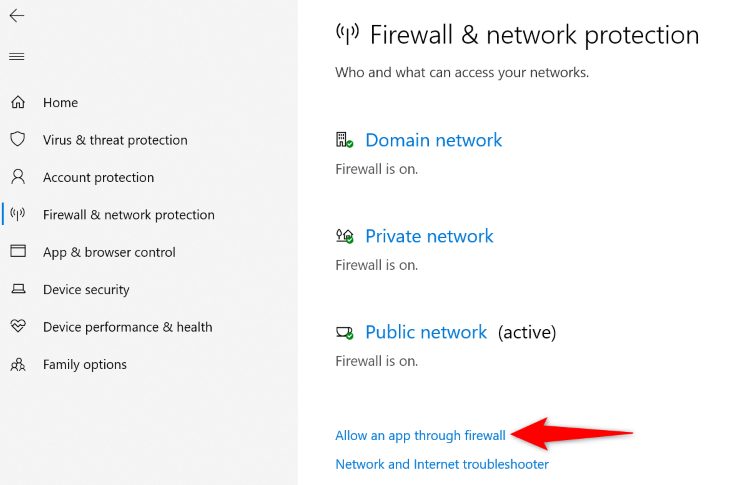
How you do that depends on the firewall you’re using. If you’re a Microsoft Defender Firewall user, add Steam to your safelist by going into Windows Security > Firewall & Network Protection > Allow an App Through Firewall.
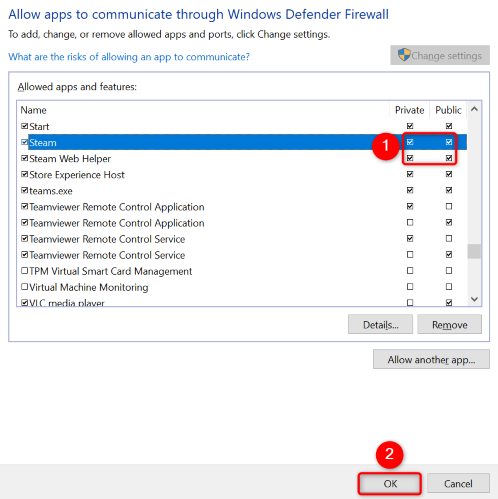
Select “Change Settings” at the top. In the app list, next to “Steam” and “Steam Web Helper,” enable both “Private” and “Public” options. Then, click “OK.”
Close your window and launch Steam.
Update Windows 11 or Windows 10
If your Windows version is outdated, that can cause issues with your installed apps. Steam not working as expected may be the result of an outdated Windows version on your PC.
In this case, update your Windows version, and your issue will likely be fixed.
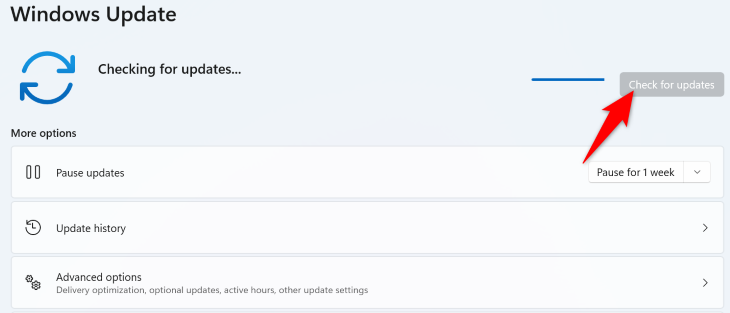
To update Windows 11, navigate to Settings > Windows Update. On the right pane, click “Check for Updates.” Then, download and install the available updates.
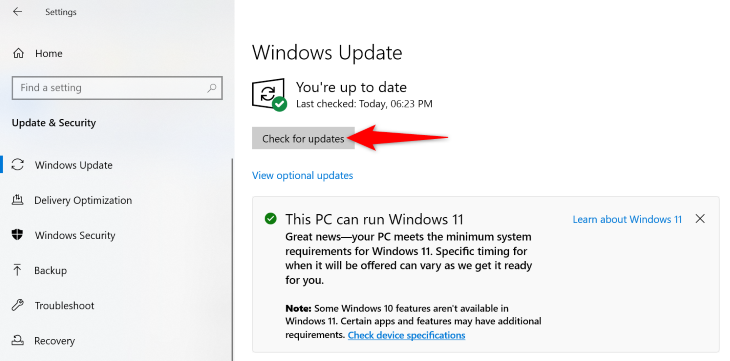
On Windows 10, head into Settings > Update & Security > Windows Update. On the right screen, click “Check for Updates” and download and install the latest updates.
When Windows is updated, reboot your PC and launch Steam.
Remove and Reinstall Steam on Your PC
If you haven’t been able to fix your Steam error using the above methods, use the last fix, which is to delete and reinstall the Steam app on your PC. This removes the app’s problematic files from your computer, possibly fixing your issue.
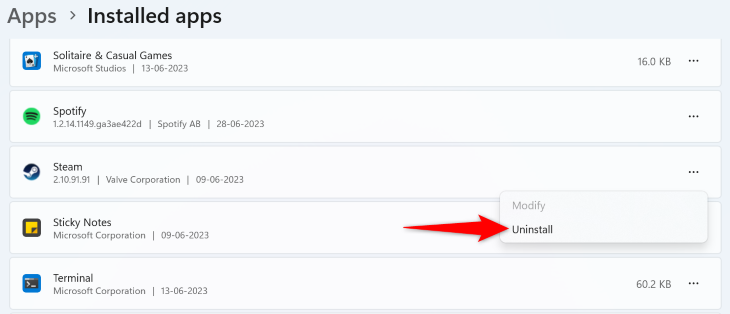
To do that on Windows 11, head into Settings > Apps > Installed Apps. Next to Steam on the list, click the three dots and choose “Uninstall.” Select “Uninstall” in the prompt.
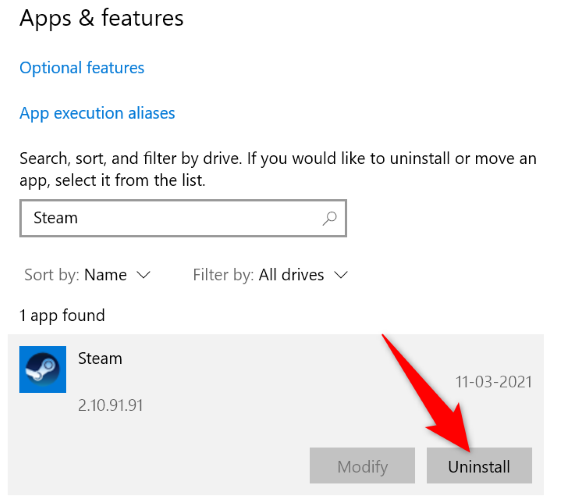
On Windows 10, navigate to Settings > Apps. Select Steam, choose “Uninstall,” and click “Uninstall.”
Now that you’ve removed Steam, reinstall the app by accessing the Steam website, downloading the app installer, and running the installer.
And that’s how you get around a service error in Steam on your Windows computer. Happy gaming!

